Peak Design Customer Service is Amazing!

When you are a travel photographer, having quality gear is important. Day to day use can be rough on basic equipment. Peak Design is a company that definitely stands behind their products and their customer service is amazing!
I often joke that I am a walking ad for Peak Design. I have their Everyday Backpack, Tech Pouch, Slide Lite, and Field Pouch and the list goes on! Last summer I purchased the Carbon Fiber Tripod to lighten my load.
Peak Design Carbon Fiber Tripod
My first impression of the Peak Design Carbon Fiber Tripod was “where has this been all of my life?” It folds down to a small diameter (according to Peak Design, the size of a water bottle), and weighs less than 3 pounds! My old travel tripod weighed more than 4 pounds and was very bulky to pack, especially internationally.
Travel with the Peak Design Carbon Fiber Tripod
I recently returned from a trip to Japan. This was my first international trip carrying the Peak Design Carbon Fiber Tripod. It fit well in my backpack outer pocket (not my Peak Design backpack as I have another smaller one I travel with), and I did not feel like it added a lot of bulk.
The set-up is quick and easy. It has a latch release and the plate slips in and locks easily. Until the unexpected happens.
Dealing with the unexpected
The first night of my tour in Tokyo, we were doing long exposure photography so the tripod was a must. We walked down a narrow street and we were photographing the Tokyo Tower. At that moment I was using my cell phone, but was getting ready to set up my tripod. It slipped out from under my arm and landed hard on the pavement. The included hex tool fell out and the group thought the tripod had sustained serious damage. I picked up the hex tool and placed it back in its holder. Nothing else seemed out of place.
We went to our next location and I could not get my camera to lock into place on the tripod. I had experienced this before, but for whatever reason this was different. I had to wait until I got back to my room where the light was better to see what was going on.
Initial inspection
Just looking at the latch mechanism it appeared to be bent. It must have landed just right to knock it out of alignment. I knew there was a camera store near-by, and we had one more day in Tokyo so I was looking at purchasing a new tripod.
While I was wallowing in self-pity over my tripod, I Googled, Peak Design, and much to my surprise, they have a Tokyo location AND it was just a few steps from my hotel!
Peak Design Tokyo
The next day, on our way back to the hotel after our morning outing, we stopped in the Peak Design store. I explained to them (the best I could with the language differences), what happened. I was able to produce my receipt on my cell phone and the young lady helping me told me to bring my tripod to the store.
I went to the hotel and retrieved my tripod and made my way back to the shop.
Customer service: Extraordinary
I arrived back to the store and she walked me through the return process…all written in Japanese! We took pictures of the latch and attached them to the claim. My tripod was less than a year old and I have to say, this was an amazing experience! I was worried that since it was an accident they would just say, “sorry about your luck.” They also had replacement parts available, they could have easily sold me those. I was pleasantly surprised when she handed me a brand new tripod!
Peak Design stands by their products

Peak Design is definitely a company that stands by their products. I would have been toting home two tripods if it had not been for their customer service. I certainly appreciate the young lady’s help in the Peak Design Tokyo store. I wish I had gotten her name. She took the time to interpret the information and between the two of us we figured out how to fill out a form that was completely in Japanese. I did joke with her and asked if I had just sold my house to her.
Peak Design saved my trip

I look back at my experience with Peak Design and I was fortunate to have a shop so close to me. This happened the first day of a two week tour; I could not imagine being without a tripod for the rest of the trip. Peak Design saved my trip. I appreciate their care and customer service.
Buying quality gear from a reputable company is important to me. I look forward to using my Peak Design Carbon Fiber Tripod for a long time.
True Lies in Photography

The world of photography has seen great changes over the last couple of decades. With the advances of digital photography and the increasing amount of editing software available, it is difficult to separate photographic fact from fiction. Recently, Mike Moats and Rick Sammon have had topics in their groups about whether members are purists or enjoy creativity.
Mike shared his experience of an individual who criticized his use of external programs to give his image a special look. Rick advocates for cropping and using programs to improve images. What about Ansel Adams? He was definitely the master of light; finding it, creating it, using it to make his photographs unique.
Photography, is it an art? Do photographers create? When is a photograph not a photograph? These are questions that have been tossed around for centuries! Think about double exposures, intentional camera movement, and dodging and burning. The photographer has a vision of what their photograph should look like. To compare a photographer to a painter might be unfair, but the process is similar.
A painter, comes on a scene and chooses the color palette, brushes, and type of medium to work with. The image is created with brush strokes on canvas, paper, or other medium. The painter decides the composition and the point of view they want to show. They may change their perspective (edit their work) while they are painting; a few brush strokes and the painting will look completely different. The painter/artist decides when they are finished. The thought process for the photographer is similar, but the tools are completely different.
The photographer approaches the same scene, makes a lens choice, sets the exposure, and studies the composition before pressing the shutter. Rick Sammon talks about using your camera like a drone; move it around and see what different angles look like. Zoom in, out, move forward, backward, turn the camera, try different angles, sometimes it works, sometimes it doesn’t. Not doing these activities will result in missing a unique angle or composition. It has been said many times, “all photographers do is press a button,” but wait…after they press that button they go back to their “darkroom” or computer and work on the image. One of the keys to the creative process is editing.
Editing a photograph can be very simple, just a few adjustments to exposure, contrast, sharpening. There are those who think editing is difficult or challenging, but if it is not practiced, like anything else, it will continue to be daunting. Editing software is easy to come by and a lot of photographers have an arsenal at their disposal, but yet, photographs are placed in public viewing without any adjustments. It is sad…there are many good photographs posted daily, but they could be awesome images with a little work! Those photographs have great potential!
Potential, one must see the potential in an image…the one thing that makes the image unique/special. Taking a few minutes to work on a photograph can make all the difference. There is an article that talks about the artistic eye or creative mind. There are individuals who innately have this “gift;” those who lack the artistic eye can develop it if they work on it. Developing a creative mind takes much practice and dropping some of the preconceived notions/rules about photography. Sometimes it’s just a simple crop or a minor clone, or it could be a hard crop or big clone! Again, see the potential in an image. Creativity takes work. Creatively changing an image often results in the photographic “lie.” Is it still a photograph or an enhanced digital image? The art belongs to the photographer; it is their vision, their view of the world.
Pay attention to photographs you see every day. In the photograph below, clearly the star of the show is the waterlily and the reflections. The photograph was taken at the maximum focal distance and the flower was in the middle of the pond. Take the shot or walk away? This was a single frame. It took work to make the photograph that was visualized at the time the button was pressed. Many pass up the opportunity to go the extra mile to make an image special. The final result? Is it an accurate depiction of the scene or is it a lie?

Leaves

Until recently I did not realize how many different types of leaf photographs I had. Leaves are fascinating. They bud in the spring and are a lively green; then in the fall, they change to reds, yellows, and oranges. Structurally, leaves have veins, stems, and are textually interesting. I love to bring that texture forward in my photographs.


I had posted the above before and after in my post “Creativity: Where Does it Start?” I had transformed the ordinary palm leave to be viewed “differently”. I feel as a photographer it is my job to challenge our view of reality from time to time. The processing I chose for this image changed the color as well as the perspective of the image. It also highlighted the details in the leaf and stem.


On the left you see the original image of the green leaves. I liked how the light was hitting the leaves and felt there was a “photograph” somewhere in this image. I began using my crop tool and started dragging it around the image until I settled on a crop I thought was pleasing to the eye. There was so much going on in the original photograph that I needed to isolate a section. I then converted it to black and white. The tonal range of the image worked well with that choice. I then finished my editing in On1 Effects to add texture and to bring out the details in the leaves.


The above sycamore leaf was taken with my Sigma 120 – 300 f/2.8 zoom. I removed the lower right stem with the patch tool in Photoshop, then edited the color and texture in On1 Effects. The transformation was just what I wanted.
Maple Leaf
I was trying out my Tamron 28 – 300 f/3.5 – 5.6 and captured this leaf hanging off of my maple tree. I was exploring for things to photograph with the lens as I had just purchased it from KEH. I brought out the texture and details using On1 Effects. The sharpening tools in On1 Effects does a great job bringing out the details in images.
Maple Leaf
This was another leaf I was practicing on with my Tamron 28 – 300 f/3.5 – 5.6. It was a single color leaf among the dry gray and brown leaves. It caught my attention while walking around my patio.
Oak Leaf
I spotted the oak leaf while walking around William and Mary College’s Campus this fall. While the image itself is a little soft, I enhanced that softness by decreasing the clarity. The colors are very vibrant. I added a soft white vignette to make the leaf stand out.


Above are a few of my other leaf images I have captured over the last year. I hope you enjoyed exploring the world of leaves! Effects 10 is available as a free download!

Lightroom Presets


Direct Positive Preset in Lightroom
Lightroom presets are interesting. Most of the time I prefer to edit my own images. If I do decide to choose a preset, I end up making additional adjustments, so I figure I should start from scratch anyway.
I saw the frosty fog rising off of the river on Sunday morning and noticed how the trees became frost covered. I know the time frame to capture this is short and it was already 10:00 a.m. I knew I had to get moving!
I used a 0.6 ND filter, because the sun was so bright and it really separated the blue sky while maintaining the white snow. I photographed these images with my Tamron 24 – 75mm f/2.8 on my Nikon D800E at ISO 50. Shutter speeds and aperture varied depending on the light. Most of the time it was at f/8 – 11 and 1/100 – 1/200.
In post I decided to try the IR preset. Some of the images were very impressive using this preset. I do like a little more contrast, so I adjusted the blacks and contrast slightly to give me the look I wanted.
I hovered over some of the other presets and the Direct Positive really made the images pop with color! The contrast between the blues and whites was beautiful! Direct positive is a process dating back to the 1800’s. Typically, the image was captured directly onto the paper and it was a black and white image. In Lightroom, the direct positive setting increases the saturation, blacks, and highlights and produces a very high color image. The image can be easily converted to black and white after using the Direct Positive preset.
The images below demonstrate the use of 2 different presets in light room; Direct Positive on the left and infrared (IR) on the right.


While I do like my images to have a little more contrast (more pleasing to my eye), there is something about the subtleness of the image below that I like. Left is the original and right is IR. I did remove the boat from the image.


The vignette in the corners is from my ND filter on the camera. I do attempt to remove that with cropping or adding a reverse vignette.
I suggest you try some of the presets in Lightroom; what is nice, Lightroom gives you a preview of what it will look like. I use this as a starting point then make my own adjustments. I have also set up my own presets in the past if I’m editing a batch and making the same changes throughout.
Have fun experimenting in Lightroom!
Focus Stacking


Image Created Using Focus Stacking
I decided to try focus stacking. Focus stacking is when you take a series of images and you focus on one section of the image at a time, then save them as PSD images. The key is to have your camera on a tripod so you do not change position.
Open the images then go to File>Scripts>Load Files into Stacks. After you stack the files you go to Edit>Auto-Blend-Layers.
The image will be in focus throughout.
This was fun to try. I will have to try it again sometime.
Refraction of Light in Photography


I saw a Facebook post on group site I participate in about refraction of light. The images were very interesting. I decided to put together a few items for our camera club to use at a future meeting.
If you google refraction of light you come back with a lot of scientific information. However when you google refraction of light in photography a lot of nice images appear!
With help from a friend of mine, I put together several backgrounds; some had color some were black and white. I purchased scrapbooking paper and used double stick tape and old scrap mats to mount the paper to so they would not bend.


Using a pole lamp with 3 lights to light my subject, I put up my backgrounds and filling glasses with water. I also laid some of the backgrounds flat and used them as a base; the patterns then reflected on top of the water.
My camera settings (Nikon D800E) ISO 640, f/14 – 16, shutter speed ranged from 1/5, 1/3, 1/13 sec depending on which background was being used.


This is a fun winter project as you do not need a lot of supplies, just clear glasses, vases, bowls, water (distilled is recommended because tap water bubbles), and paper or fabric with a design. You can make your own designs using Photoshop and printing the off of you printer.


Have fun experimenting!
Old Country Store, Jackson, Tennessee


Ice Cream Parlor at the Old Country Store in Jackson, Tennessee
Every so often I browse through my images and something catches my eye. I look at it and think, “What can I do with this?” Images like this have so much detail and I like converting that detail into an HDR-like image. I started out by making a few adjustments to the shadows and highlights in Lightroom. I then moved the image over to On1 Effects to do the rest. I used the Amazing Detail Finder, Clarity, I lightened the shadows, Exaggerated the tones and edges, and added a subtle HDR look to the image. I moved it back into Lightroom to adjust the contrast slightly for my finished product.
See the before and after side by side:


Never give up on images you may have in your files. I hear people all of the time say they delete pictures. While I have many, many images I will never process, occasionally I find one that surprises me!
After posting this blog, it was suggested to me to see what the image looked like in black and white. Here is the result:
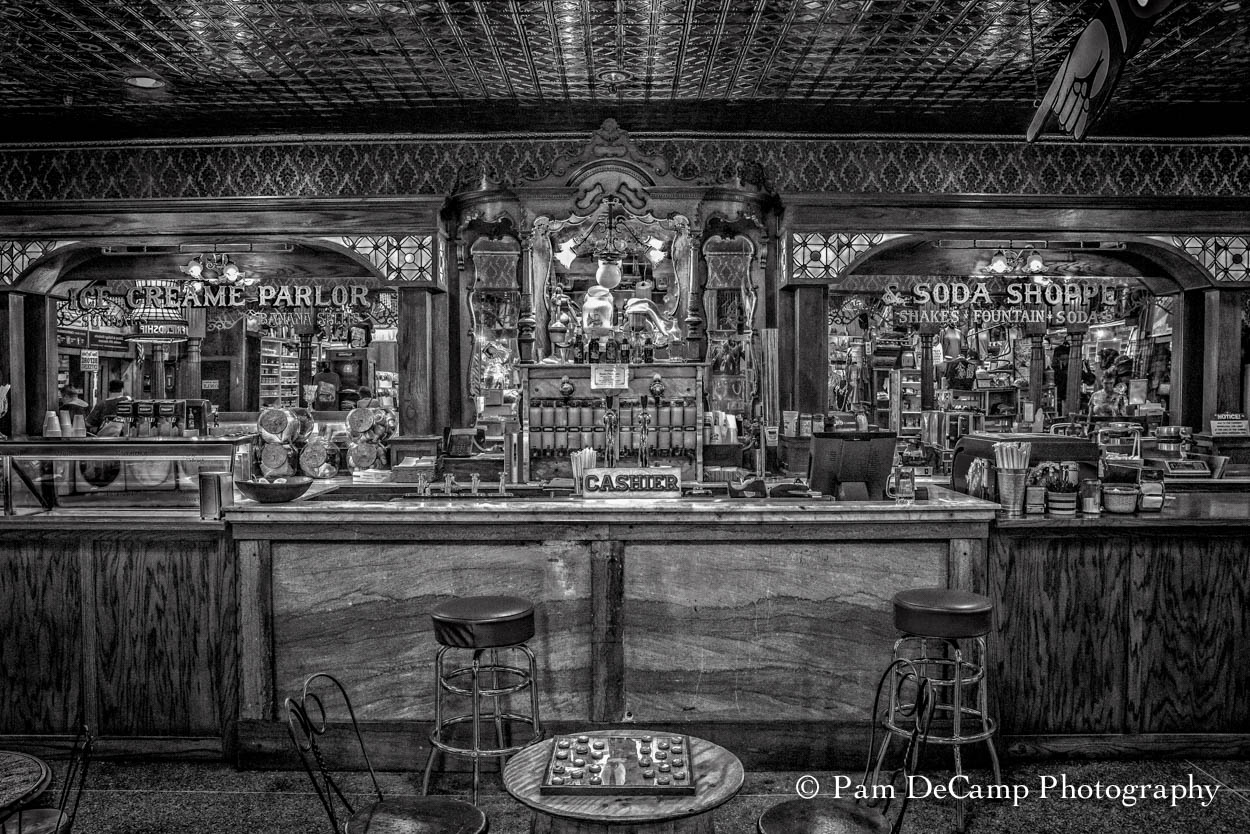
Black and White Version of the Ice Cream Parlor

Nature’s Imperfections

When photographing nature we encounter imperfect subjects. It takes a little patience and imagination to make corrections to an image after it’s captured.
While looking through images that were photographed this summer, this one was intriguing. The bug on the coneflower was lost in the shadows and was very much in focus.

Bug lost in the shadows
The shadow slider in Lightroom opened the area and other adjustments were made to the image. Then the gap on the left kept screaming! Cropping did not help, so the image was edited in Photoshop (Photoshop is used as a plug-in to Lightroom). The magic brush tool was used to capture a piece of the adjacent area and a layer was created of that selection. The petal was turned and transformed, then a layer mask was applied so the petal could be blended in with the rest of the flower.

A petal was added to the left to fill the gap
Then the space on the right was an attention grabber. The same technique was applied. After the second petal was added the image was saved in Lightroom and the radial filter and adjustment brush was used to make sure the bug was the central focus of the image.
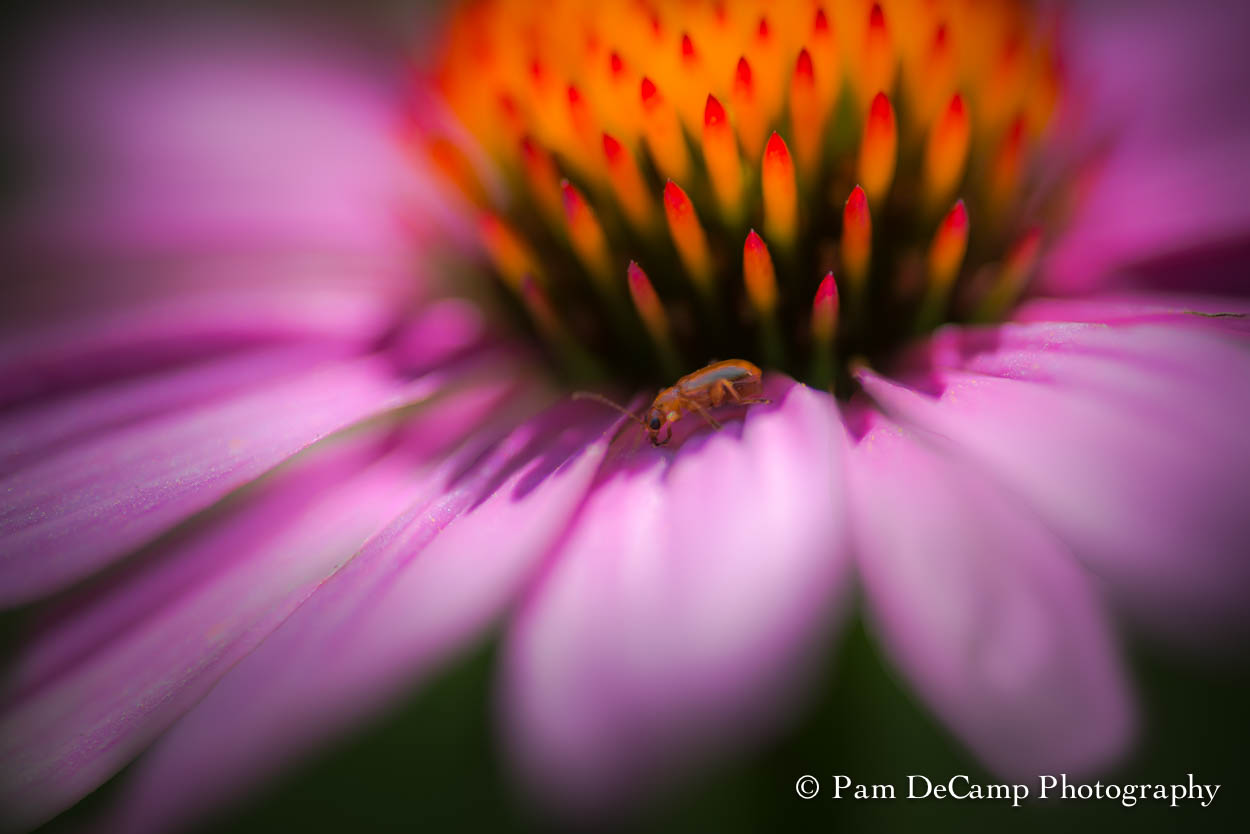
The gap on the right was filled with data captured from the adjacent area
Nature is imperfect and as the old margarine commercial says, “It’s not nice to fool Mother Nature!” there are those who believe that you capture the image “as is” and make no changes. Making changes to an image that is imperfect has it’s merit. The photographer has to make the decision if the risk of “fooling Mother Nature” is worth taking!
Creativity: Where does it start?

We are all familiar with the chicken and egg concept…which came first? In photography we are faced with a similar dilemma, do our creative ideas come when the photograph is taken or afterwards in post-processing?
There are times when an image is photographed with an end result in mind. Then there are times during post-processing when an idea emerges on how to create a special image.
Take this palm leaf for example:

Palm leaf as shot
It is a nice image, but it is not “special”. How about if the perspective is changed?

Changing the perspective of an image can give more interest
A diagonal line forces the eye to move up through the photograph. While it is an acceptable image, what else can be done to make it more interesting?

Colorization and the addition of textures
By changing the color and adding textures to the image it changed the look all the way around. A tilt-shift was added on a diagonal to give a soft blur to the edges. On1 Effects is an easy way to make these changes. After the changes were made and tweaked, the images were then saved back into Lightroom.

After a few changes in Lightroom
Once the image was imported back into Lightroom, the Trey Ratcliff HDR Romance Soft pre-set was applied and the image was cropped.
Using Lightroom and On1 together is simple. If On1 is set up as a plug-in program to Lightroom, you right click on your image and choose <Edit in> and select the module you need. It will save a copy in Lightroom with your initial edits and then when you are finished in On1 it will save those changes in Lightroom so you can make additional edits if necessary.
Enjoy being creative!

My Favorite Images of 2015: Macro/Close-up

Happy New Year to all! Each new year brings hope and the prospect of new opportunities for us to pursue.
On April 23, I will host my first Spring Flower Workshop. You will notice that I do not always use a macro lens to capture a nice sharp close-up. A good zoom lens (like the one your received if you purchased a kit) will give you the range you need to create wonderful close-up images. If your zoom says “macro” on it, you will be able to get a little closer than you would with a regular zoom lens. It is not a 1:1 macro, but you should be able to get close enough to capture many of the small details in your image. I wanted to share some of my macro/close-up images from 2015 to inspire you to get out and explore your surroundings!


This first group of images was taken in Colorado at Garden of the Gods. I saw this as the life span of a thistle. Through the series you can see how it changes over time. These were taken with my Tamron 24 – 75mm f/2.8. I often use it as a carry around lens and it has great close-up capabilities. I love how it blurs the background, but keeps the main image sharp.

White Trillium
This image will always be special to me. It was taken at the Shoot the Hills weekend photography competition. You are not able to edit your images and you have to choose your best image in each category (approximately 6 images) and turn those in to the judges. The white trillium was taken with my Sigma 105mm Macro lens using the ring flash. This was my first time participating in the competition; the image won an honorable mention in the Flora Category.

Here Kitty!
While not a flower; this cat is a nice example of a close-up image. Eyes are in focus and looking straight into the camera! I had put my camera on the ground and “hoped” it would focus on the right area. Again, this was taken with my Tamron 24 – 75mm f/2.8.

Intersecting Lines
I enjoy experimenting with textures and other processing techniques. I try to look for interesting forms and shapes in my surroundings. This was taken at the Huntington Museum of Art Conservatory. It is a wonderful place to take photographs. Most of the time is is not crowded and it is great to go to on a cold day. The palm branch was processed using the On1 Photo system.

Follow the Line
I also look for leading lines. The vine entwined itself along the branch of this plant. There is a nice curve for the eye to follow.

Young Coneflower
Young Coneflower was an image I enjoyed experimenting with. I had photographed the coneflower in front as it developed over several days. I wanted a nice linen texture and painterly feel. I used a combination of Oil Paint filter in Photoshop and did texture layering using On1 Photo. I had it printed on metallic paper with a linen texture. It does have the look and feel of a painting.

All Alone
This was taken in North Carolina at Thanksgiving. I saw the “lone” leaf sticking up off of a branch in the woods. This was photographed with my Sigma 120 – 300mm f2.8. The image was processed in Lightroom.

Purple Basil
In my opinion, I saved the best for last! My image, Purple Basil, was captured with the LensBaby Spark. The Spark comes with multiple disks that you can insert to create interesting shapes out of light. I did very little processing to this image; just basic adjustments using Lightroom. The morning sun was hitting the leaf just right. I had only a couple of minutes to photograph the leaf and the light was gone! I print this image on metallic paper and also have had a metal print created. The highly saturated colors pop on the metallic mediums. It won an Honorable Mention at the Foothills Competition in the fall.
I hope you have enjoyed the 2015 recap of my favorite images! I look forward to sharing more information in 2016!
Watch for notices of my classes and workshops for the upcoming year!

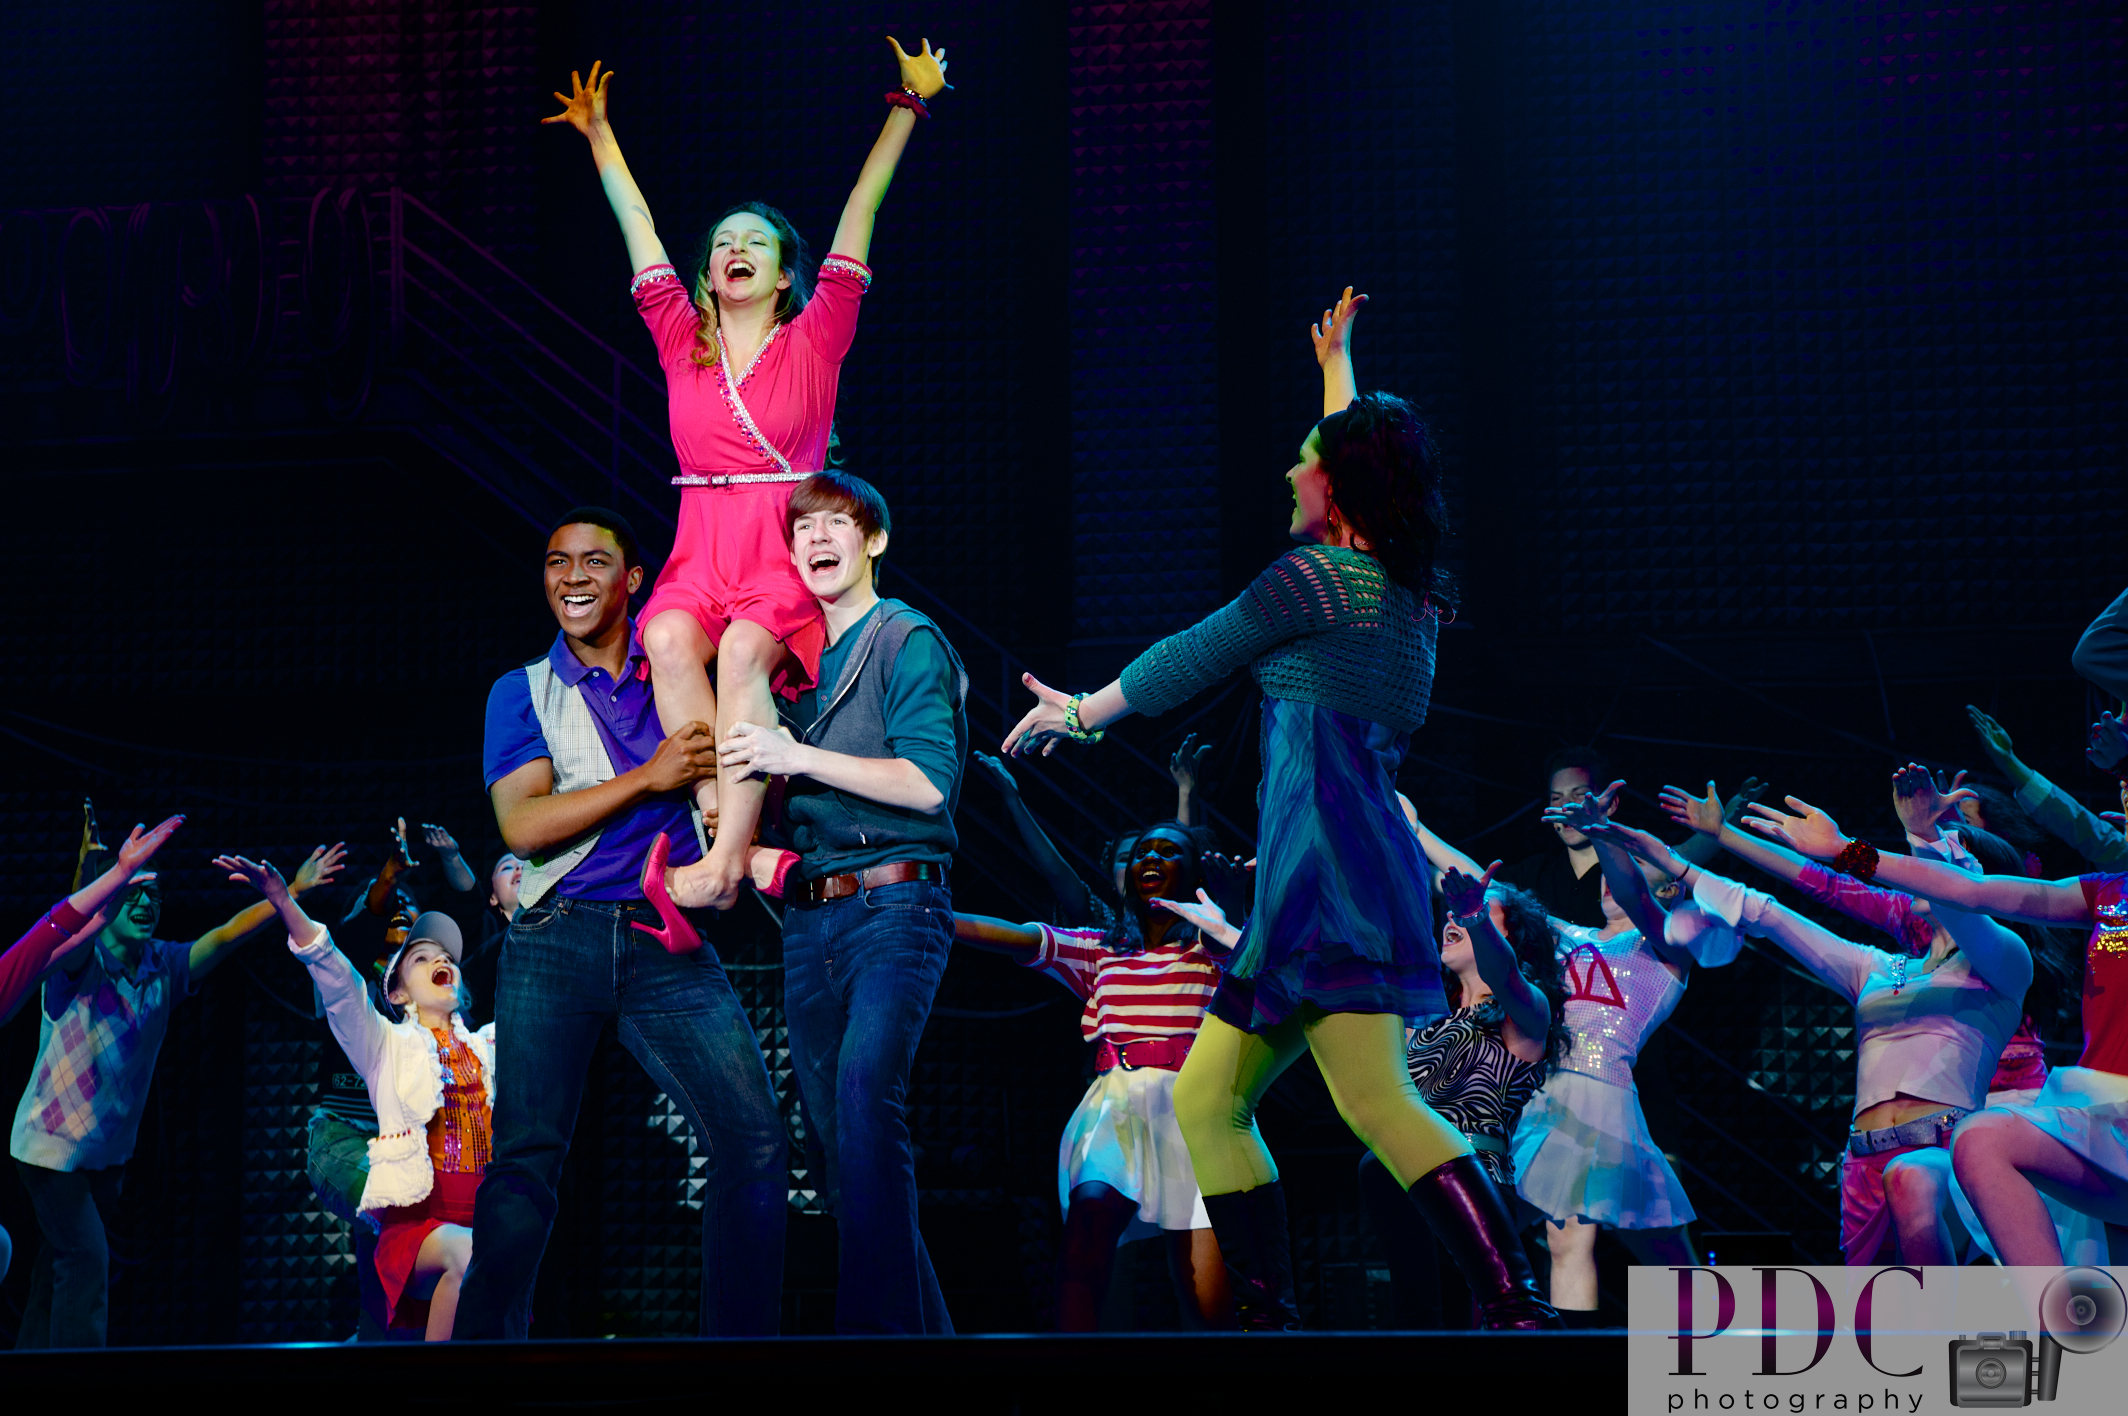
My Favorite Images of 2015: People

A second installment of my favorite images of 2015 has to do with people. I love to photograph people in their natural settings or as a portrait shoot environment. People can be very expressive and interesting.


A couple of my favorite photographs came from my 98 year-old uncle’s life-long companion, Lela’s 100th birthday! Lela and Thelma were being interviewed by a local television station on their “secrets to a long life.” They were wonderful to listen to.

Jules In Motion

Pasta Lady at Fil0mena’s in Georgetown (Washington DC)
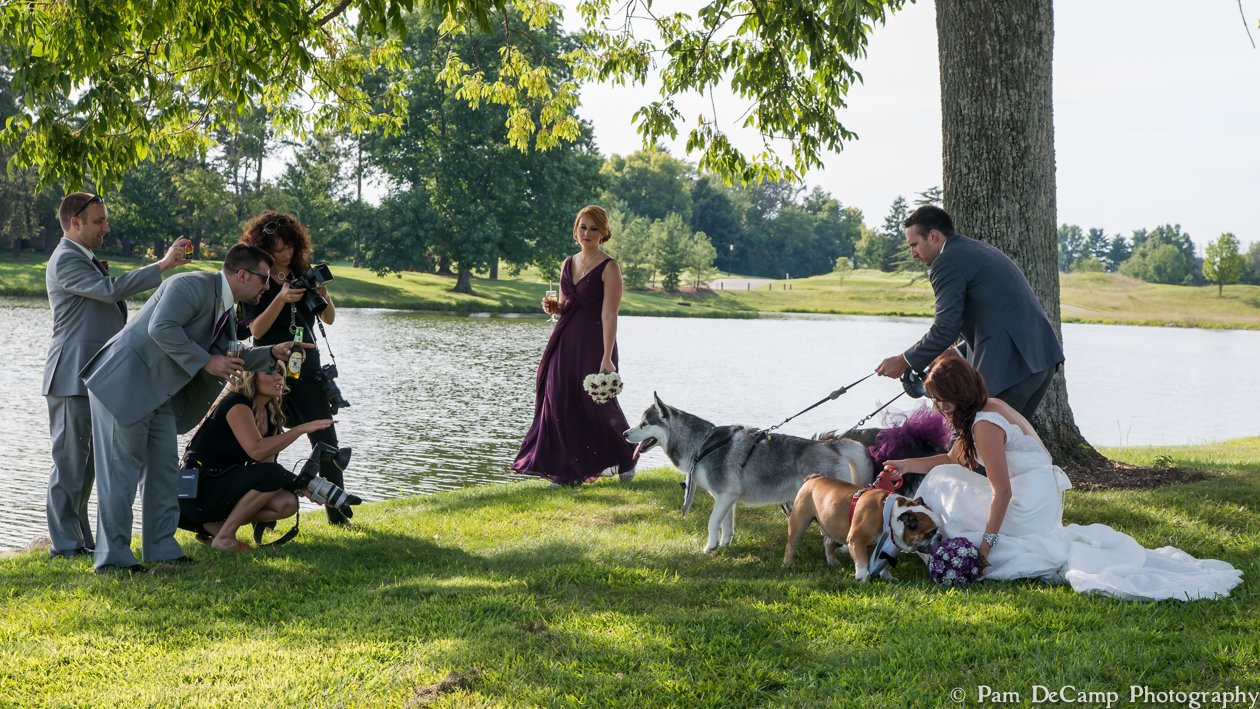
Wedding party goes to the dogs!


Two of my favorite wedding photographs of the year were from Ben and Elisha’s reception and Stephanie and Andy’s wedding. Ben and Elisha got married in Australia where they live and came to Cincinnati for their reception. I went outside to check on the sunset and asked them to come out for a few photographs. I took this using a flash so I could retain the colors in the sunset, also so I could have them visible in the image.
Andy is my cousin. He and Stephanie were married in March behind the Smithsonian Castle. While we were taking a few photographs we were asked to leave by security agents. We were told the reason we had to leave was because we could not have an “organized photoshoot” on federal property. Because I was using professional equipment (my flash was on a monopod and I was using it for fill) I guess they thought we were having an “organized photoshoot.” We got what we needed plus a great story to tell! I do like this photograph; the cherry blossoms were added in post processing.


A couple of fun photographs from 2015 were on my trip to Ossabaw Island in Georgia. The domesticated donkeys were a first for me.
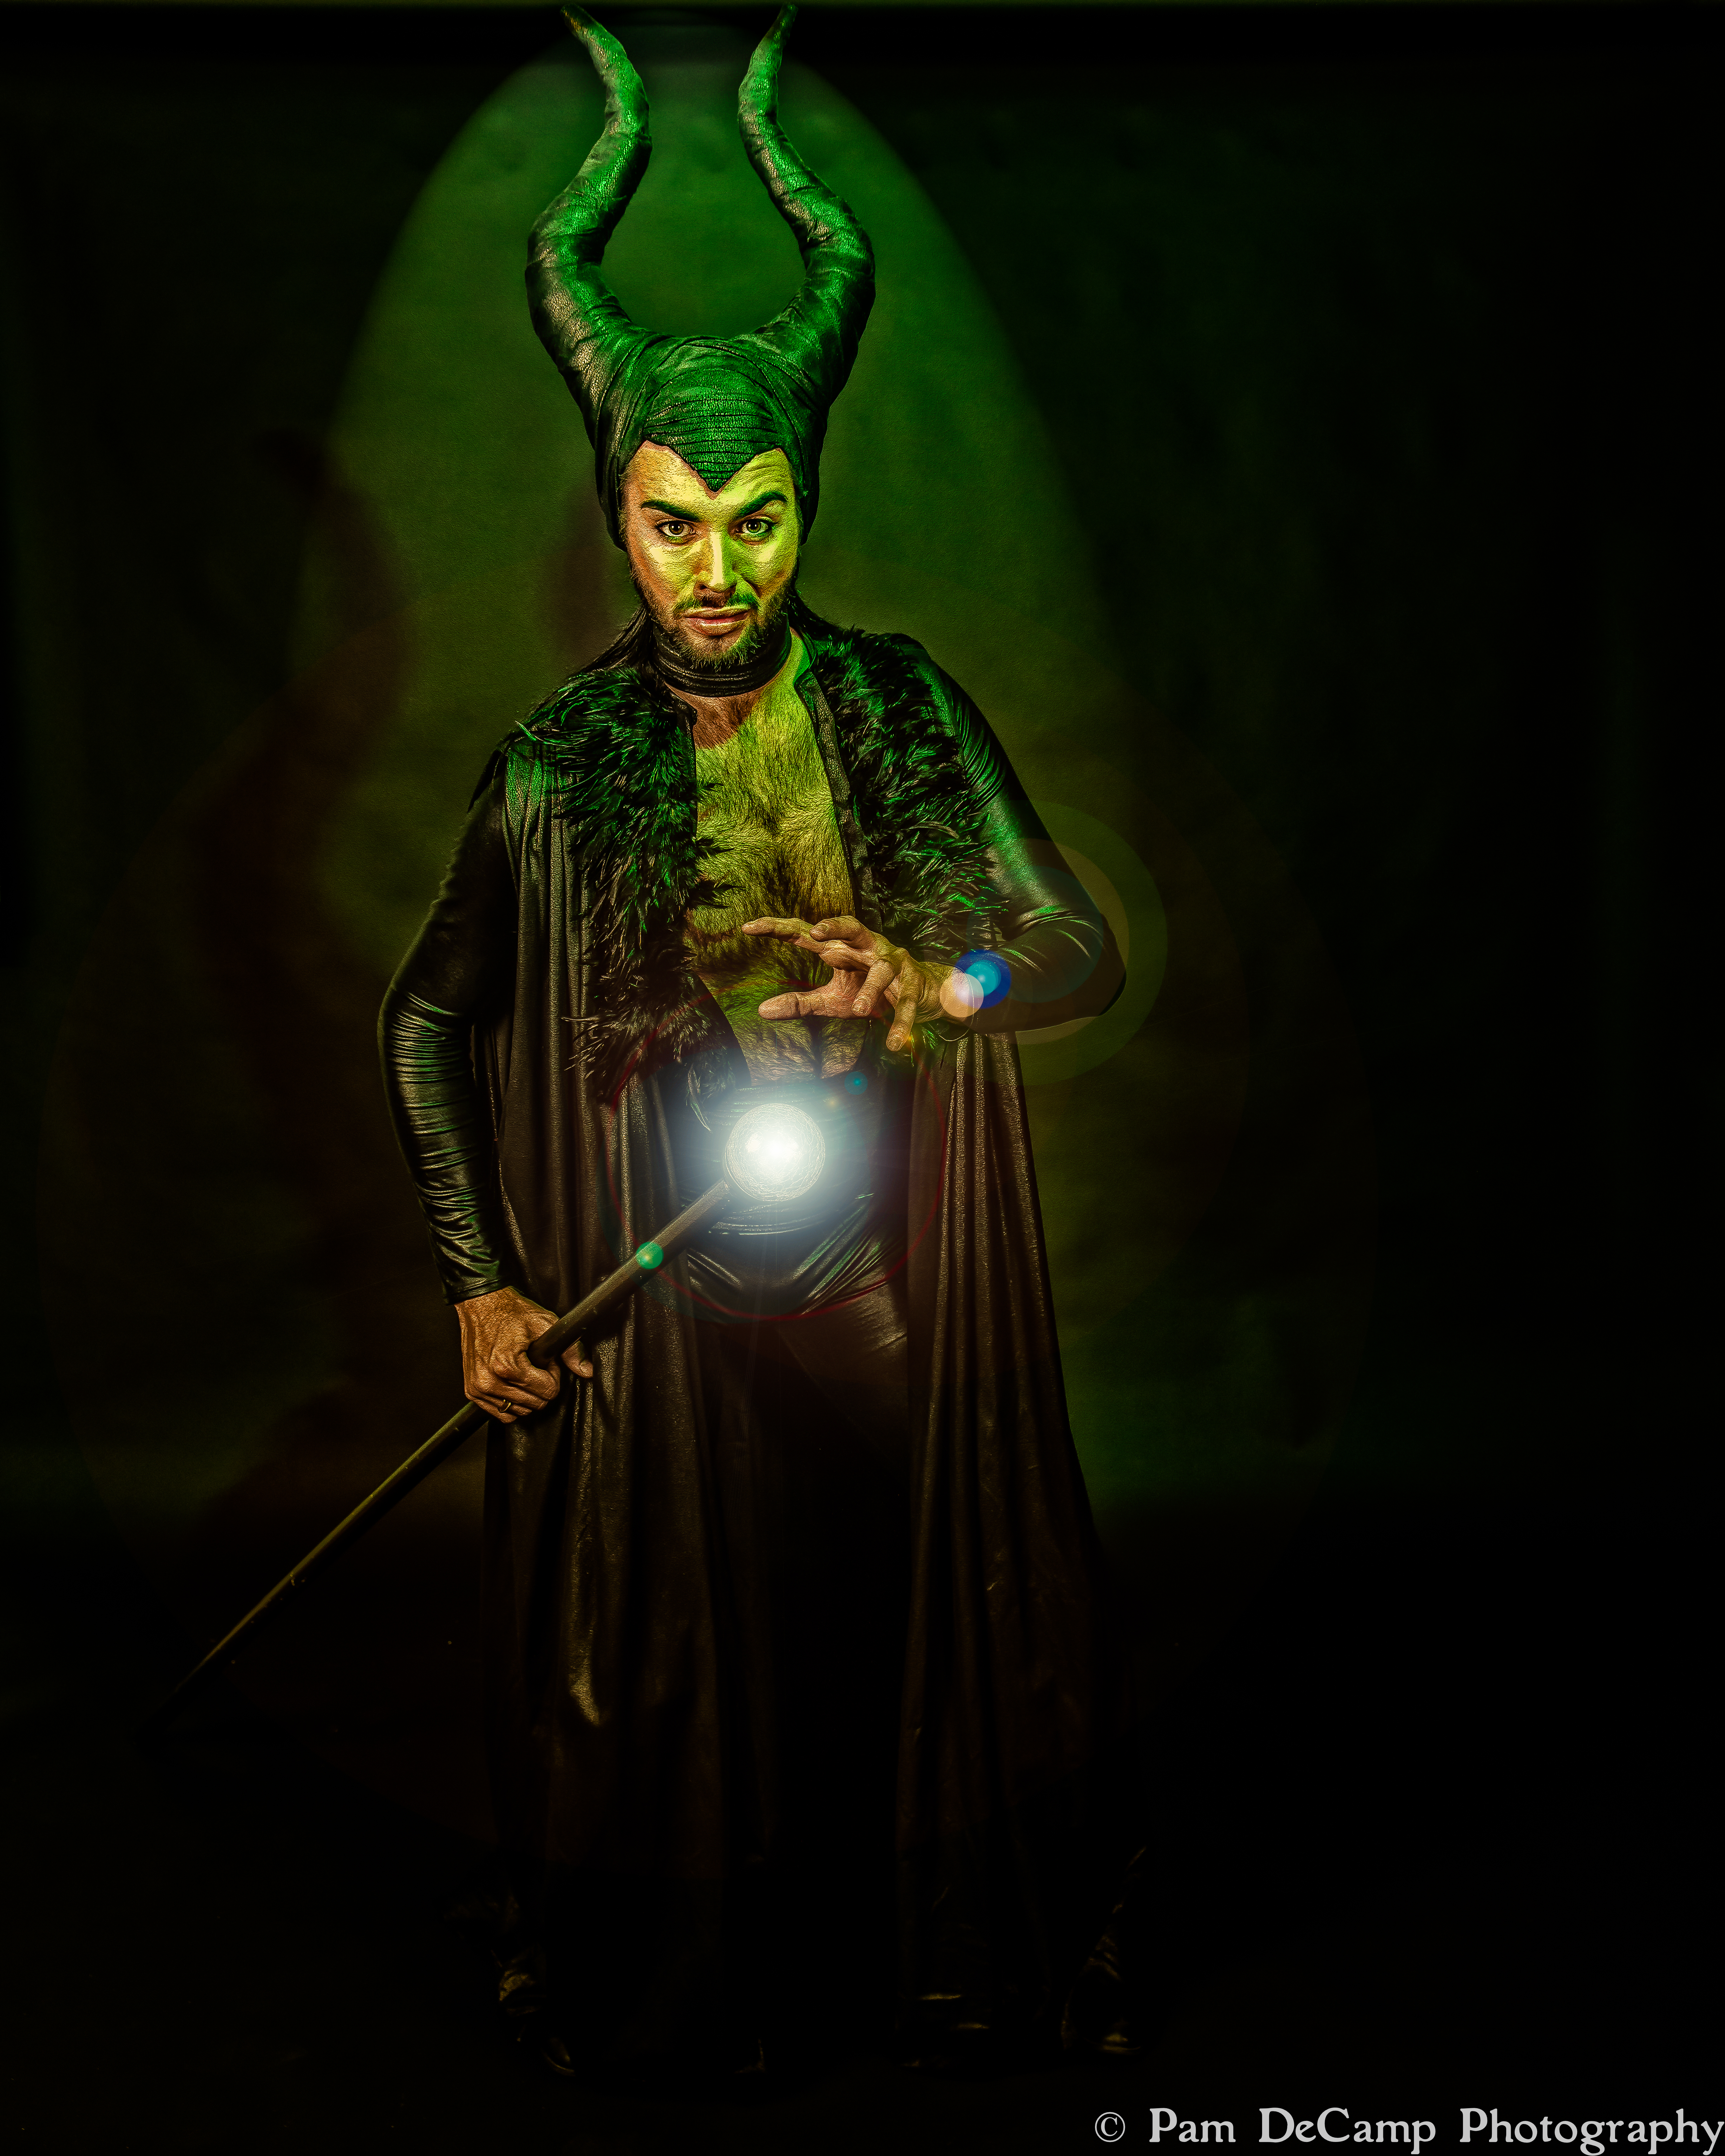
Edward Warren as Maleficent
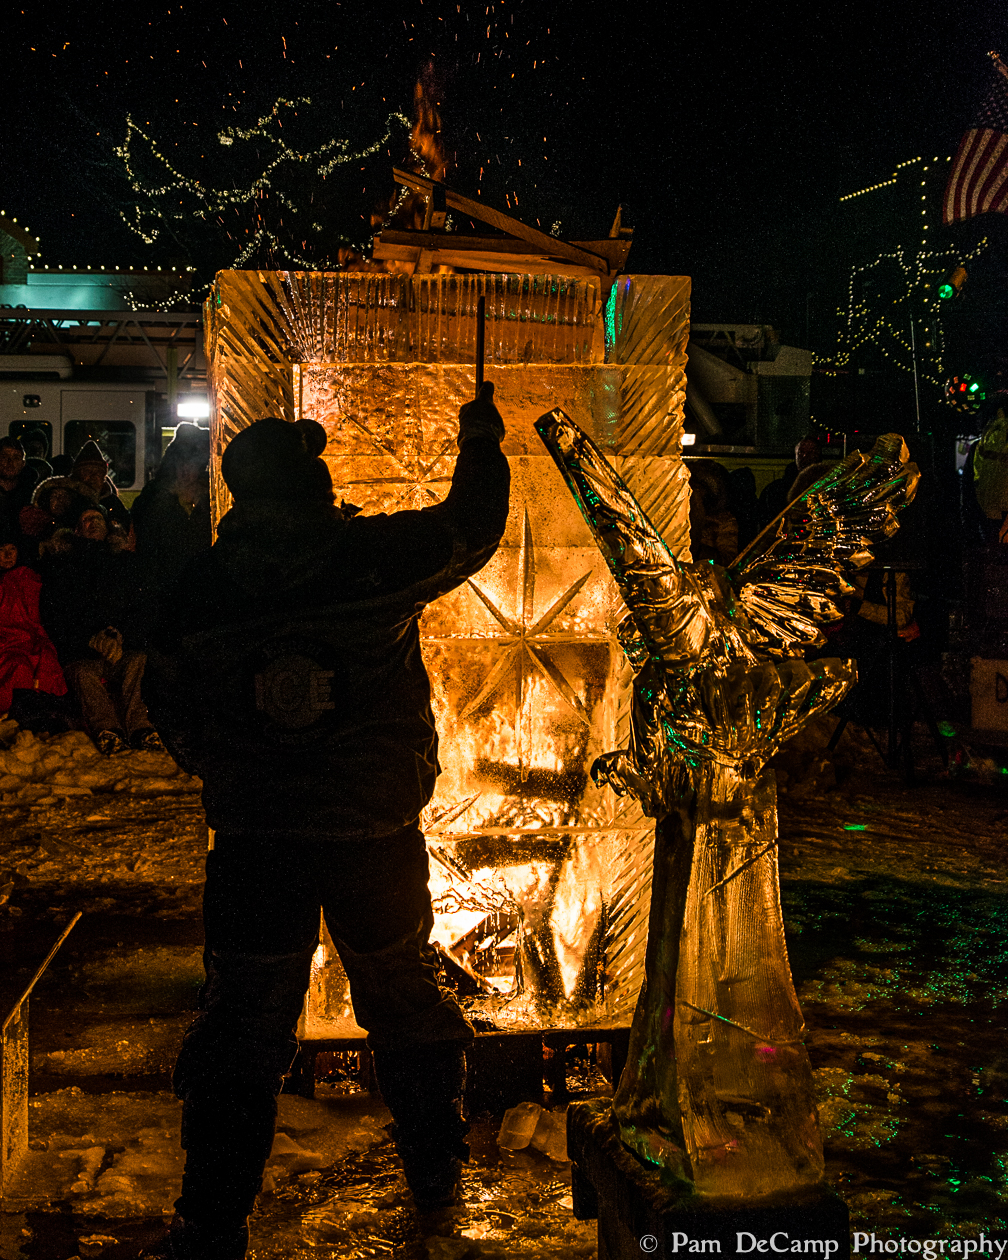
This was taken at the Fire and Ice Festival in Medina, Ohio. The lighting of the ice tower.

Taking aim!
I hope you have enjoyed my people pictures for 2o15!

My Favorite Images of 2015: Landscapes

As 2015 comes to a close, I have decided to share my favorite images of 2015 and why they are special to me. I hope you enjoy these images as much as I do!

Arlington National Cemetery

New River Gorge, West Virginia
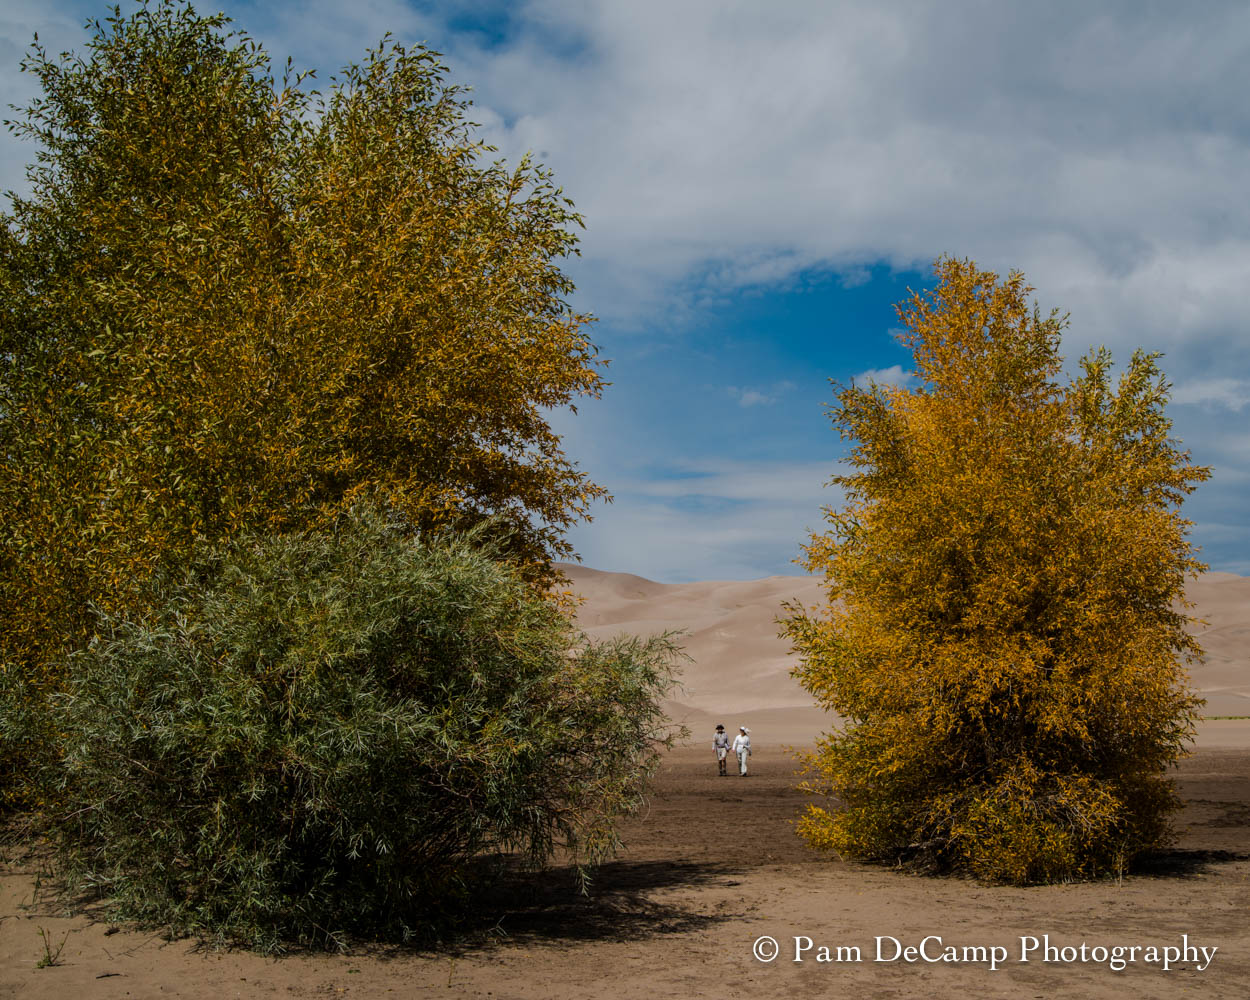
Great Sand Dunes National Park, Colorado


The two images above are from the Cadillac Ranch in Amarillo, Texas. I had taken a trip out west in 2013 and passed this area without knowing what it was until after the fact. I knew we were going to be going past here again so I made sure we stopped. The bold, highly saturated colors stand out against the cloudless blue sky. My daughter enjoyed the fact she could “legally” paint graffiti onto an object and not be arrested. Her initials EM were boldly painted in yellow and I’m sure were gone by days end. What a great experience though!

Abandoned Corral, Roy, New Mexico

Cabin in the Woods, Adams County, Ohio
Enhanced Landscapes
The next 3 images are ones that I did special processing on to give the images an aged feeling or to enhance specific details in the photograph.

Sleigh Ride, Maryland

Old Mill of Guilford, North Carolina

Tabby Shack dating from the 1700’s on Ossabaw Island.
I hope you enjoyed these images! Photographs capture our moments in time and bring back the memories connected to those moments.
Look for my other favorites of 2015!
Photographing Americana: Signs and Structures of our Past: Chapter 3


The Anna Plaza Motel sign in Anna, Illinois is very much a “blast from the past”. The actual age of the sign is unknown but based on the style and shape it is likely late 1940’s or early 1950’s.
Take note of the conveniences listed: Modern Electrically Heated (I assume that means the rooms) and TV. Then as the times changed a sign was added at the bottom to include Cable TV with remote, water beds, and direct dial phones.


Think about what we consider modern conveniences today. Free wifi probably tops the list for most people. I remember traveling with my parents, we looked for places that had a pool; a heated pool was a bonus. We stayed in Ithaca, New York one summer and it was unseasonably cold. The motel said they had a heated outdoor pool, but after an evening swim I was as blue from the cold water as the guy in Big Fat Liar after his swim in the blue dye!
Think about having “direct dial phones” when the majority of the nation has cell phones. How times change. I found an article written in 2005 by someone who also photographed this sign. They said in their article that this sign probably would be gone soon. Here it is 10 years later and it still stands.
As for staying at the Anna Plaza Motel; no thanks! I am sure in the early days it was a very fine establishment. The town of Anna has many old structures and other interesting signs. I look forward to sharing those with you in the future.
Image Enhancement

Since posting my blog on using On1 10, I have received approval to be an On1 Affiliate. You can click the link at the bottom of my post to learn more about the On 1 software.


On1 10 was released in November. I have been an On1 user since about version 6. I received a free version of Perfect Effects for attending a Kelby Photoshop Workshop. I thought it was odd they had another company promoting their products at the workshop, but I took the time to watch the demo during our lunch break.
What I found out was On1 can be used as a plug-in or as a stand alone software. I have used it both ways. I make my adjustments in Lightroom then move my image over to On1 Effects to further process my image.
For me On1 is a very simple way to enhance my images using the filters they have built into the program. I am able to layer and mask my images to bring out the details I want or to add in textures or other color enhancements to make my images stand out. And as an O1 user, I receive several preset packages throughout the year. Most of the time I create my own images, but I also try the others out.
My favorite adjustments in On1 Effects are the Amazing Detail Finder located under the sharpening tab and clarity under the tone enhancement tab. I find that these two adjustments bring out details in my images that I may have not noticed.


I use a Nikon D800E DSLR and shoot in RAW. The image above was taken with a Tamron 28 -75mm f/2.8 lens. My settings were ISO 320, f/11, 28mm, 1/160 sec. The light was behind me and it was about 4:00 in the afternoon. While I was happy with my original image I decided to work with it in On1 Effects. I used the adjustments I mentioned above and then worked on the highlights and shadows. On1 works similar to Photoshop in that you can make adjustments in different layers and if you are not happy with the change you can always go back and change or delete the layer. I also added a leather texture to the image which created a warm feel. When I photograph a landscape with an older structure, such as this grist mill, I prefer to age the photograph to give it character.


The image on the left is what was captured out of the camera. On the right I used the On1 Effects to pull out the detail in the bricks and to give the image a more surreal look. The time of day I captured my images made the reds pop. My settings were the same as in the images above. After I adjust in O1, it saves it back into my Lightroom catalog and I can


This is a collection of bottles in a potting shed. I thought this made a nice grouping. I did not move anything, just photographed it “as is”. My settings were ISO 800, f/4.0, 1/125, at 38mm with a Tamron 28 – 300mm. I like how the coarse detail in the wood was revealed using the Amazing Detail Finder. I also used a subtle HDR look in this image. I like photographs with lots of texture.
Many times On1 offers the On1 Effects module as a trial; that’s how I started. In the full suite they had enhance, portrait, resize, and B&W modules, too. I have used all of these at one time or another. What I like about On1 is it’s ease of use. I have produced several images with On1 that have been in exhibits, competitions, and have won awards.
Thanks for reading! Photography provides infinite opportunities for learning!

Fisheye Lens: Pros and Cons


Yorktown Beach captured with a fisheye lens; you can see the slight curve in the foreground from lens distortion
The 8mm Rokinon fisheye lens is a great lens to capture landscapes and to create surreal images. There are definite advantages and disadvantages to using a fisheye lens. The photographer has to decide what adds to or takes away from the image.
Pros of using a fisheye:


Using the fisheye to creatively “bend” the subject is a pro of this fine lens. The clarity throughout remains intact. It creates a snow globe effect when used close-up.


When shooting with a fisheye lens it is possible to capture sweeping landscapes with a greater depth of field. The image quality and sharpness throughout the image is a definite pro. The photographer can also create surreal images with a fisheye lens.
Getting low to the ground will provide for interesting foreground in the image.
Cons of using a fisheye:
While the pros listed above are very positive uses, they can turn into cons if you do not want your subject to bend or curve. Even in the best case scenario you may end up with a slight curve on the edges. When looking through the viewfinder, move the camera up and down and watch for the bend. The image can be exaggerated or will look fairly normal as the camera is moved.
Photoshop and Lightroom have excellent lens correction features; with practice, lens distortion can be corrected or enhanced depending on the final vision of the photographer.


In the sunrise photos above you can see how the clouds curve, but the horizon is fairly level. It does make for a nice effect with the arching clouds. In the photograph of the boat, the horizon is curved and the foreground is bubbled toward the viewer. While this may not be a desirable outcome, the photographer has to decide if that is what the end result should be.


The fisheye lens definitely has its place in the photographer’s bag and there are many creative uses for it. Adding a slight curve to a photograph can enhance the image or provide an unwanted distraction to the viewer. It is up to the photographer to decide how to use the lens. If given the opportunity to try one; see what kind of images can be made!
Photography is a skill with infinite learning opportunities!
Photographing Americana: Signs and Structures of Our Past: Chapter 2


Standard Oil Service Station, Vienna, Illinois
Having grown up in a small rural community, I remember an old castle gas station in the center of town. It is long gone and I so wish I had taken a photograph of it to preserve its heritage. Vienna, Illinois has a beautiful gem that has fallen victim to vandals and decay.
The station was built in 1930 by the Standard Oil Company. It is one of several that was built across the country to fit the space available. Many of these old stations have been converted into private residences and other businesses. I spoke to a resident of Vienna and he said, “Many people have expressed interest in the building, but there it sits, decaying each day.”
My imagination wandered to the days of “full service” stations. I could visualize the service man rushing out to gas the car, clean the windscreen and “take a look under the hood!”


As you can see from the above photographs, the torch (in photographs of other stations, it was a beautiful gold and red torch) has been chiseled away. It also appears that someone has tried to removed the entire “service” emblem! The lettering on the crown has also been removed leaving behind a skeleton of the past.


Other views of the building show the decay that is occurring. It is just a matter of time this beautiful landmark will be a memory just as the castle in my hometown is a memory for me.


I could only see inside the bay area; there were broken panes of glass that I could aim my camera through. I read other articles lamenting the sadness people have for this wonderful icon on the corner of Routes 146 and 45. It is a shame that someone will not step up and take charge of the restoration. I’m sure the expense is a hinderance. The red tiled roof, the yellow brick; a wonderful contrast of color!
Take the time to notice the images around you; pause and reflect on the past.
JAX Theatre: Hansel & Gretel: The Musical

We all know the Grimm’s fairy tale about Hansel and Gretel; they leave a trail of bread crumbs to find their way out of the forest, only to have the crows eat the crumbs and they stay lost, then happen on a gingerbread house owned by a witch who wants to cook them…
JAX Theatre has it’s own adaptation of this classic tale. Jordan Nickles is the creative mind behind the characters and the song lyrics in his adaptation of Hansel and Gretel: The Musical. If you have followed JAX over the last 4 years you have seen Jordan transform himself from a “young Scrooge” to the “elder Scrooge” for A Christmas Carol: The Musical. For this, we need to start from the beginning.

Jordan Nickles
In 2011 JAX Theatre had it’s first production of A Christmas Carol: The Musical. Nickles portrayed “young Scrooge”, Marley’s ghost, and Ol’ Joe. Marley and Ol’ Joe required extensive make-up applications and removals between scenes. Jordan designed his own make-up for the parts and applied and removed one character’s features to transform himself into another character. Jordan brings such energy to his performances and each production is bigger than the previous. In 2012 and 2013 JAX brought in the talent of RJ Haddy to transform Jordan into the “elder Scrooge”. (See blog post:https://pamdecampphoto.wordpress.com/wp-admin/post.php?post=101&action=edit) Other plays produced by JAX Theatre have been Steel Magnolias, Sleepy Hollow, and Alice’s Wonderland.
In 2013, not only did Haddy transform Jordan into Scrooge he applied his creativity to transform actors into Christmas Past, Christmas Present, and Marley’s Ghost.
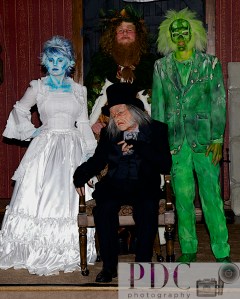
Standing L to R: Christmas Past (Hannah Noel); Christmas Present (Adam Lucas); Marley’s Ghost (Ethan Lawson); Seated: Scrooge (Jordan Nickles)
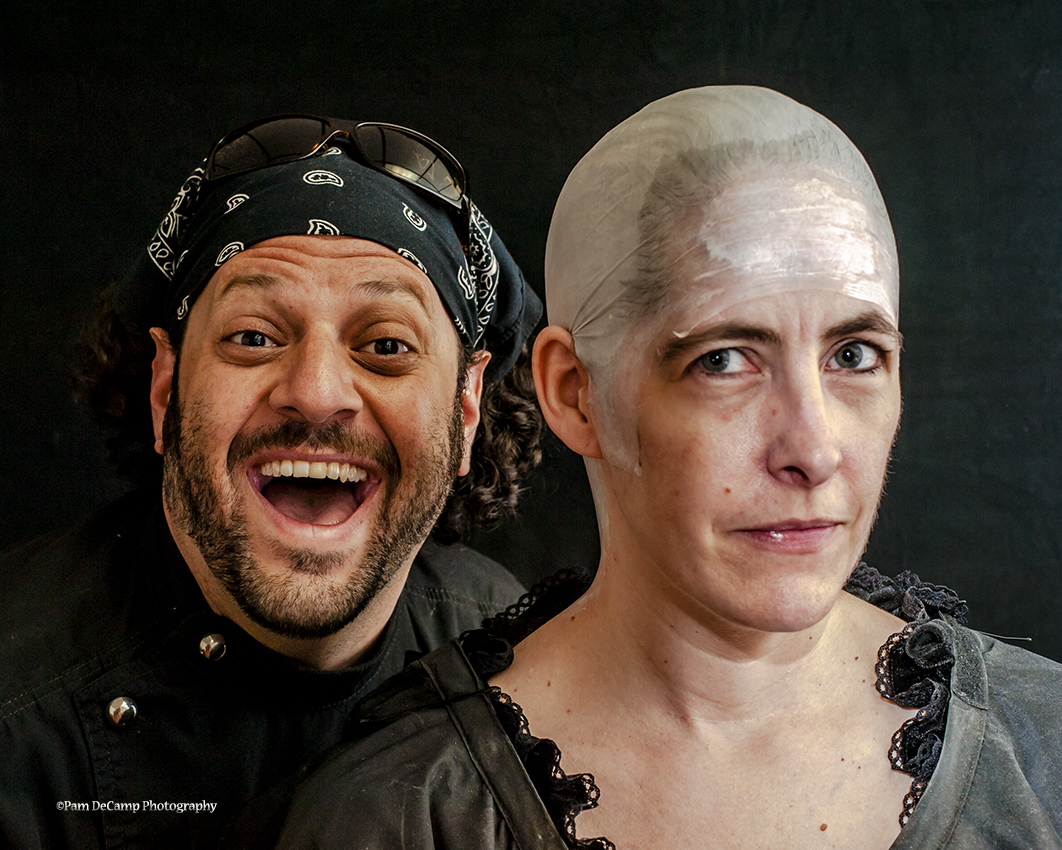
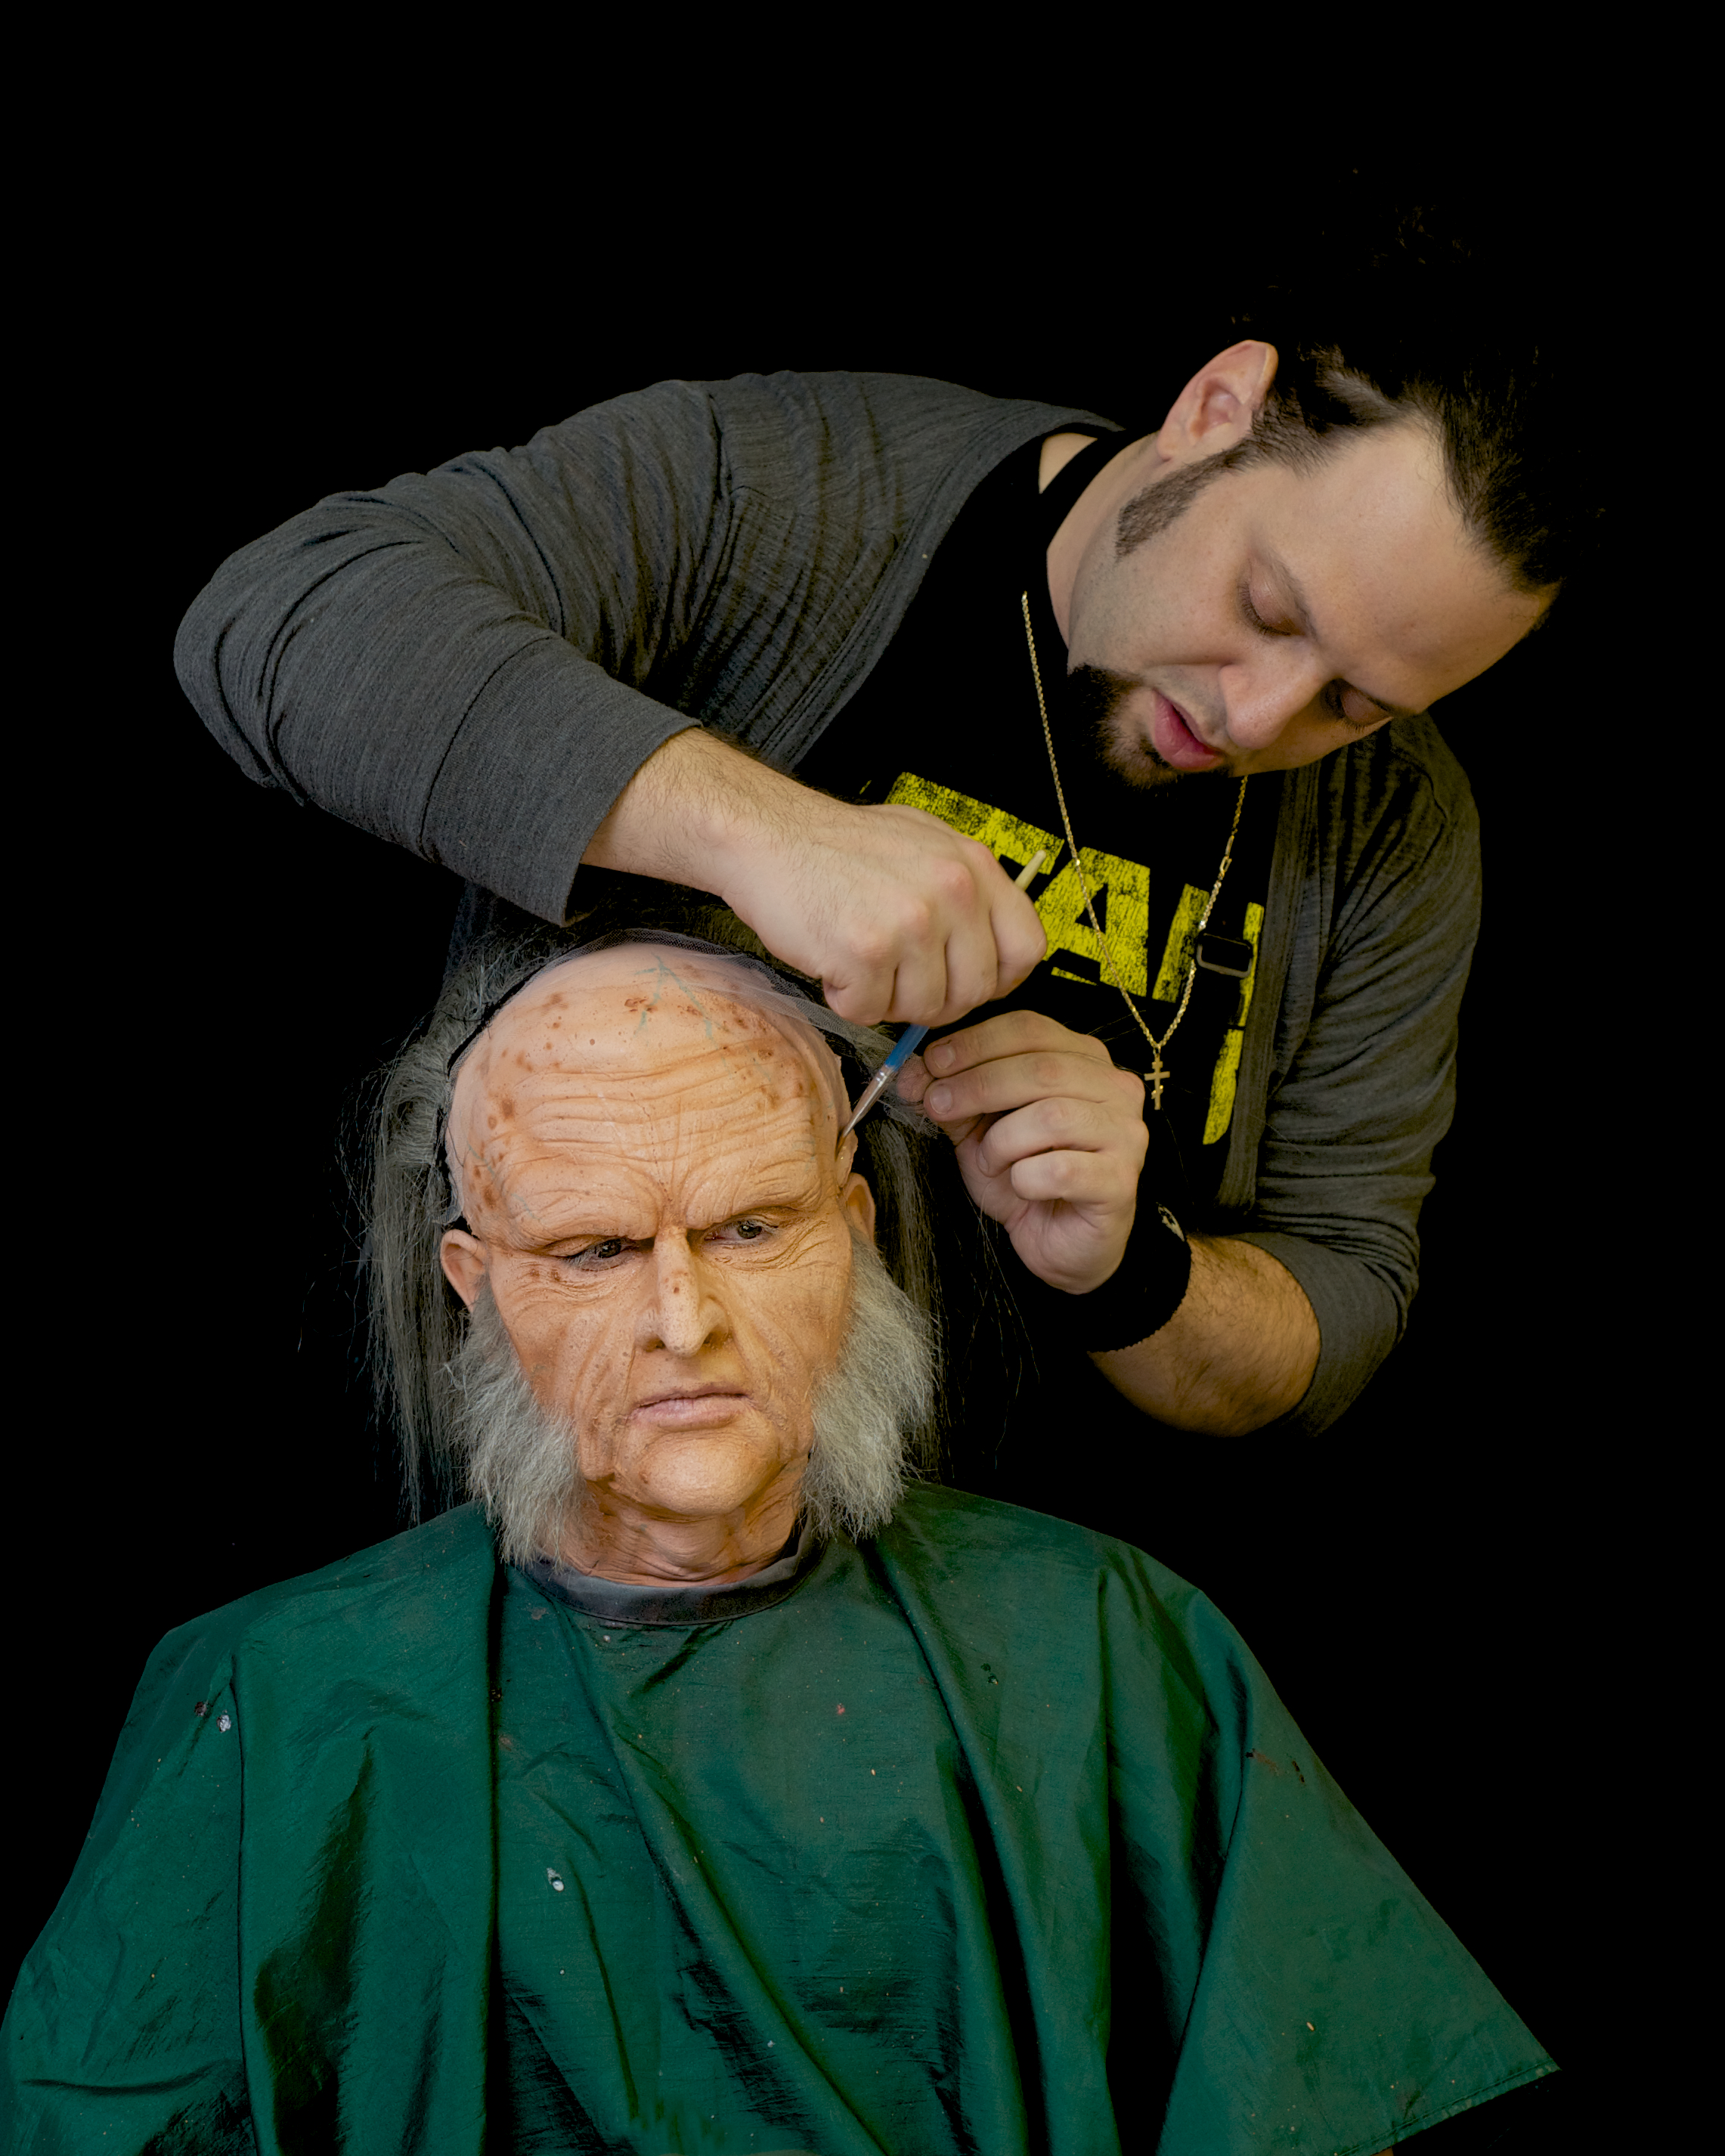
For the JAX production of Hansel and Gretel: The Musical, RJ Haddy’s talents were called upon again to transform the lovely actress, Eva Martin, into Beatrix the Witch who lures the Hansel and Gretel into her home.

Eva Martin before her transformation to Beatrix
Eva was thrilled with the opportunity to work with RJ. During the time in the make-up chair Eva sat very still and RJ was amazed at her patience while he glued, sponge painted, and airbrushed her features on. The process began with Eva having her beautiful locks of hair covered with a bald cap.
RJ & Eva during the bald cap application.
RJ applied a layer of white on Eva’s face. He used his signature Shadow airbrush to apply the contours and fine details to give her face dimension and depth.

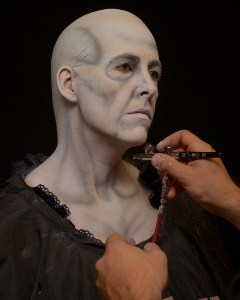 RJ adds contours to Eva’s face to give her character dimension and depth.
During the play the Beatrix takes on her own transformation so cracks are painted onto her “skull” and some of Eva’s own hair is pulled through the bald cap to add to the witch’s realistic appearance. After all Beatrix is 900 years old!
Cracks are added to Beatrix’s skull
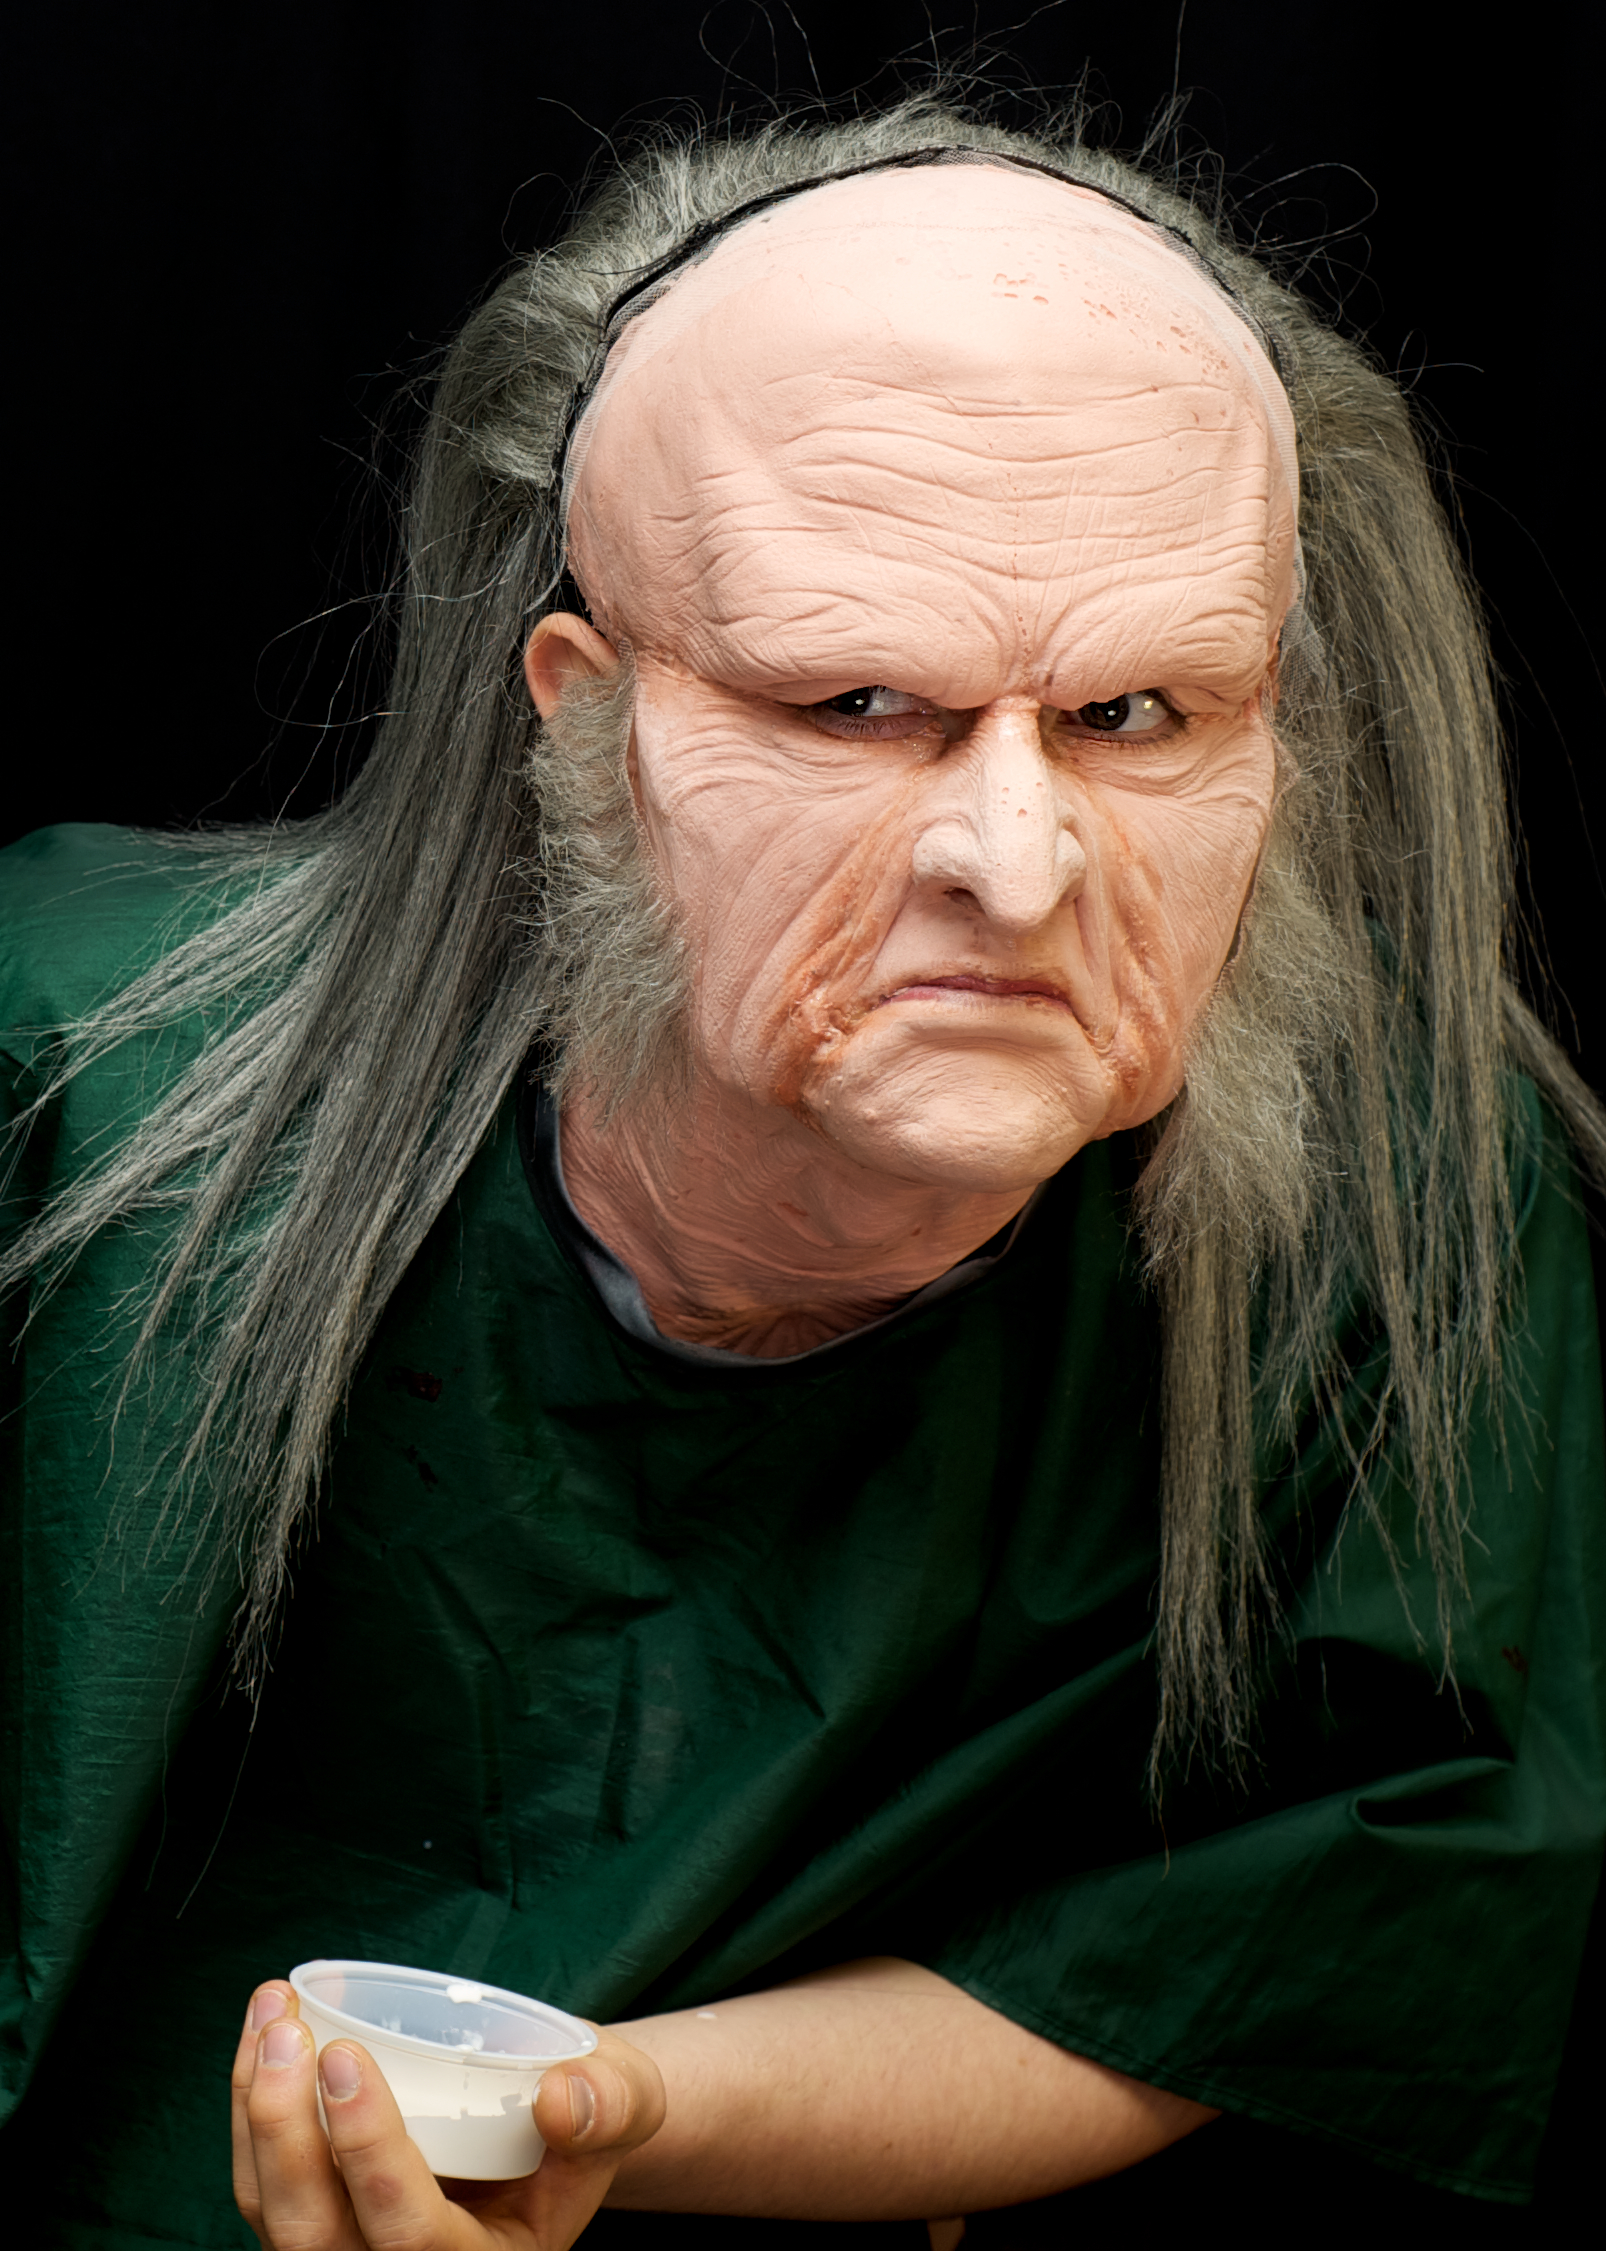
A long flowing wig was added to complete the look.

RJ touches up around the wig so it blends with the rest of the make-up.
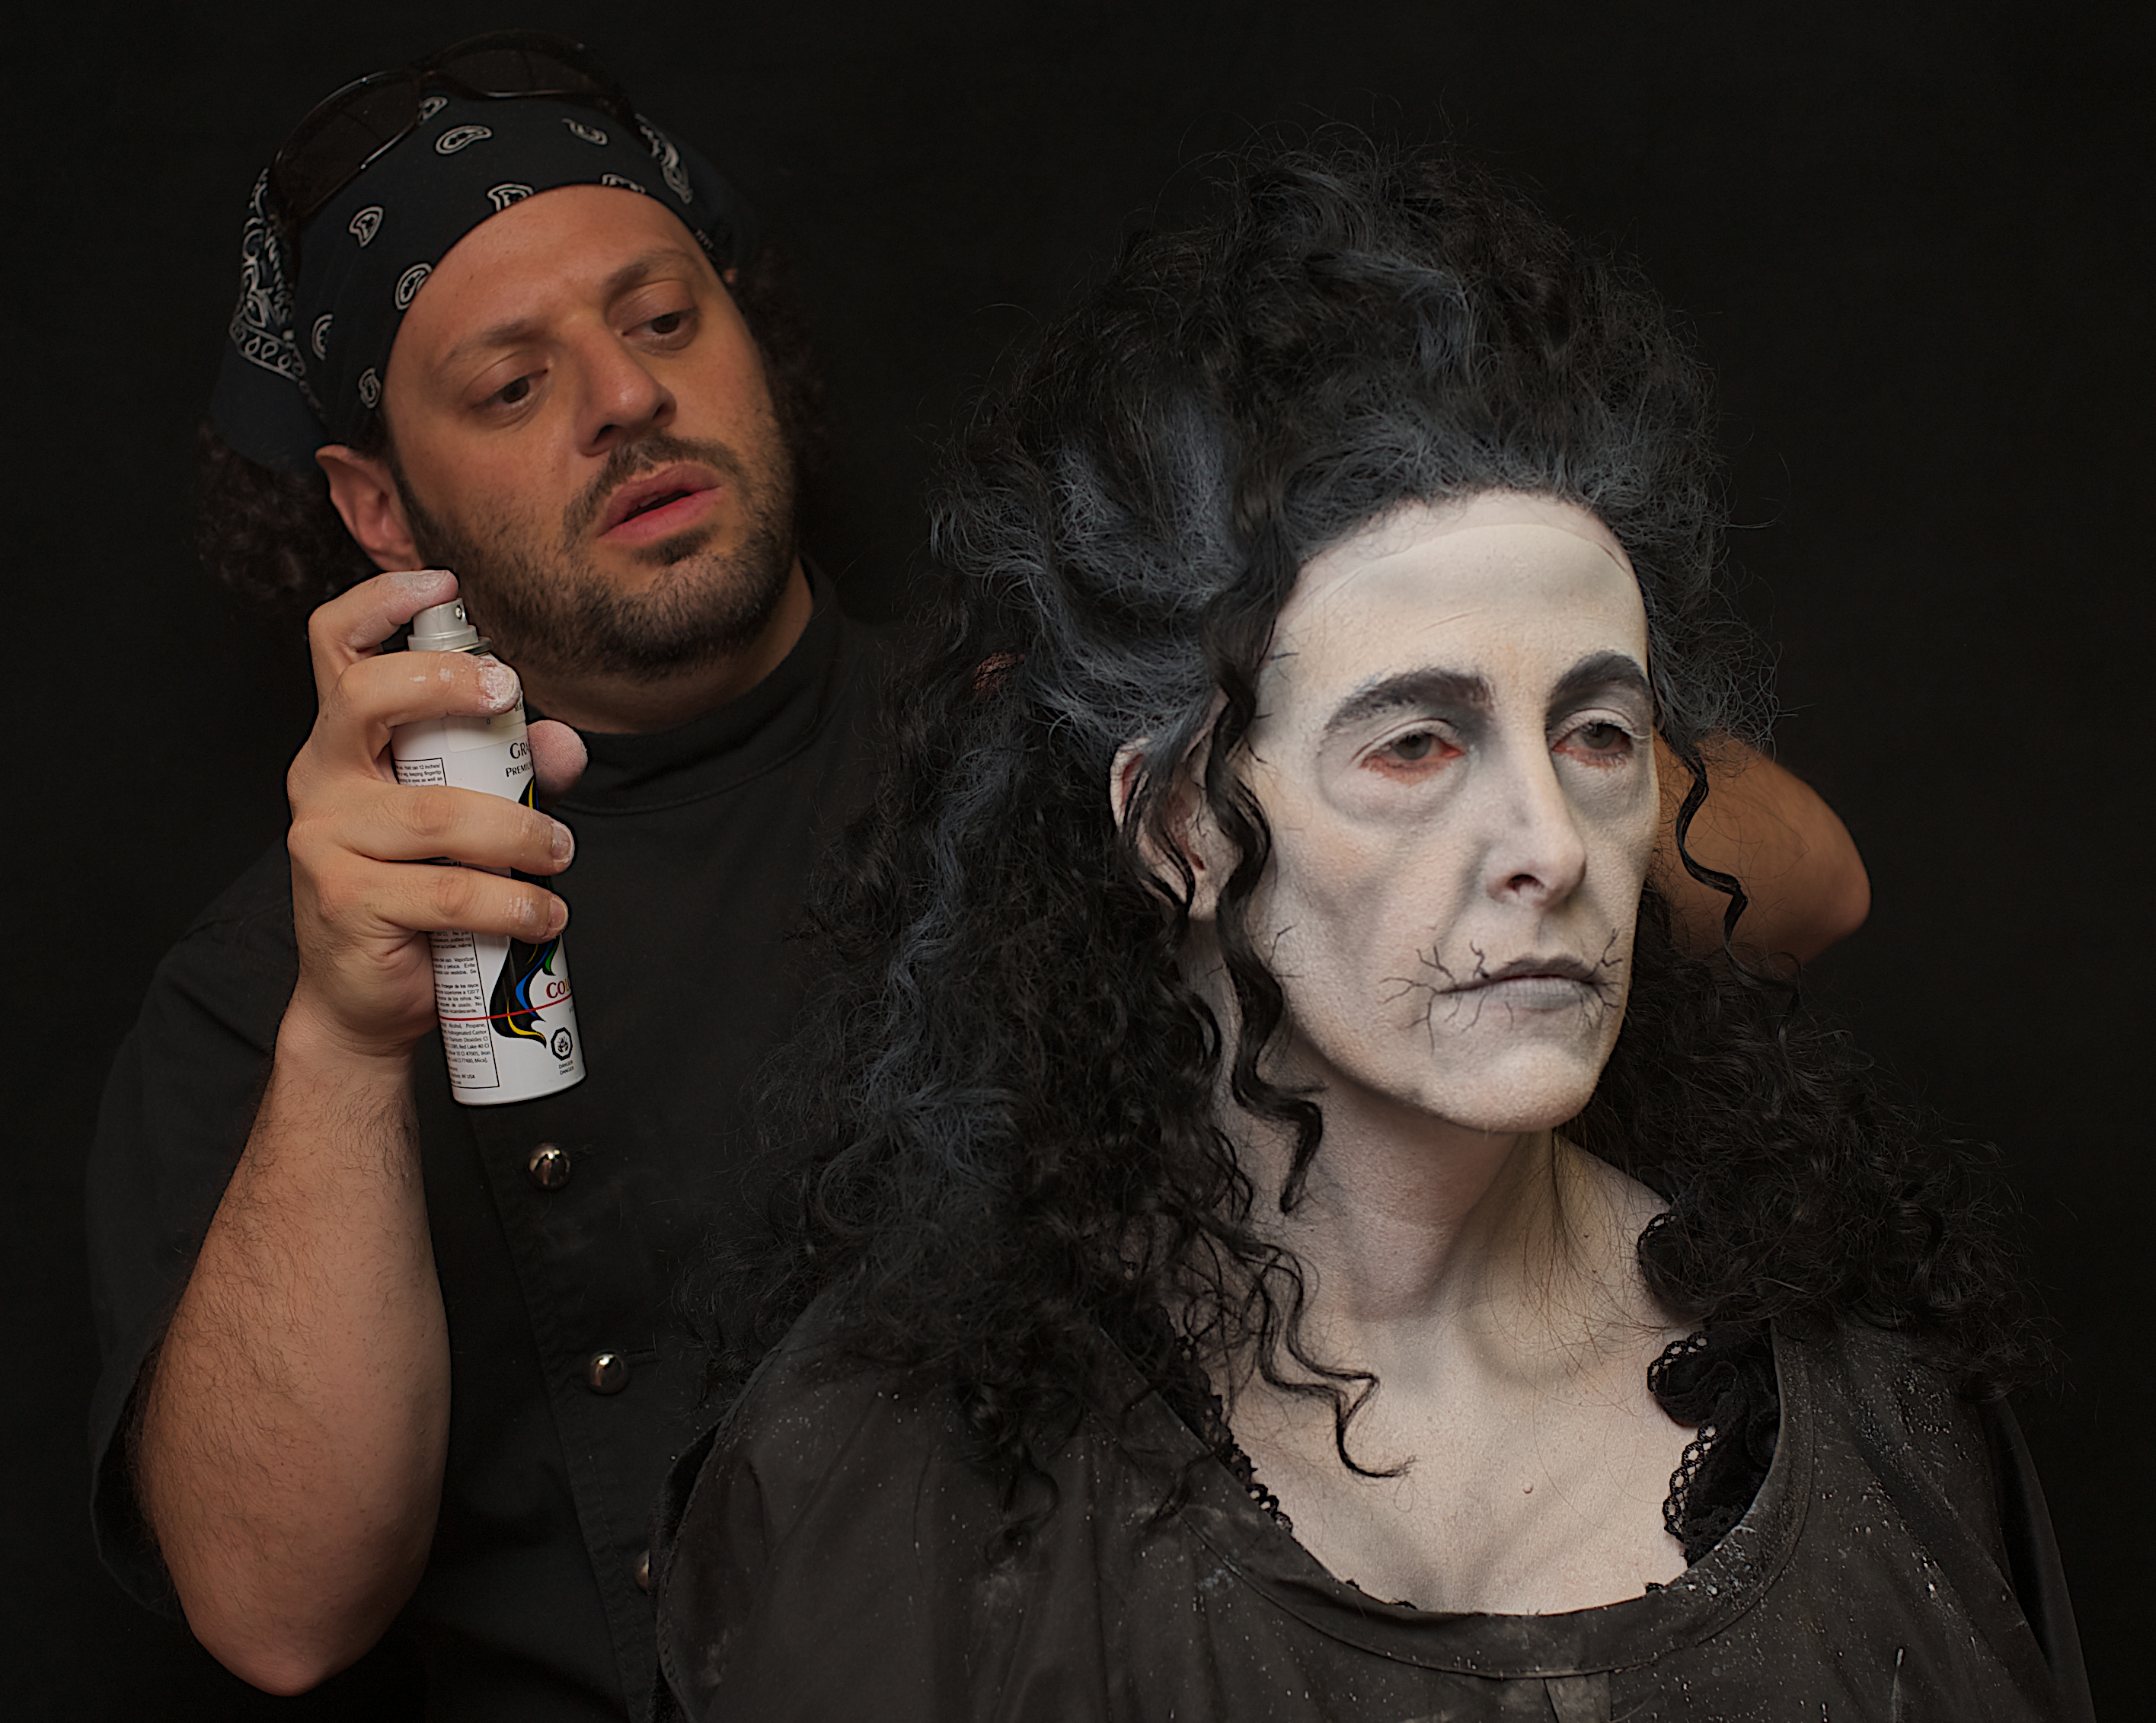
RJ adding highlights to the wig.
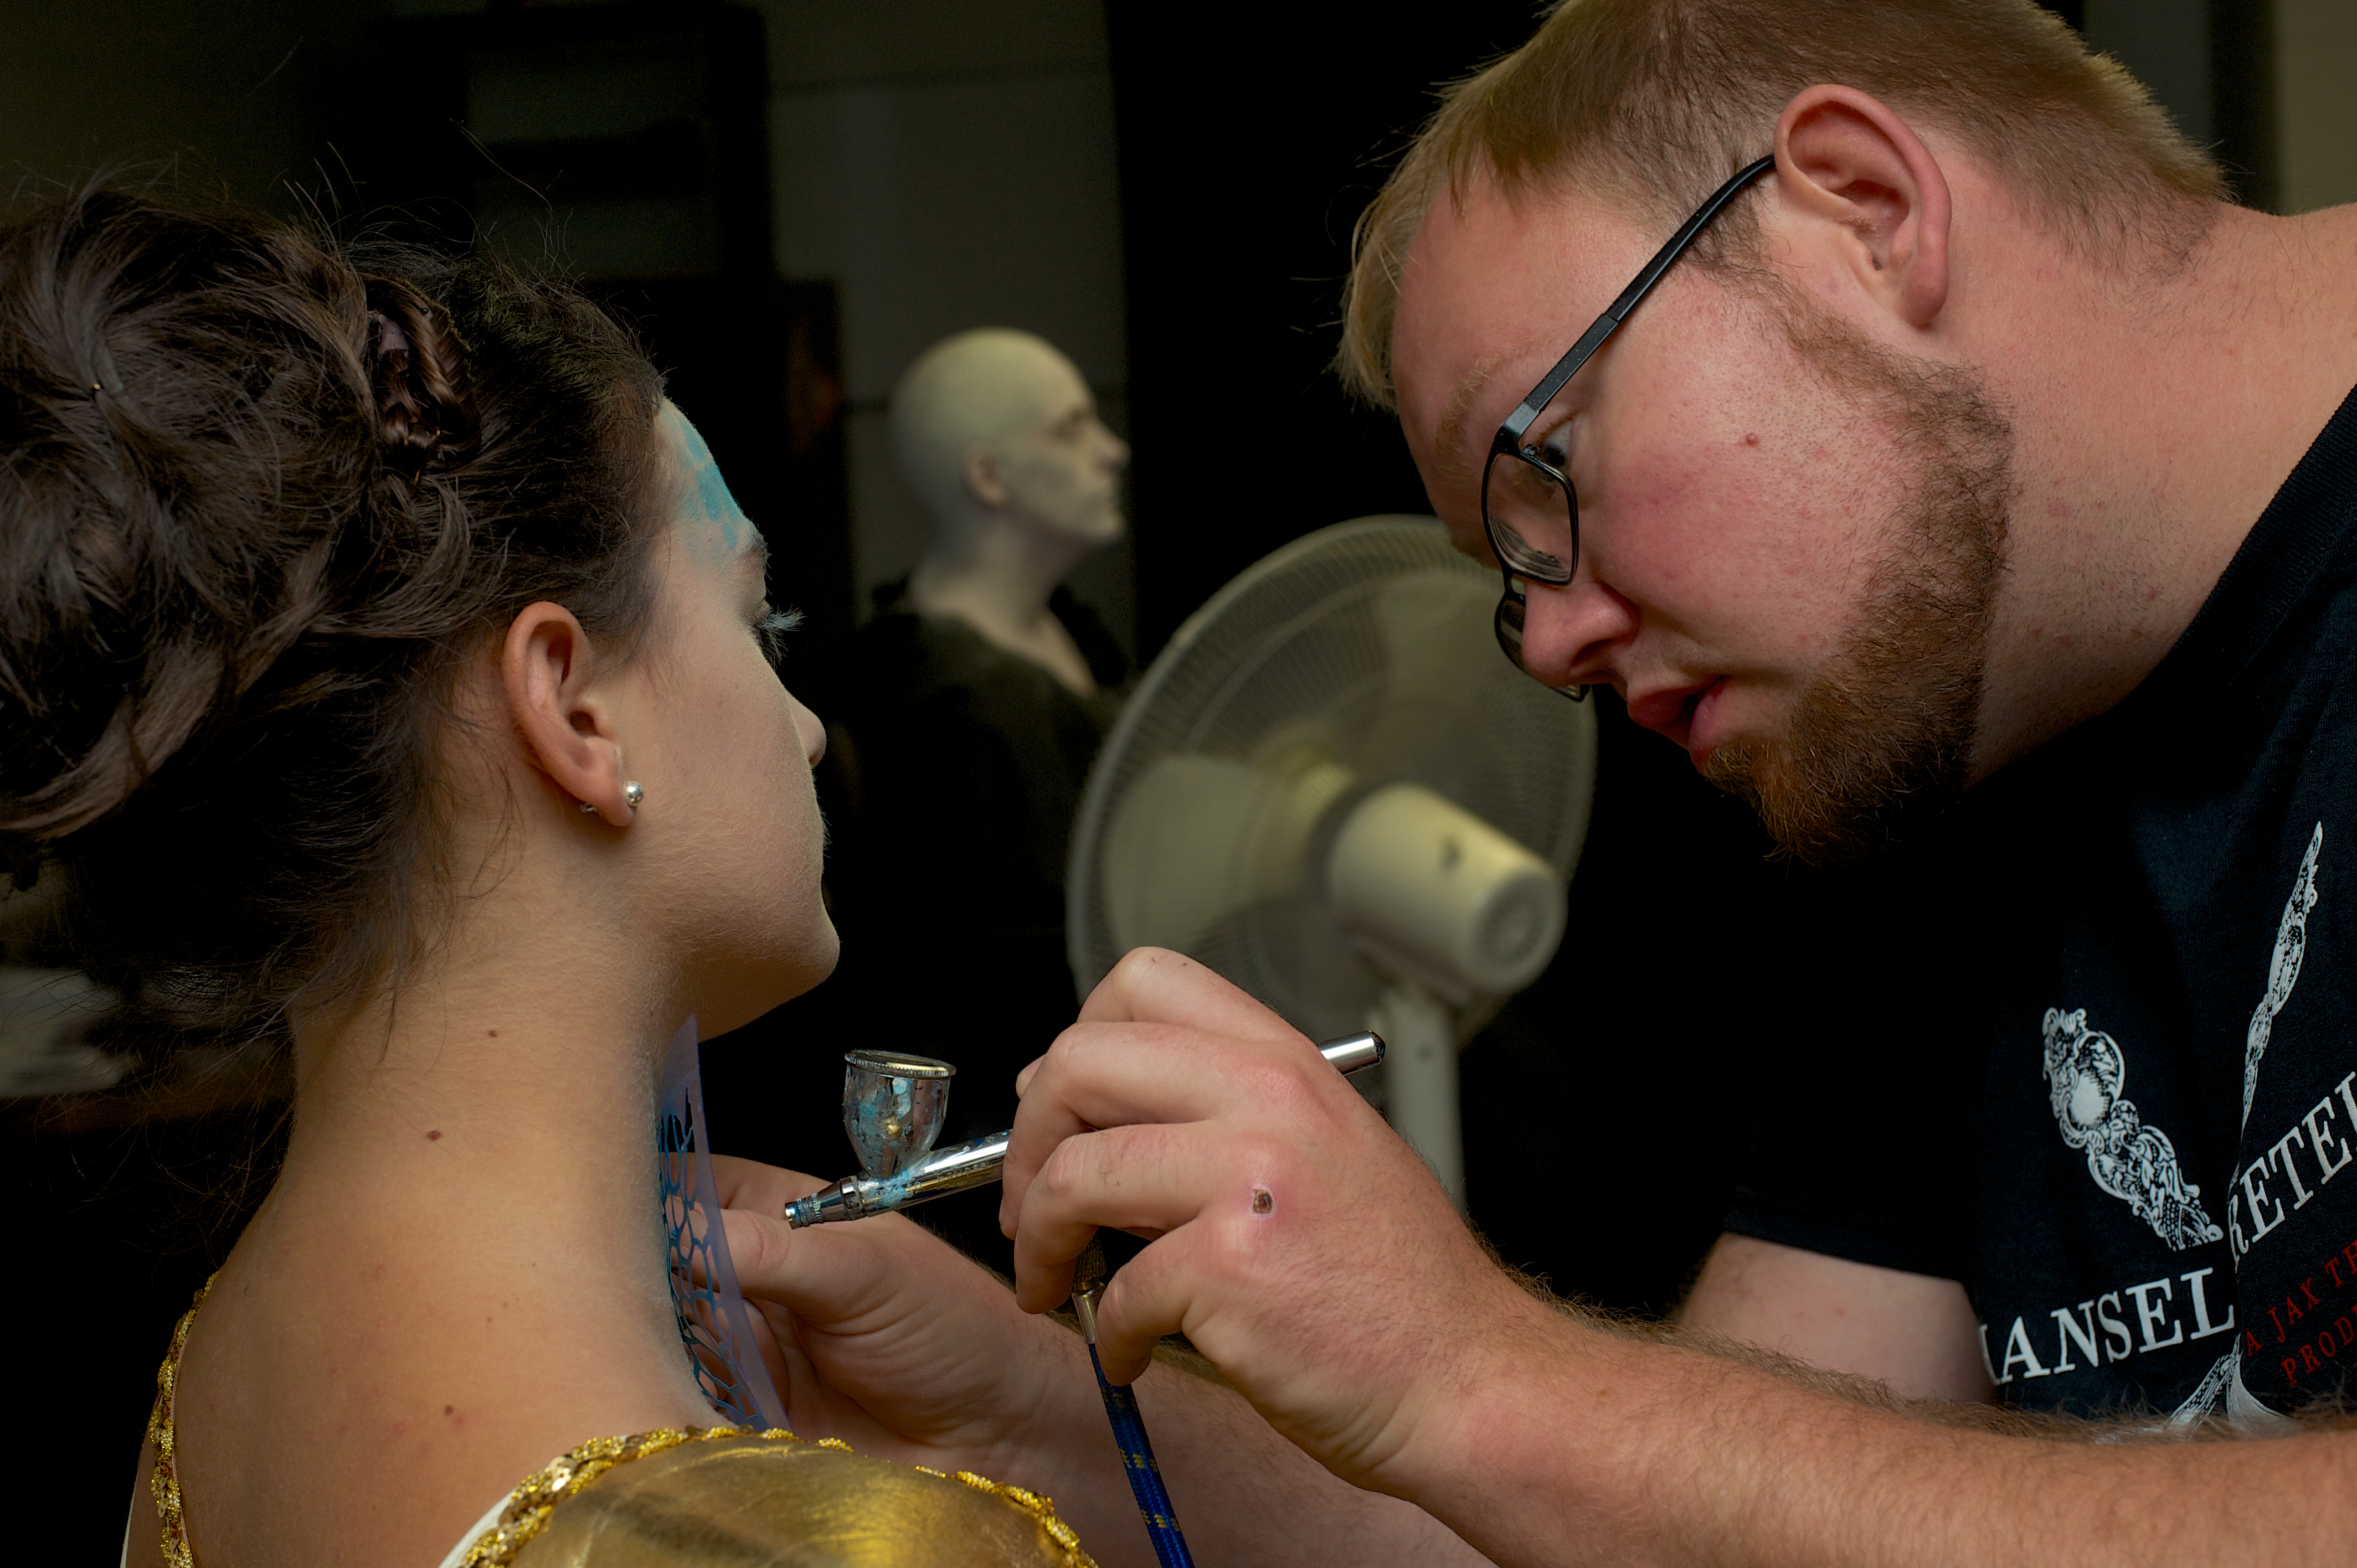
When RJ is working he attracts on-lookers. These are not they typical on-lookers though. Stacey Morrison and her fiancé Jerod Walker both enjoy crafting sets and experimenting with special effects make-up. They helped to design and build the set for Hansel and Gretel plus provided make-up design for the ballerina Petra.
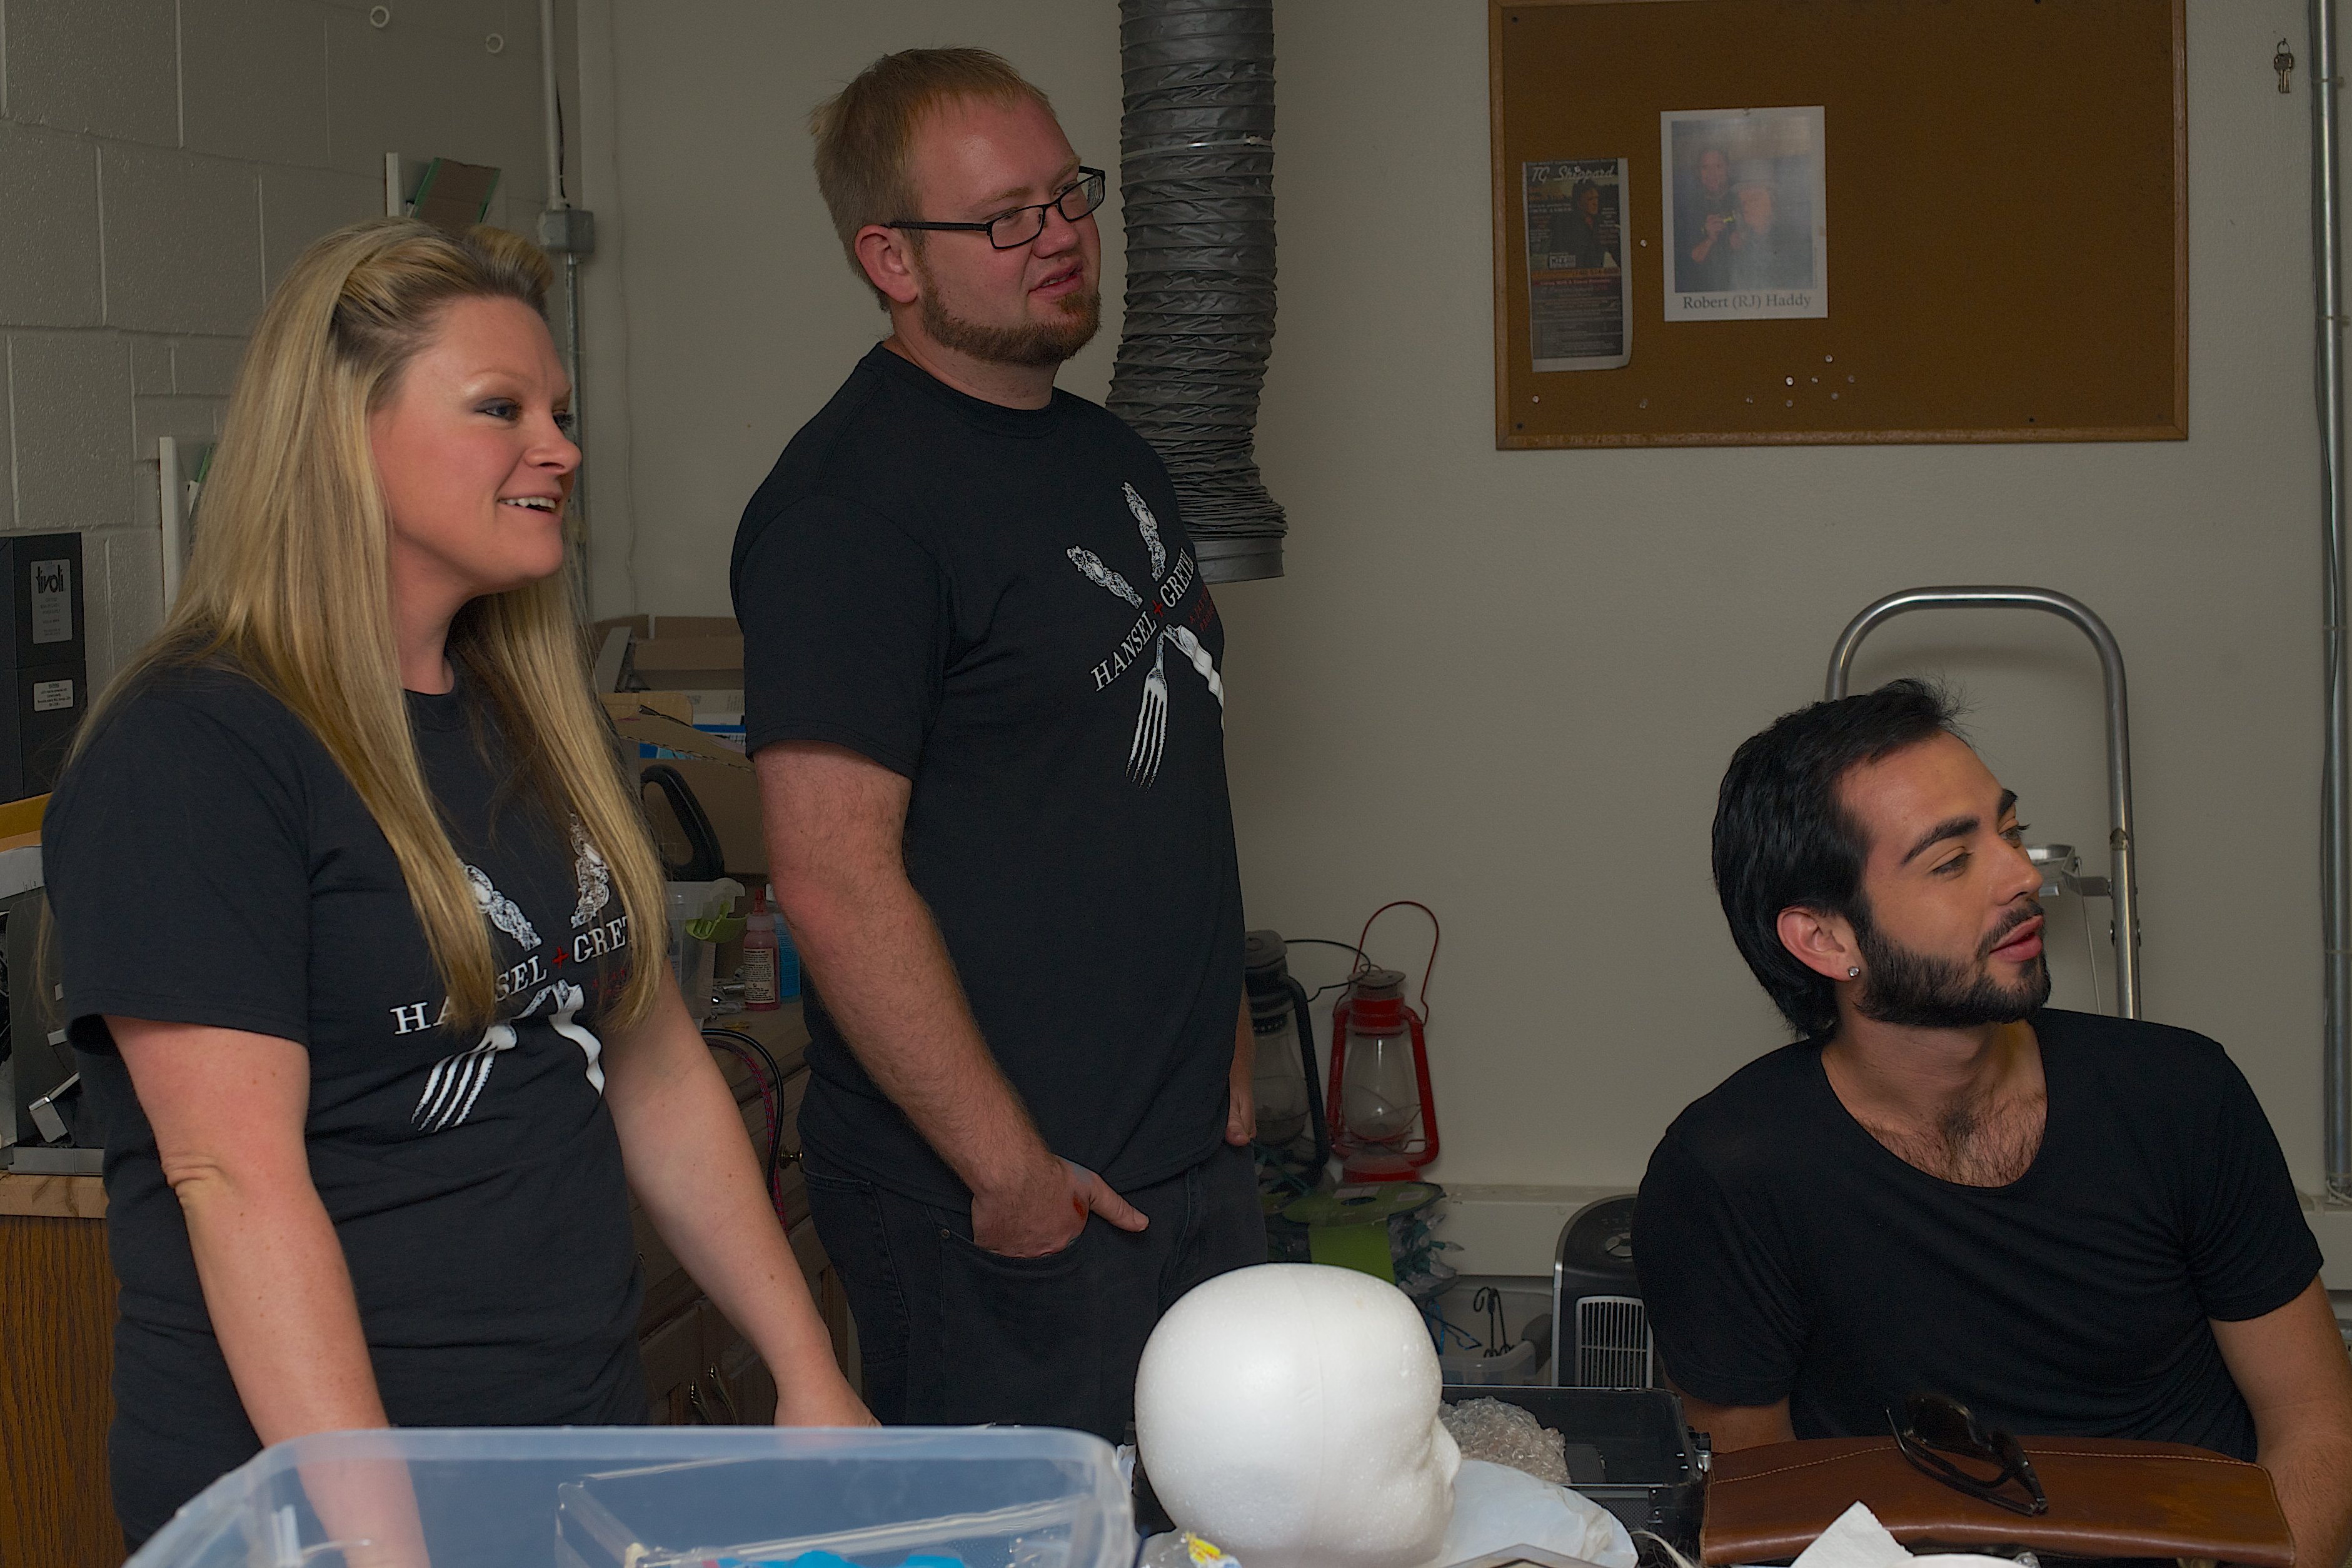
Stacey Morrison, Jerod Walker, Edward Warren watch as RJ transforms Eva into Beatrix.
Below Jerod provides his talent to bring Petra to life.
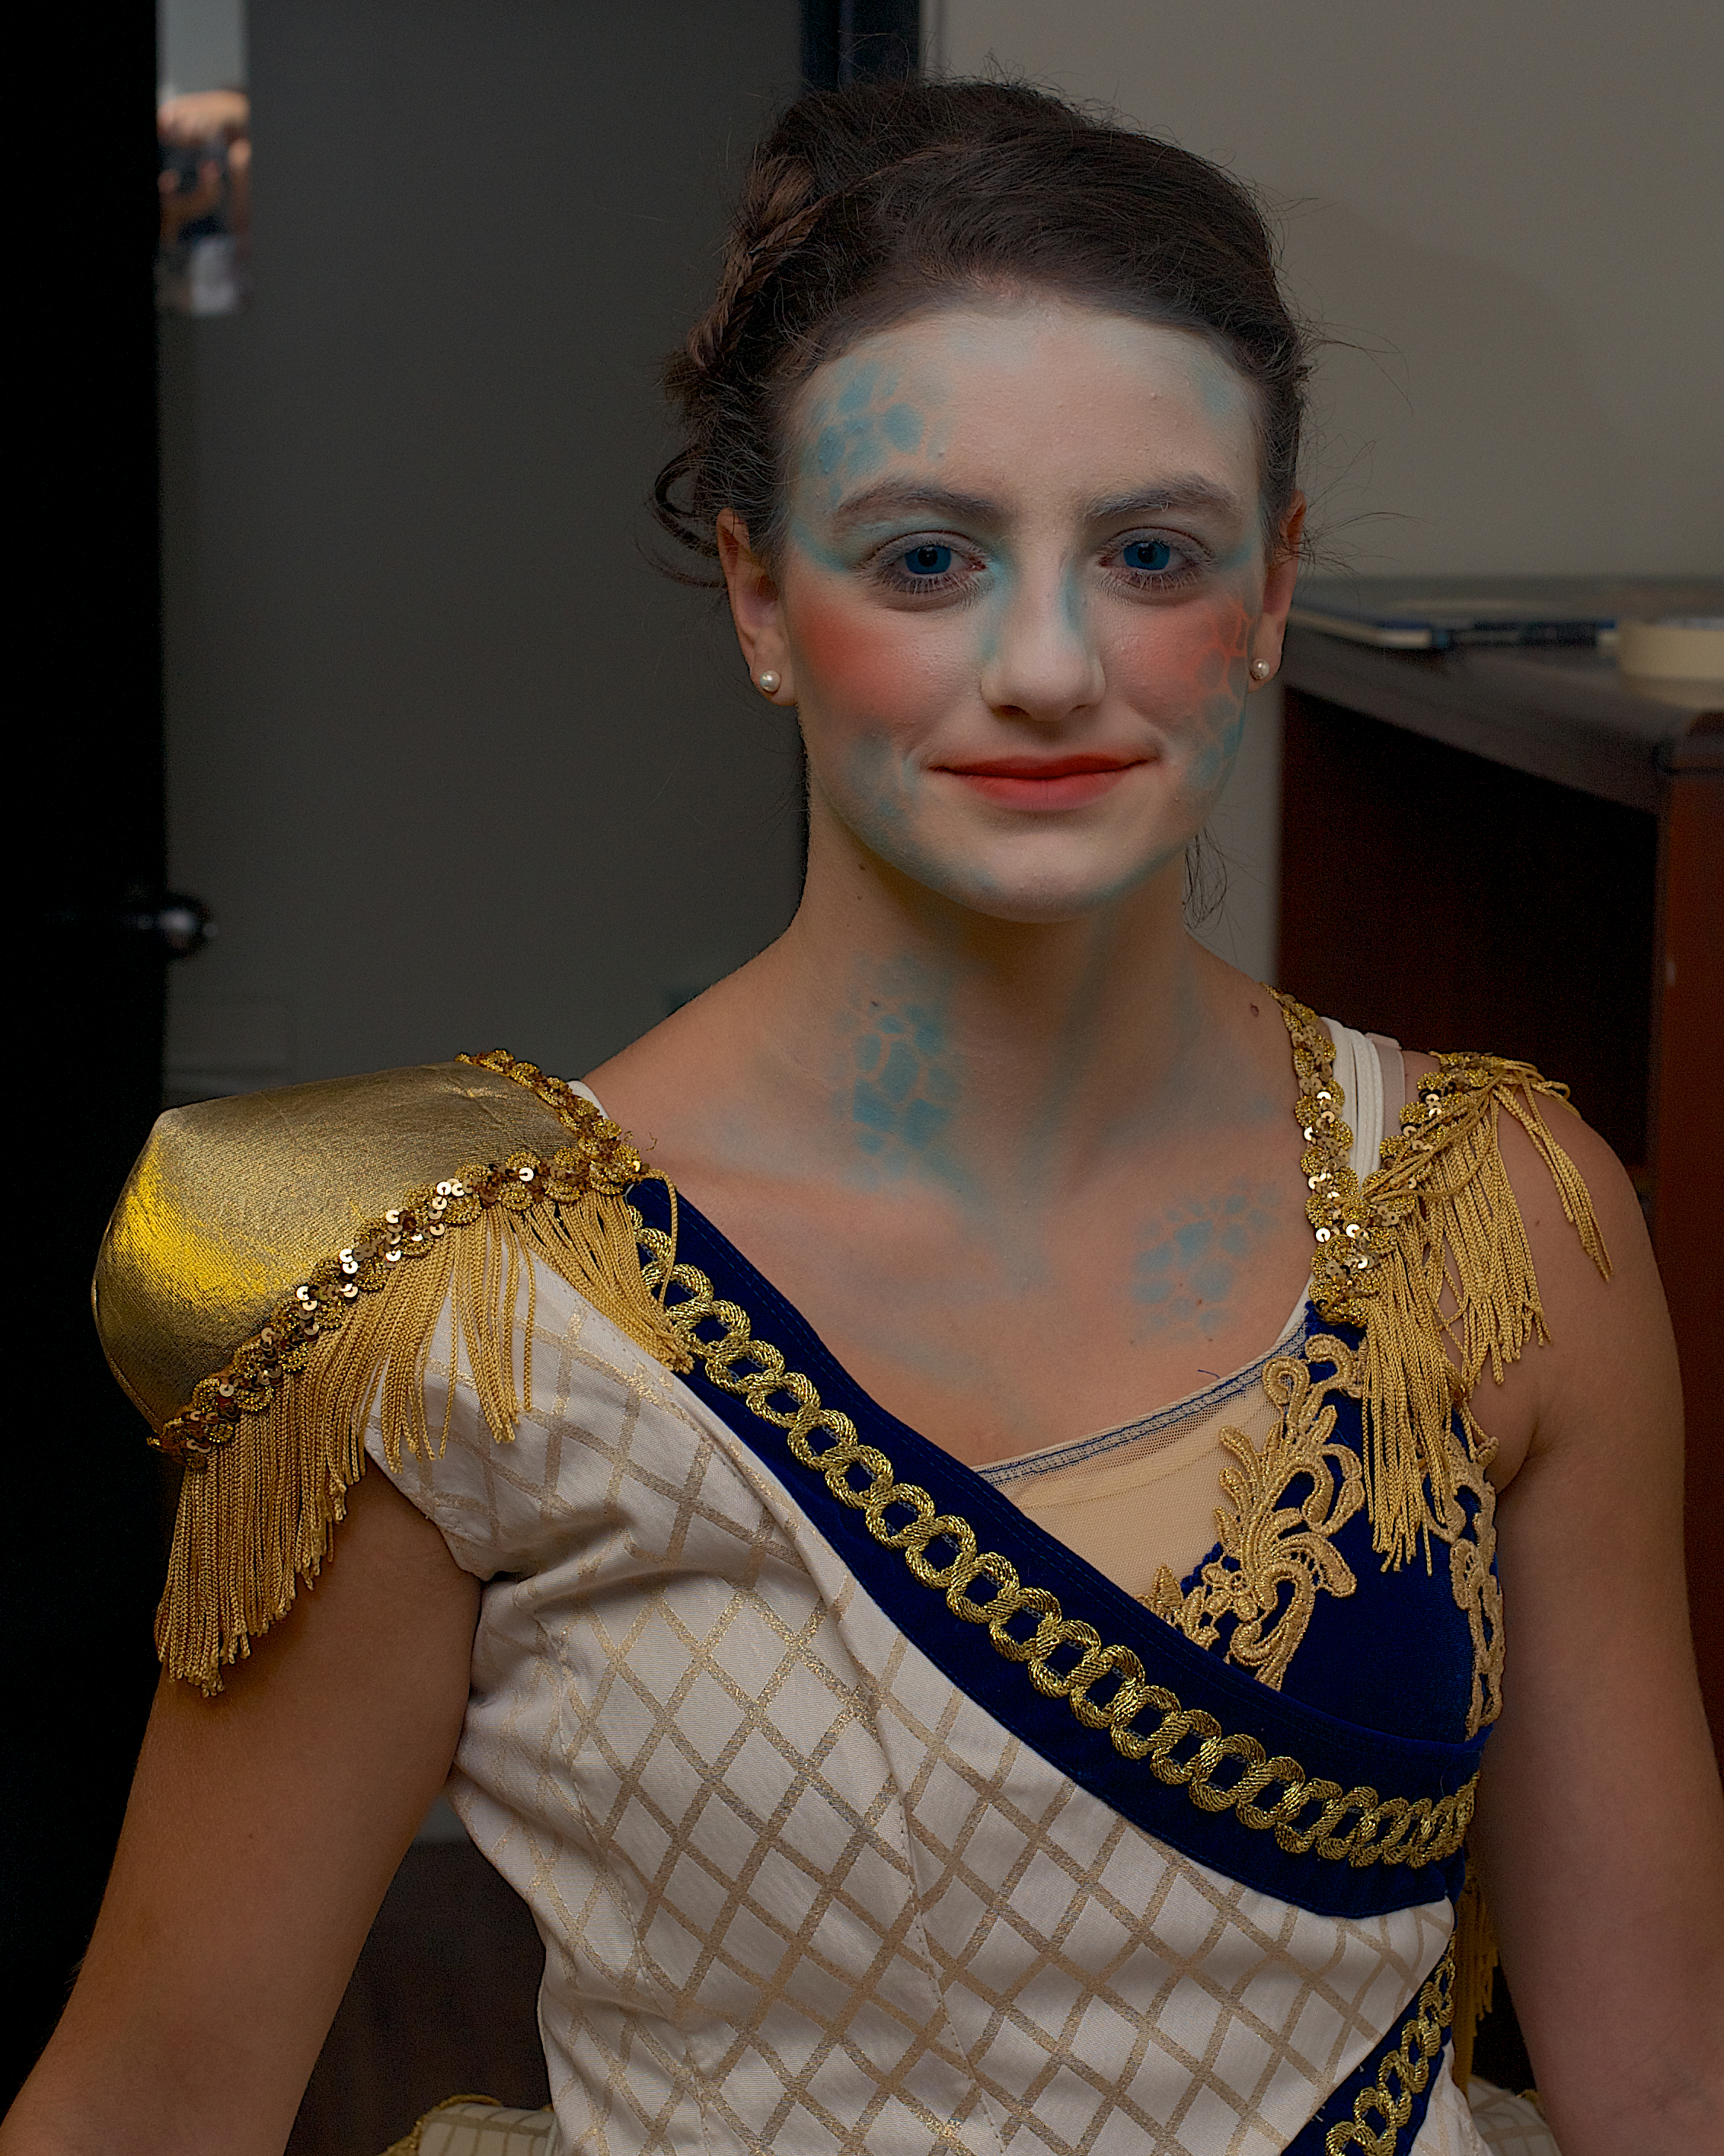
 Jerod applies features to Petra (Sami Matthews)

RJ Haddy and Beatrix (Eva Martin)
Below are scenes from Hansel and Gretel: The Musical.
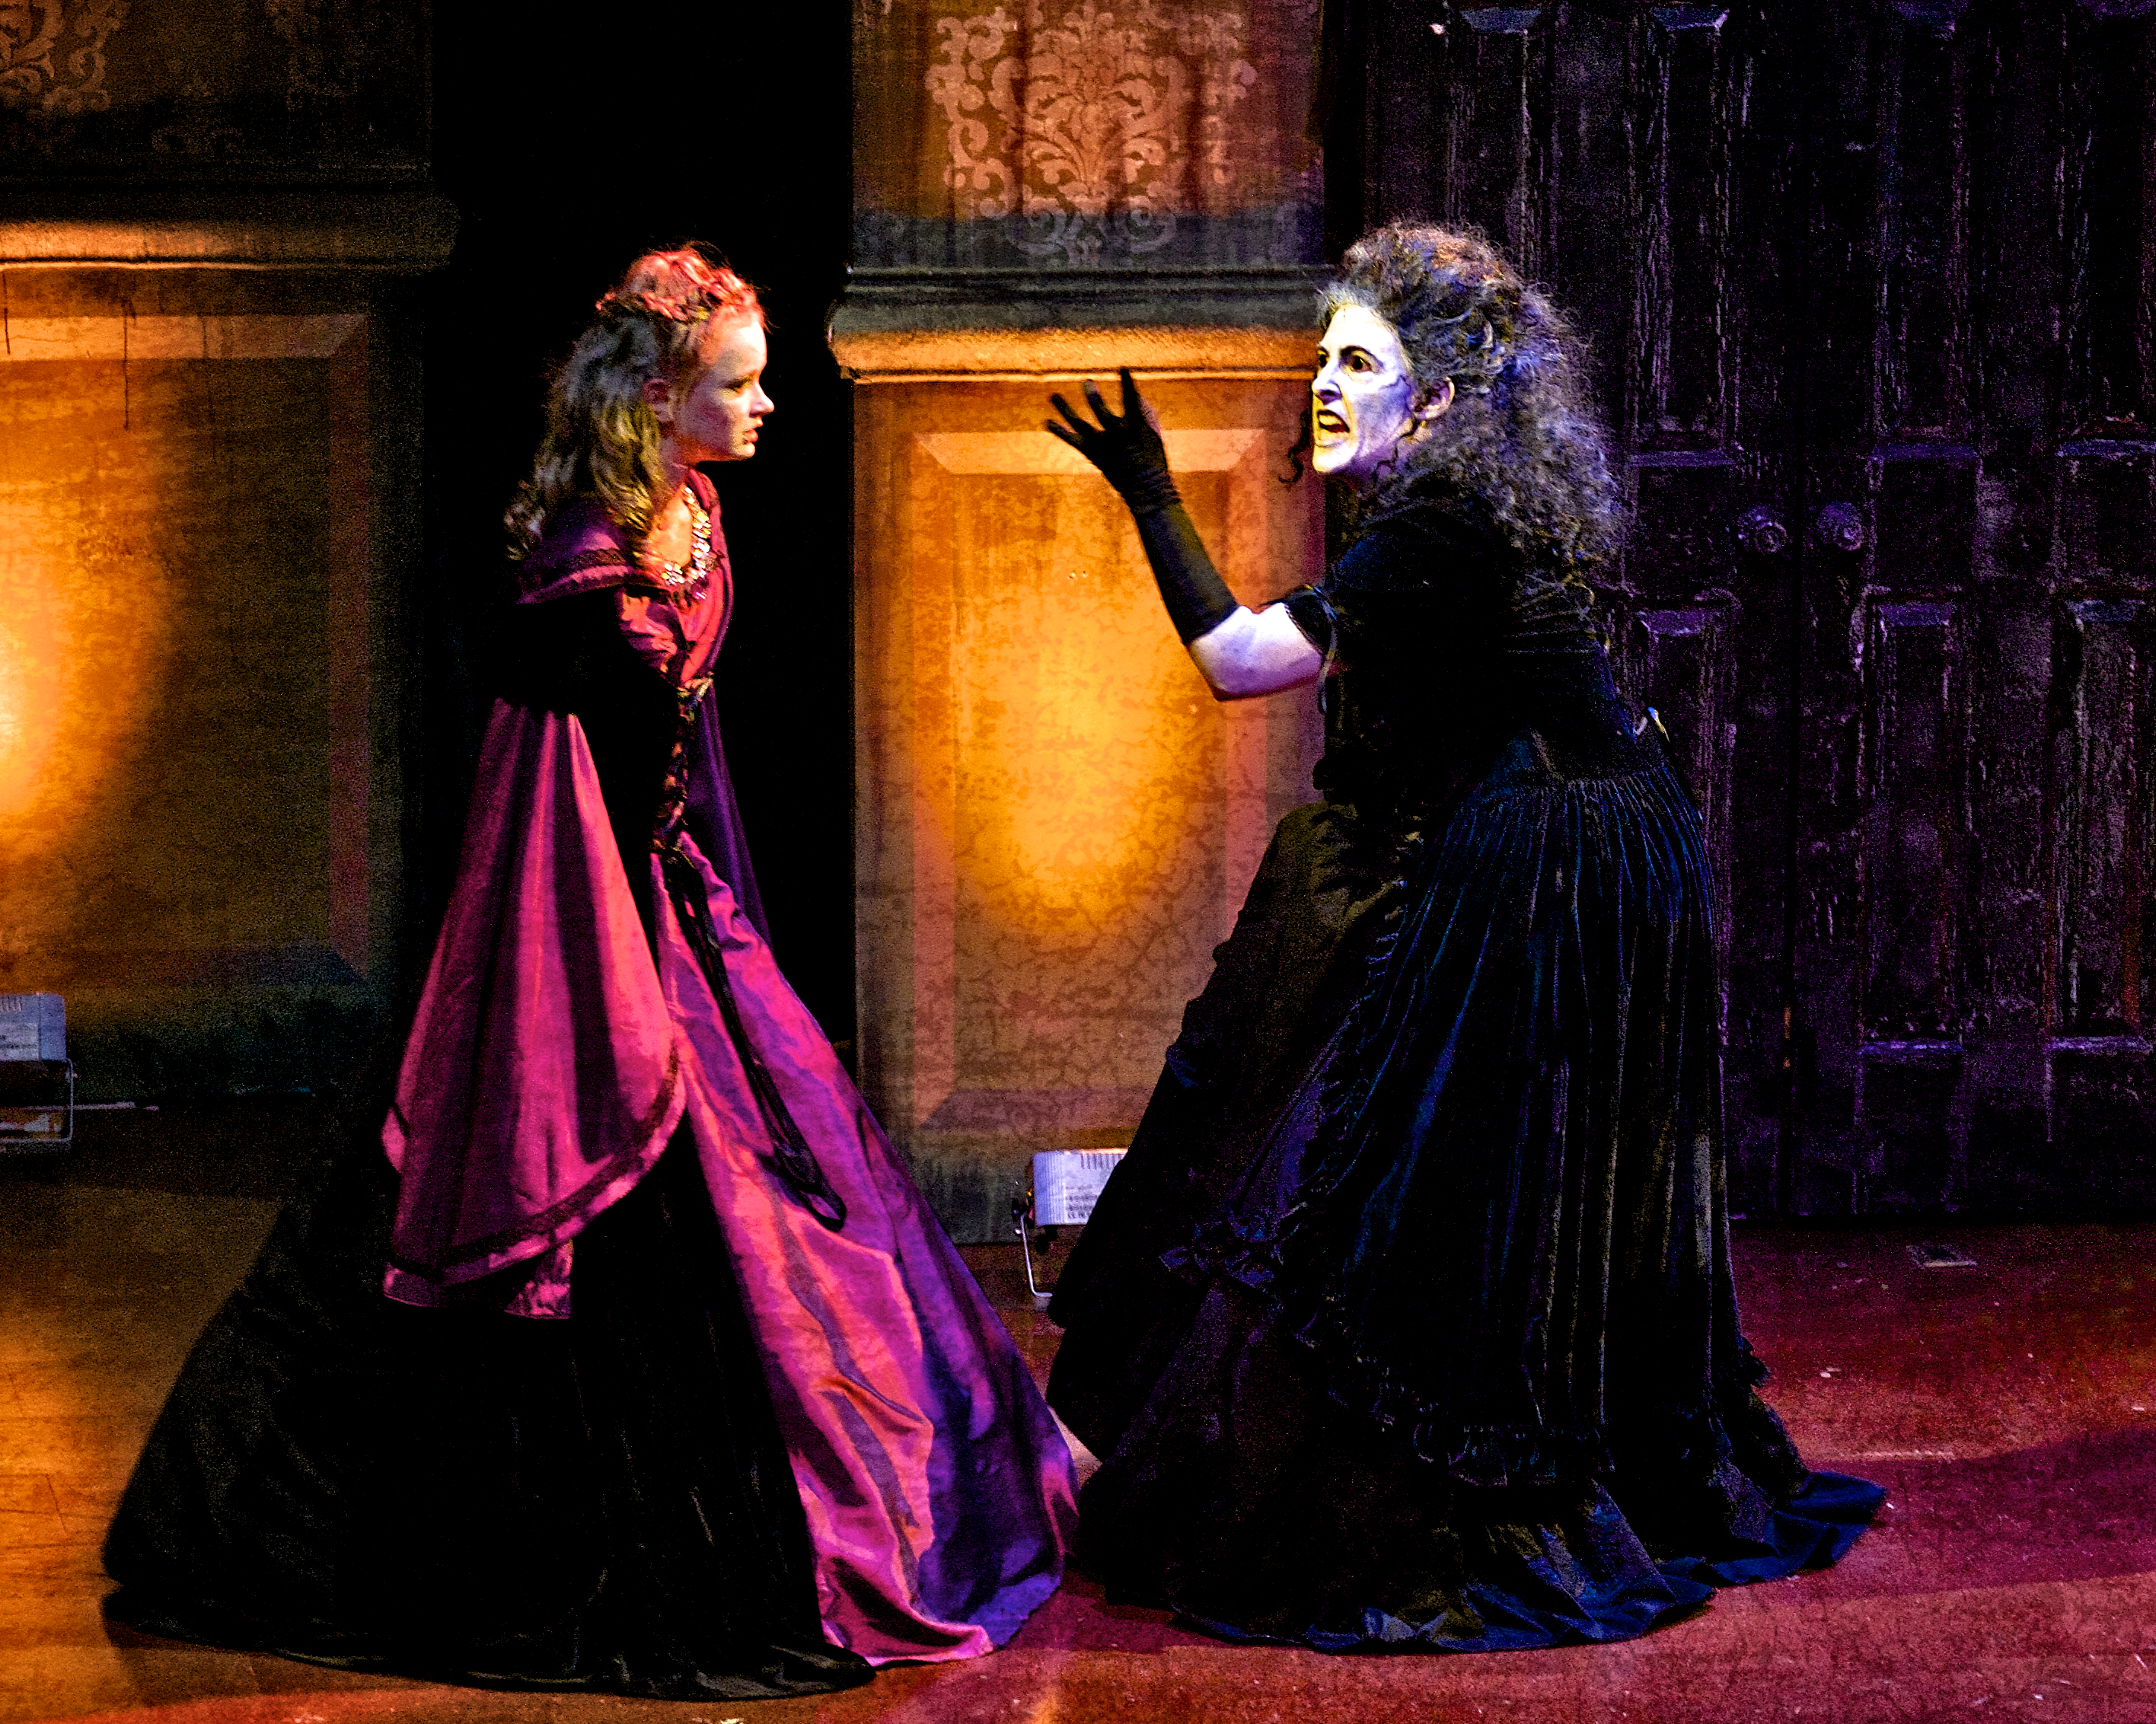
Beatrix gives Rosalinde (Baylee Martin) her opinion on Hansel and Gretel’s fate.
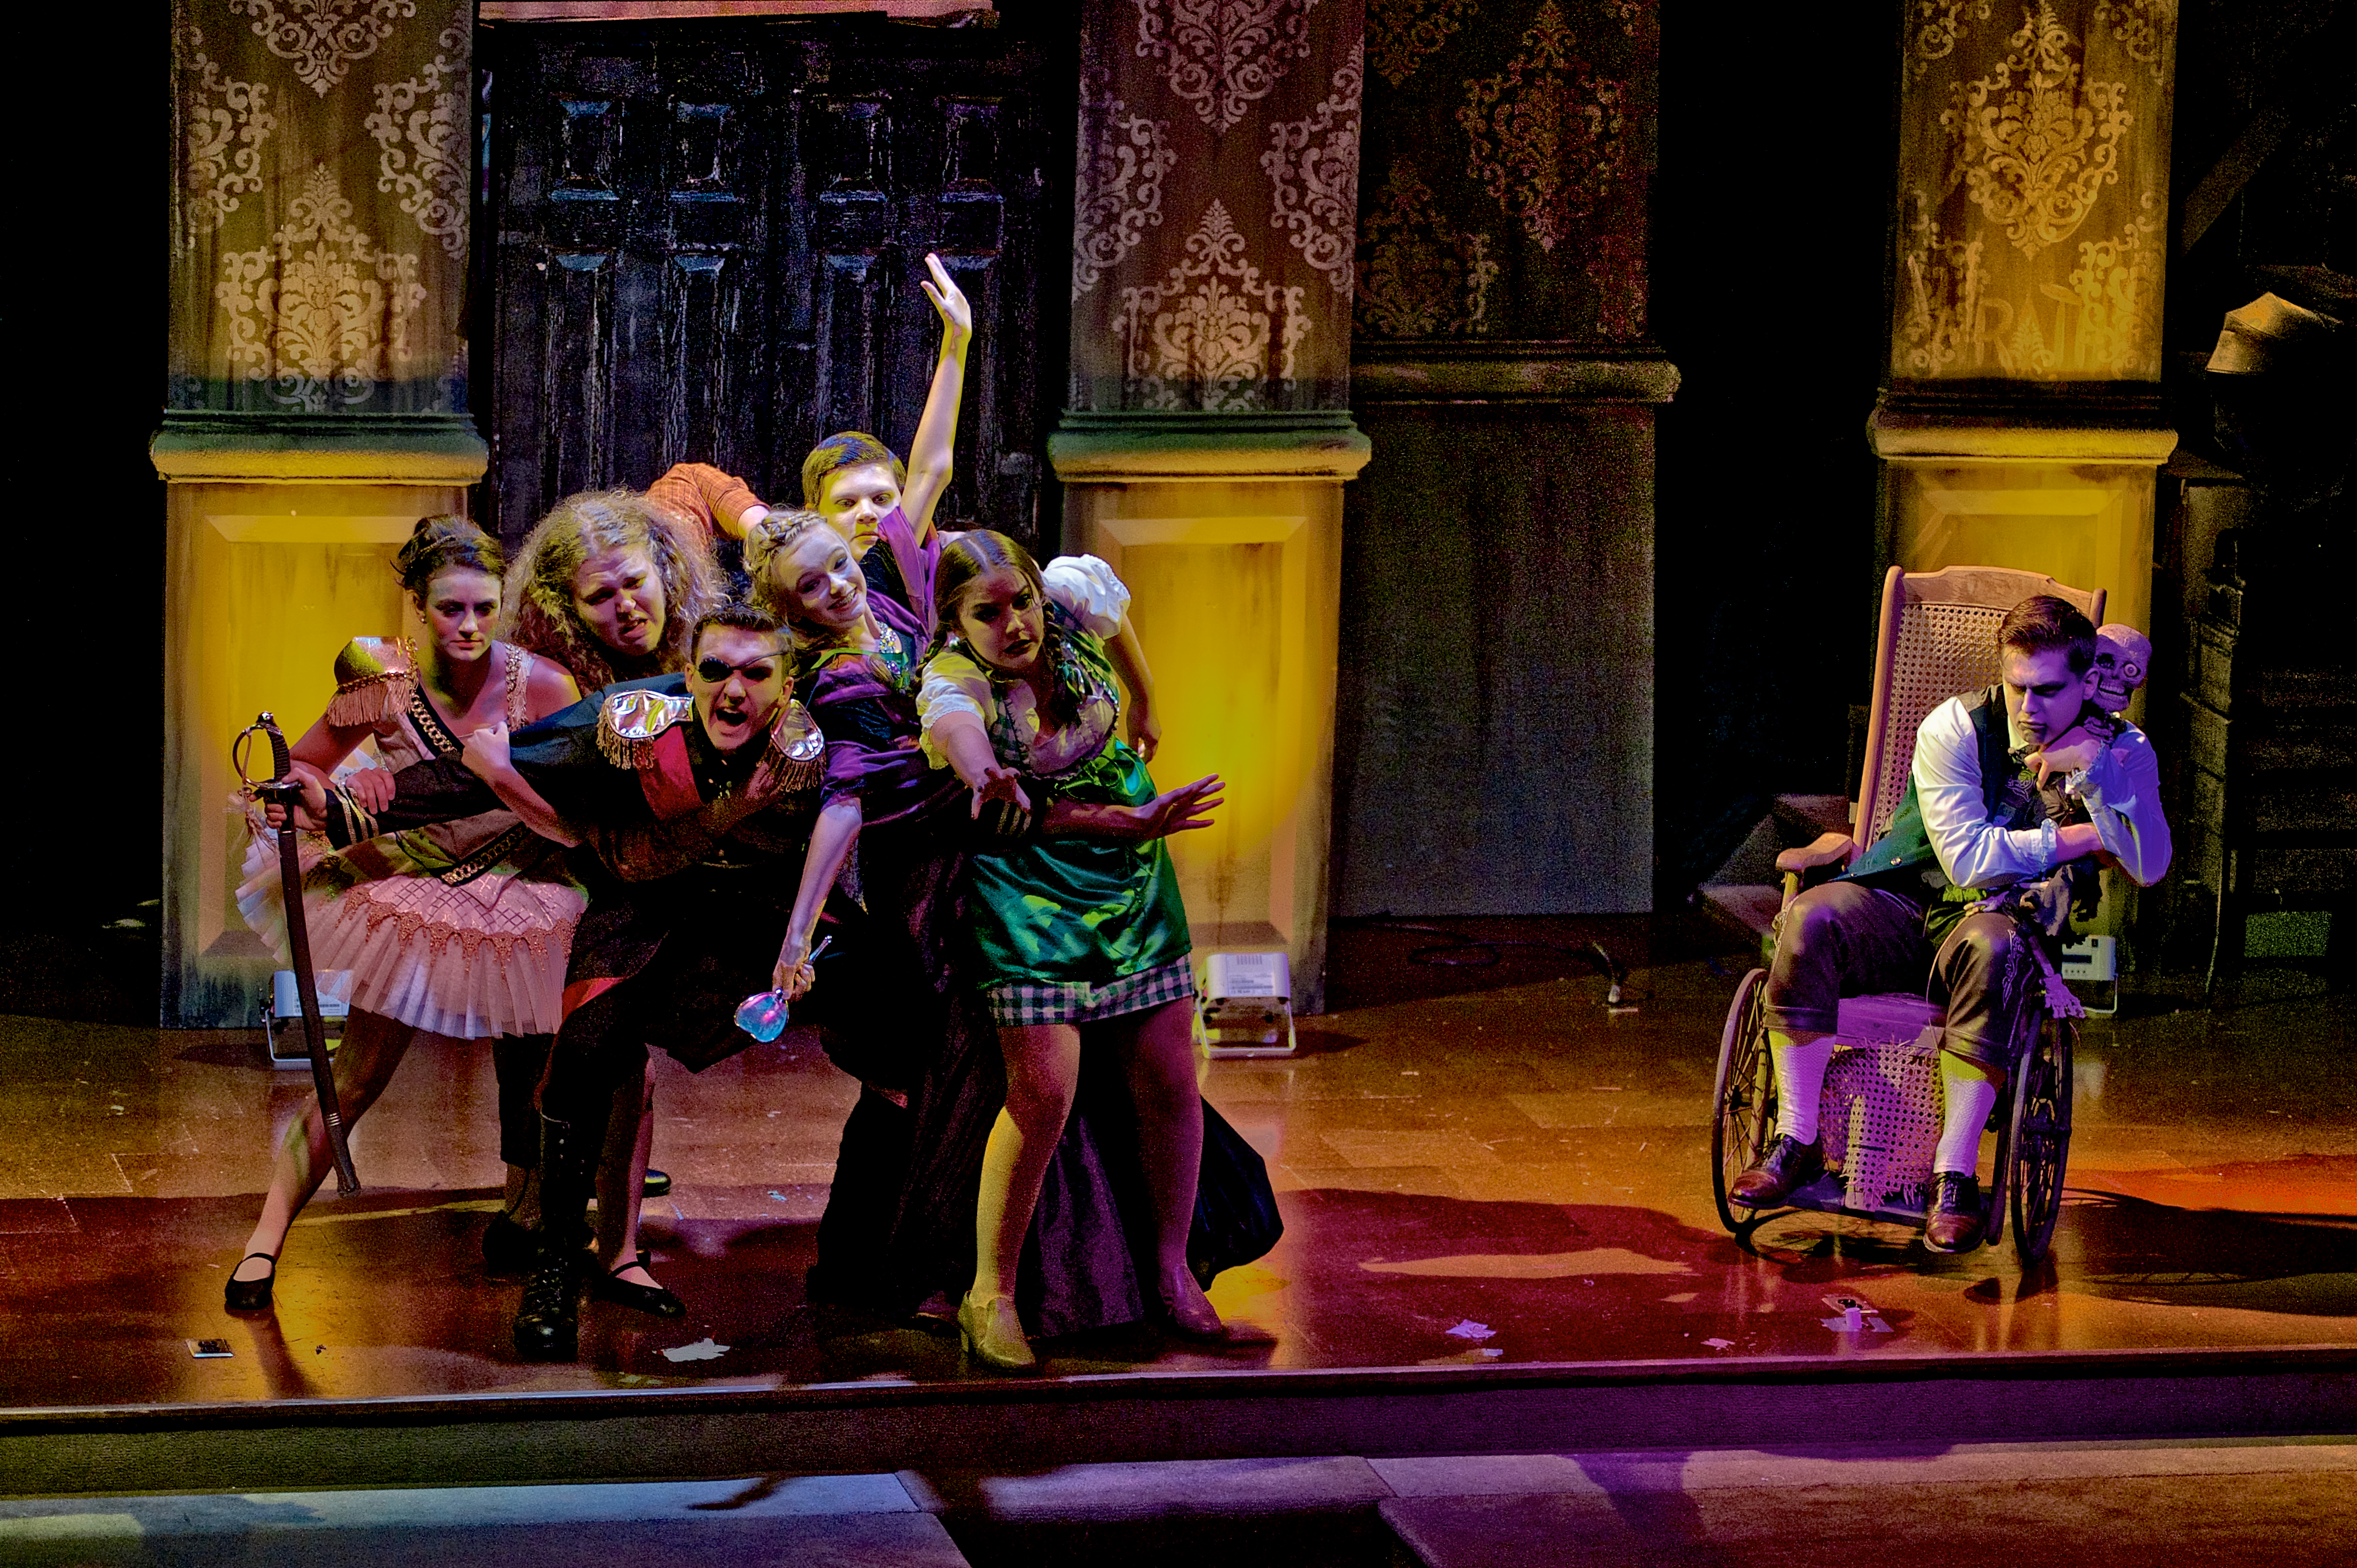
The clan of witches decide the fate of Beatrix. Pictured are: Sami Matthews (Petra); Adam Lucas (Udolf); Ethan Lawson (Admiral Theodoric); Rosalinde (Baylee Martin); Bastian (Micah Simmons); Yvonne (Lana Percell); and Klaus/Felix (Jordan Nickles)
Junior Theatre Festival 2014 Sets a Positive Example
Unless you are involved in community theatre or work with children’s theatre programs (or theatre period) you’ve probably never heard of Music Theatre International (MTI) or the Junior Theatre Festival. MTI was founded in 1952 by composer Frank Loesser (Guys and Dolls) and orchestrator Don Walker (Carousel, Fiddler on the Roof) and is the industry leader in theatrical licensing. In other words, this is who you contact if you want to do a musical that is in their library. You pay a licensing fee to put on the performance.
The Junior Theatre Festival (JTF) started in 2003 and was created by Nick Manos, who dedicates his time to the planning and expansion of the annual festival, and Timothy Allen McDonald, CEO and founder of iTheatrics. Mr. Manos and Mr. McDonald were inspired by the enthusiasm and excitement of the kids who participate in musical theatre and felt there should be an arena where the kids could showcase their talents and learn from each other.
The Junior Theatre Festival in 2003 was attended by approximately 650 kids. In 2014 the participation at this event was over 4,000! For the statisticians in the group, that is a 515% increase in an 11 year period! As it is stated in Mr. Manos bio, “the excitement of those kids was palpable and infectious” at this event!

This was the first time I had the pleasure of attending the JTF. I attended as a photographer for one of our local writers, Joseph Pratt, who wanted to cover the event. One of the adjudicators asked me what I thought of it. I replied, “In one word, energy!” There was so much energy the entire weekend. Not just with the kids, but the workers as well. All involved with the JTF deserve a big round of applause for all they do. I felt welcome by all and it was truly a “family” feel.
The CEO of MTI, Freddie Gershon and his wife Myrna were in attendance at all of the events. They, too, were very cordial and welcomed all of the guests as if they were welcoming them into their own home. The weekend is non-stop from performances by each of the groups participating in the festival to the finale of Broadway stars performing on stage.

The entire weekend is a very positive and uplifting experience. Every review the adjudicators gave came across positive and encouraging. Author, Tim Federle (Five, Six, Seven, Nate!), was one of the adjudicators. He would go through a routine with the performers and show them how to make it better. I do not believe I heard any negative comments from the adjudicators. They were there to educate and show the kids how to improve. It was very inspiring to see and hear the encouragement the kids received.
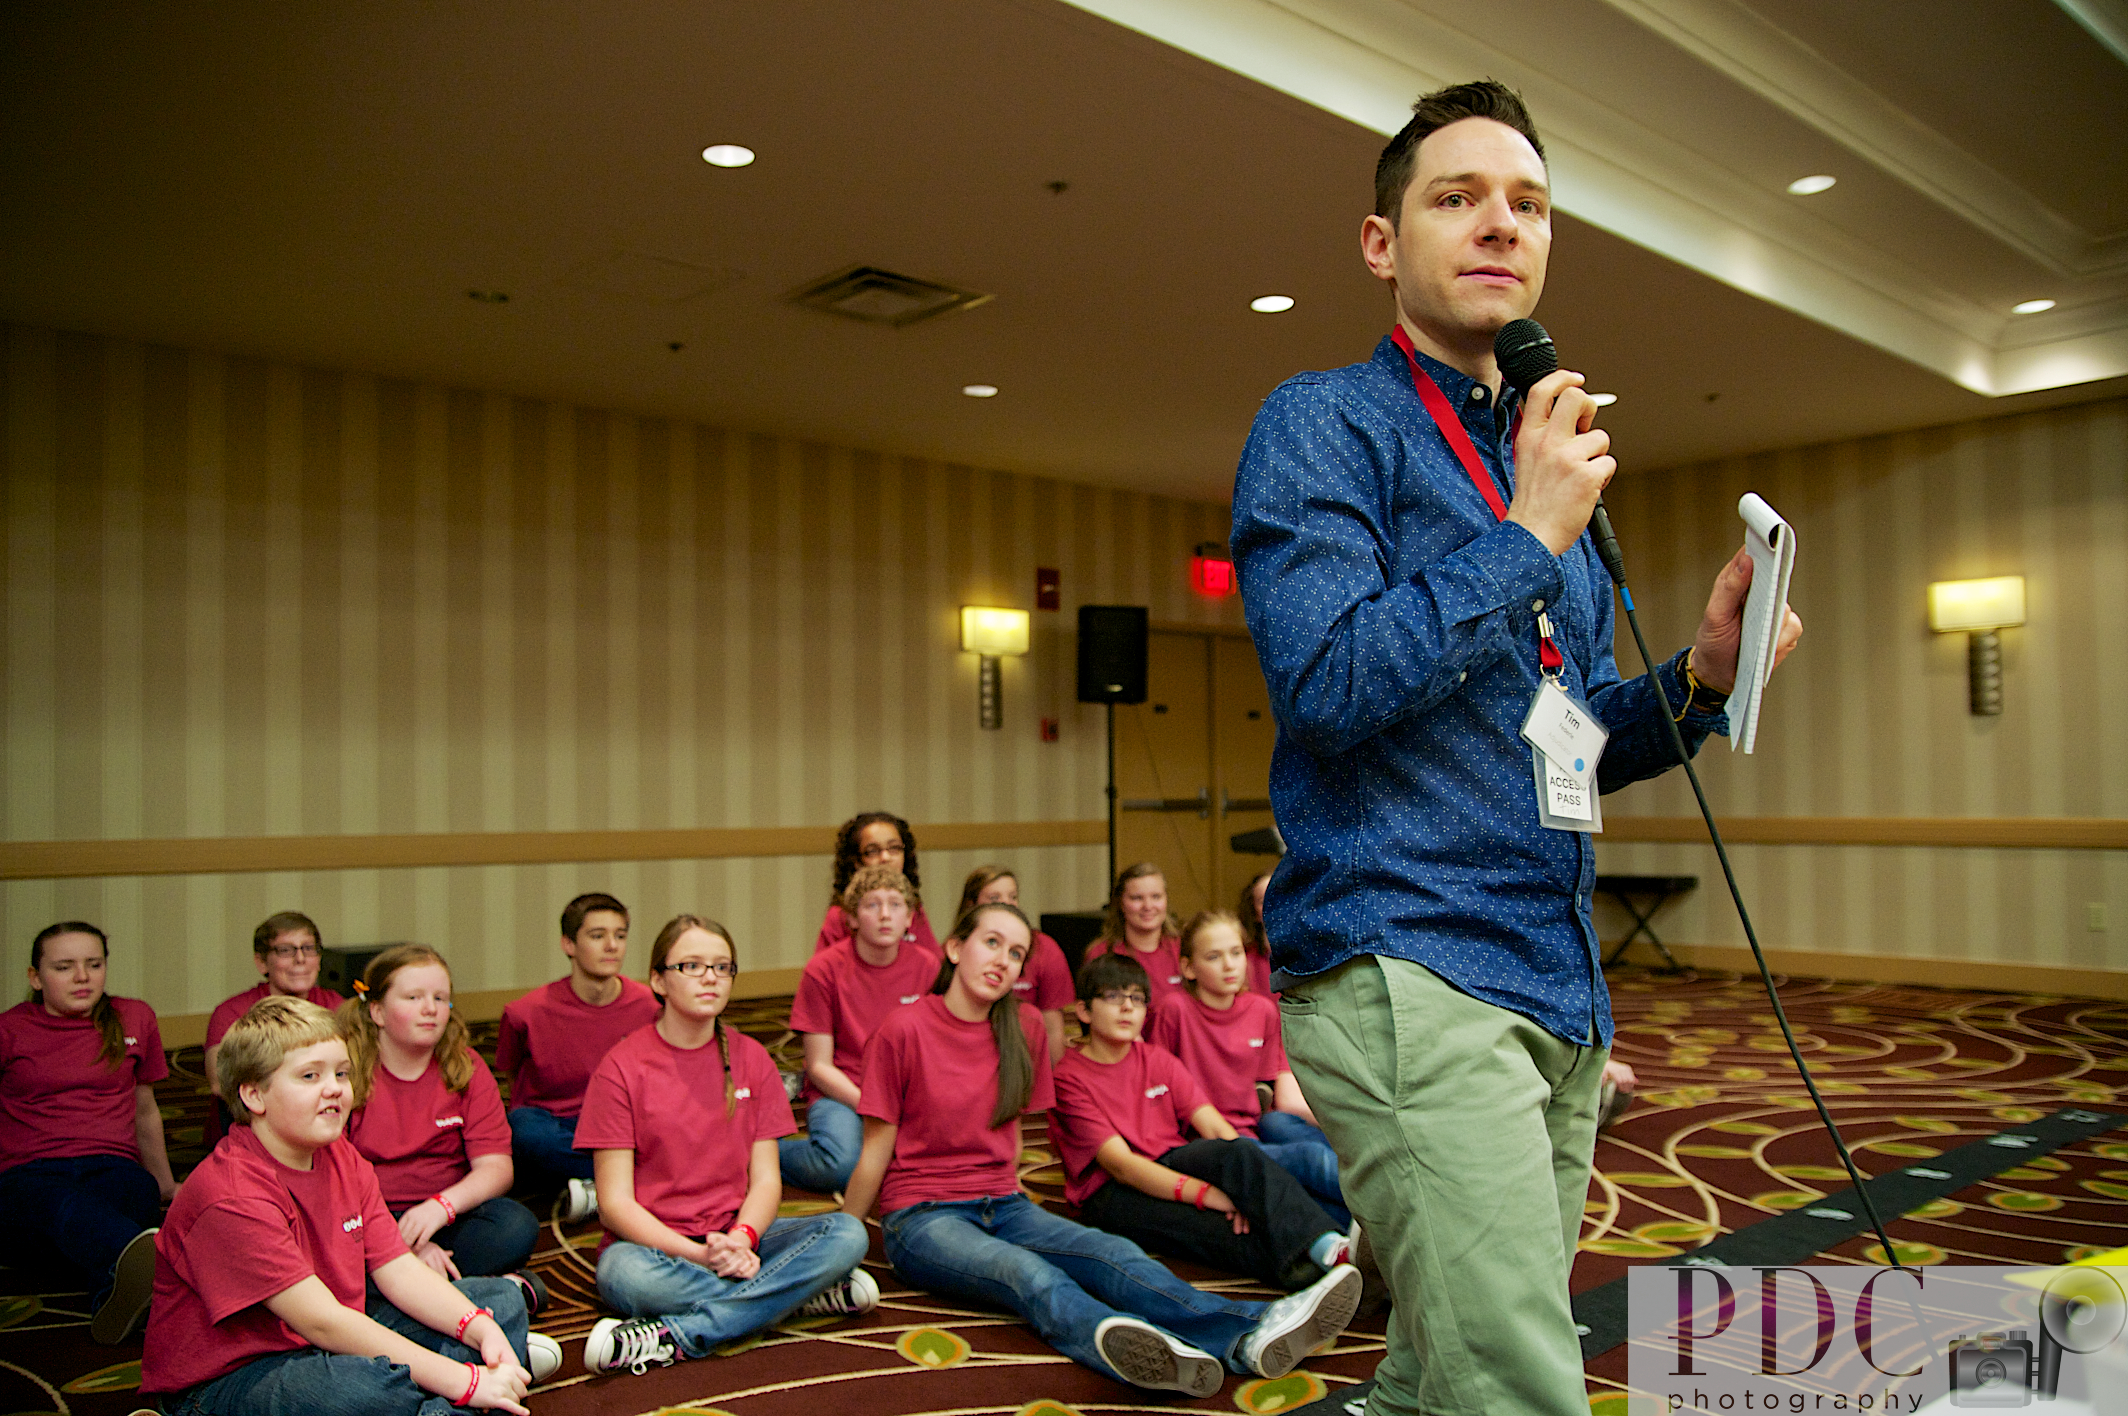
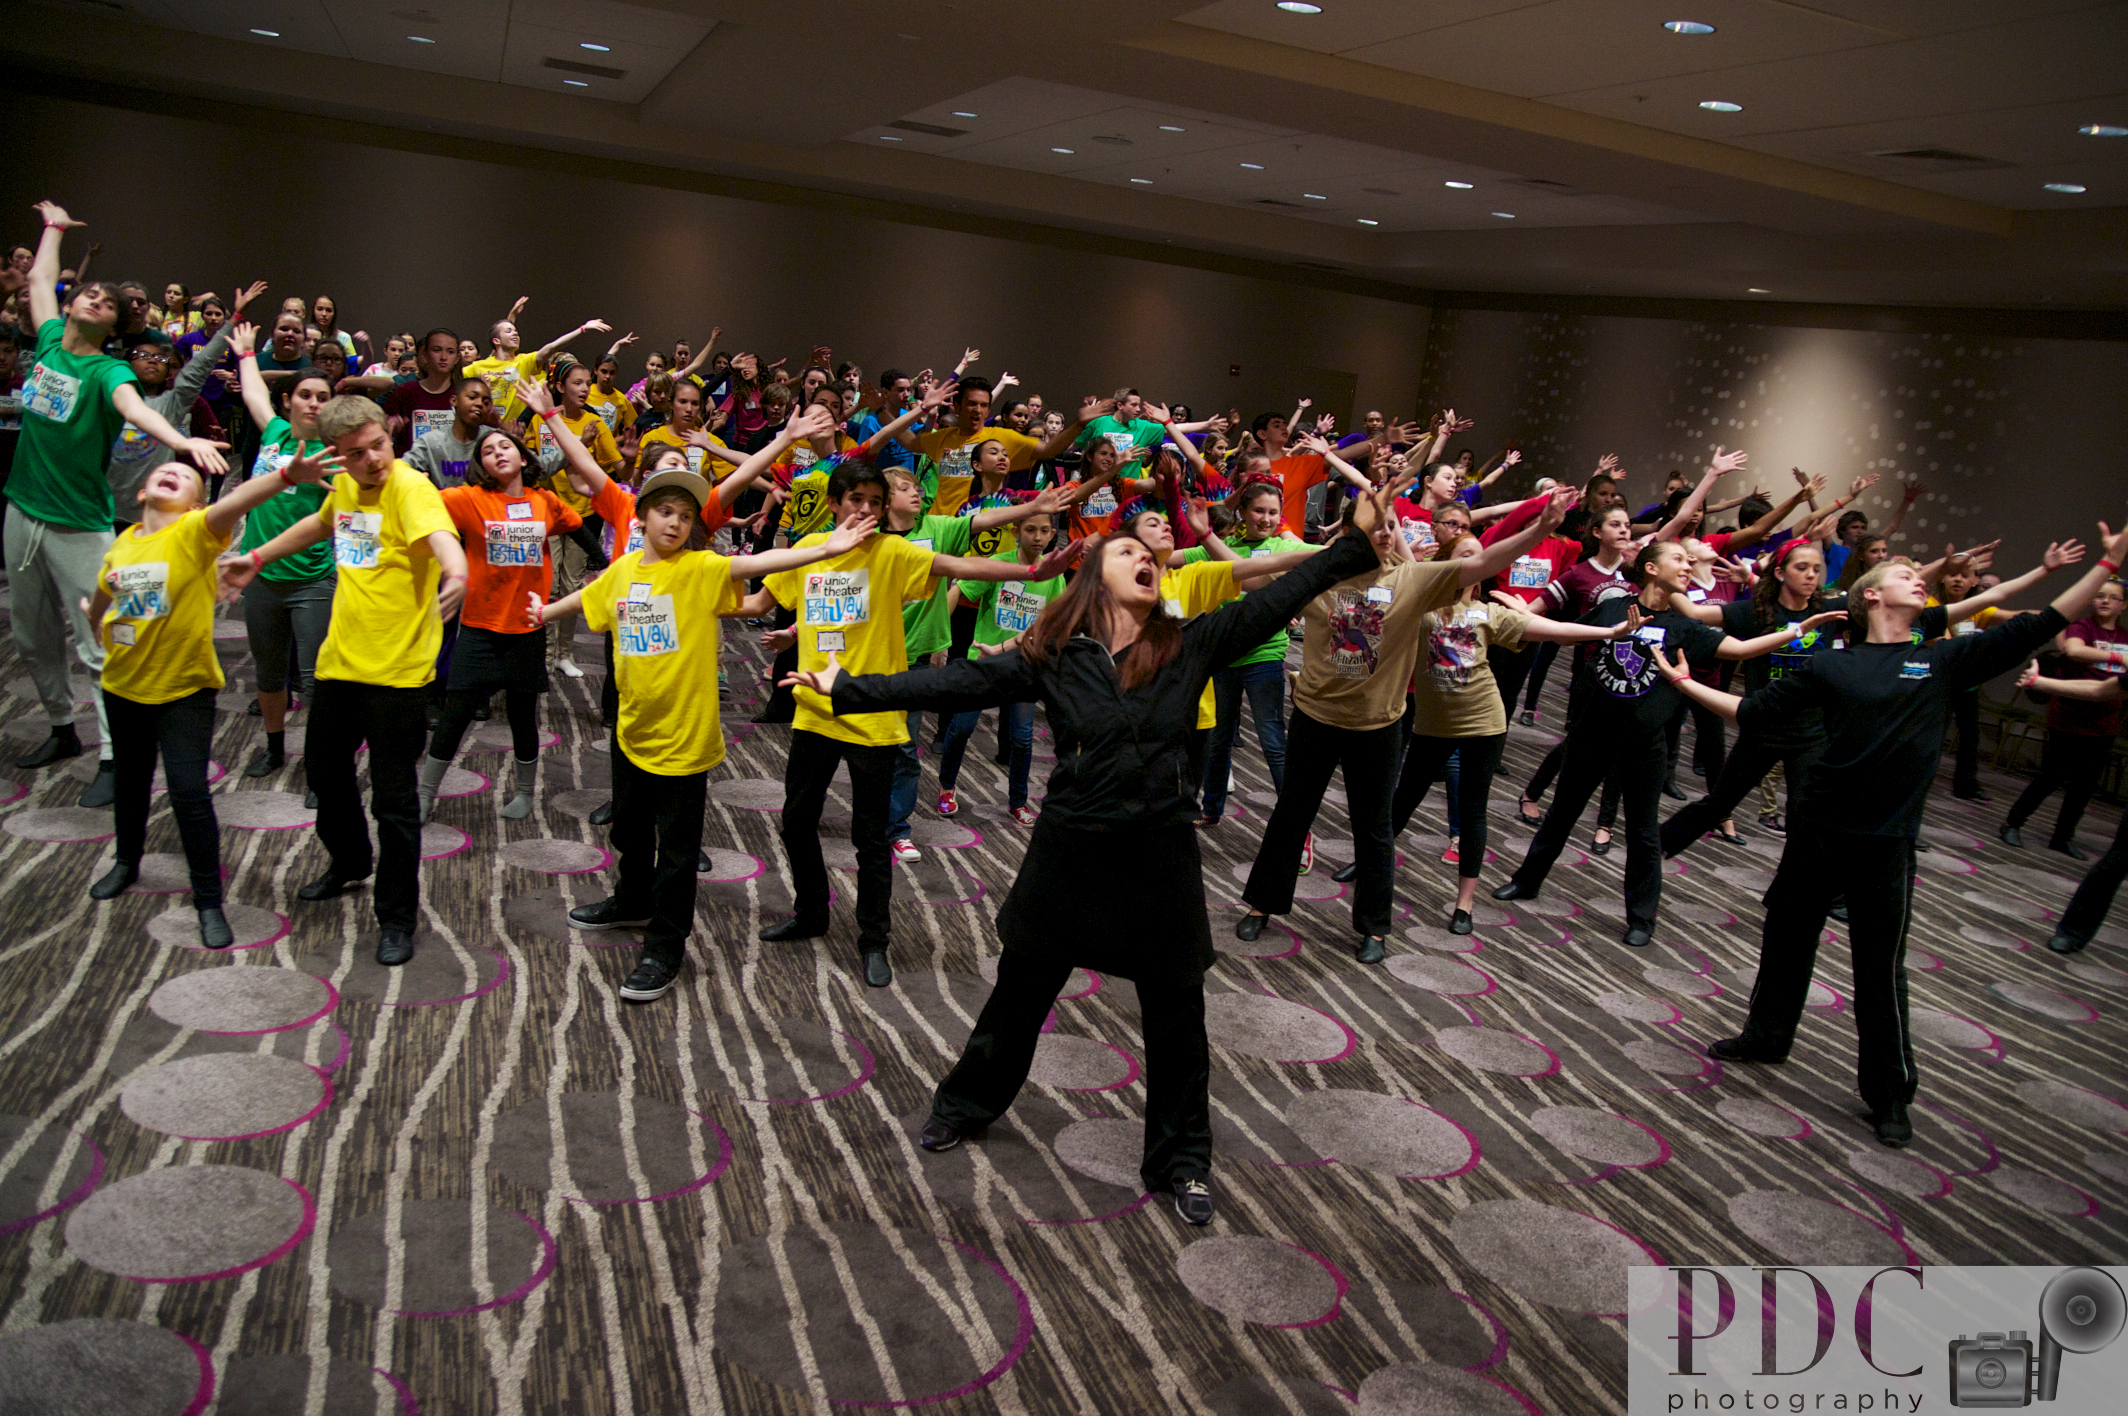
During the adjudication process, kids were selected to receive a “golden ticket” which granted them the privilege to audition for the JTF video. This is a BIG DEAL for the kids. Out of the 4,000 who attended only 300 received the precious “golden ticket”. I had the privilege to sit in and photograph the “closed” audition. It was an awesome experience to see and hear 300 talented kids from 26 states sing in harmony and dance to an impromptu choreographed piece to put their skills to the test.
The group gathered into a room where they were each given a number; then they were split up. Half went with the choreographers, Steven G. Kennedy, Kelby McIntyre-Martinez, and previous video participant Ben Sears (there was no one in the group who did not know who he was!) and the other half stayed and learned the musical number, “Good Morning” from “Singin’ in the Rain”.
Kennedy kept emphasizing to the kids, “You need to stay focused. On Broadway you are given 15 mins to learn a routine. The key is focus.”


The poise and professionalism that each of the staff members showed was phenomenal. I cannot recall the last time I was at a conference or convention where the energy and excitement carried through the entire event and even during the “social” time. The lounge area was buzzing with energy during the after hours time. The staff and adjudicators were approachable and took the time to engage in conversation and answer questions. Often times they would address me by name (I did not have on a name tag), which is impressive considering the number of people they encountered during the weekend.
The New Works Showcase is an opportunity for theatrical groups to put on a live performance of one of the Junior Theatre shows. This year’s showcase was presented by Disney Musicals. To demonstrate the diversity of these groups, you had elementary, middle schools, and community theatre groups showcasing hits like, Legally Blonde, The Musical, Jr., Shrek, The Musical, Jr., Magic Tree House Collection: The Knight at Dawn Kids, 101 Dalmatians Kids, and Mary Poppins. Each of these groups did an outstanding job!


The weekend finale was Disney Theatrical Productions, Broadway and Beyond: An Evening With the Stars of Broadway. The show included hit songs from the Disney musicals, Beauty and the Beast, The Lion King, AIDA, Tarzan, Mary Poppins, and The Little Mermaid. The performance also introduced the audience to other songs from the productions of Newsies, Peter and the Starcatcher, King David, and Aladdin (which opens on Broadway in March). The stars of the show were Heidi Blickenstaff (Ursula, of The Little Mermaid); Ashley Brown (Mary Poppins); Merle Dandridge (Aida); Josh Strickland (Tarzan); and Alton Fitzgerald White (Mufasa of The Lion King). Again, the energy in their performances was strong. They carried the emotion through each verse from humor to sadness. The expressions in their faces and their body language enhanced performance of each song.
The highlight of the show was when Strickland came into the audience singing “She’s In Love” from The Little Mermaid. You could hear a collective sigh from the audience and all of the kids came rushing to the front of the stage to get close to him. He sang to one of the girls in our group from Portsmouth, Ohio. Ironically, it was the same song she sang in the performance the Portsmouth group did for the adjudication process. How cool is that?

All in all the weekend is a great learning experience for these young actors and actresses. For me the take away was maintaining a positive attitude and encourage, not discourage these young performers. The JTF is a positive way for kids to express themselves and to receive inspiration from the pros. What a great opportunity this is!
Here are a couple more pictures from the Broadway and Beyond performances:

Alton Fitzgerald White and Merle Dandridge

Ashley Brown

Heidi Blickenstaff
The Adventure: Days 7 – 10 (I Think!)
Time flies when you are on vacation time! We’ve seen much and have put 2800+ miles under our butts! I think this will go down as a “scouting” trip as there are places I passed that I really need to go back to…yes, need to!
I made it to Douglas Wyoming by gosh! I will have to say going through Wyoming is akin to going through Kansas. Mile after mile of field and rock. We have yet to see a buffalo! But we continue to say that the buffalo are disguised as cows, rocks and even the occasional tree…at one point I could have swore one was hiding out in an oil well costume! We’ve had to try to be creative, can’t you tell! It was a long drive across Wyoming. We finally made it to Colorado Springs, I believe, on Saturday.
My uncle Max has been a long time Colorado resident. He lived in Aurora for many years, in an apartment without modern conveniences like a phone. He always used the pay phone down the hall to make calls. When he retired he purchased his girlfriend’s brother’s property in Deer Trail, Colorado…he had to have utilities and when he went to connect his phone he was asked when he had a phone last…in the 1950’s when he lived in Illinois! Fast forward to the present…my uncle Max is 95 years old and his girlfriend Lela is 98. They live in assisted living apartments down the hall from one and other. I was able to spend time with uncle Max. He is still sharp as a tack mentally and so is Lela.

This is my favorite photo of uncle Max. He is smiling; I’ve never photographed him smiling!
While in Colorado Springs, my daughter and I went up to the Garden of the Gods and did a few senior photos. I did not feel well that day. Between the heat and the altitude I think they got the better of me. I always like going to the Garden of the Gods. I would like to visit it in late spring or fall when it is not so hot out.
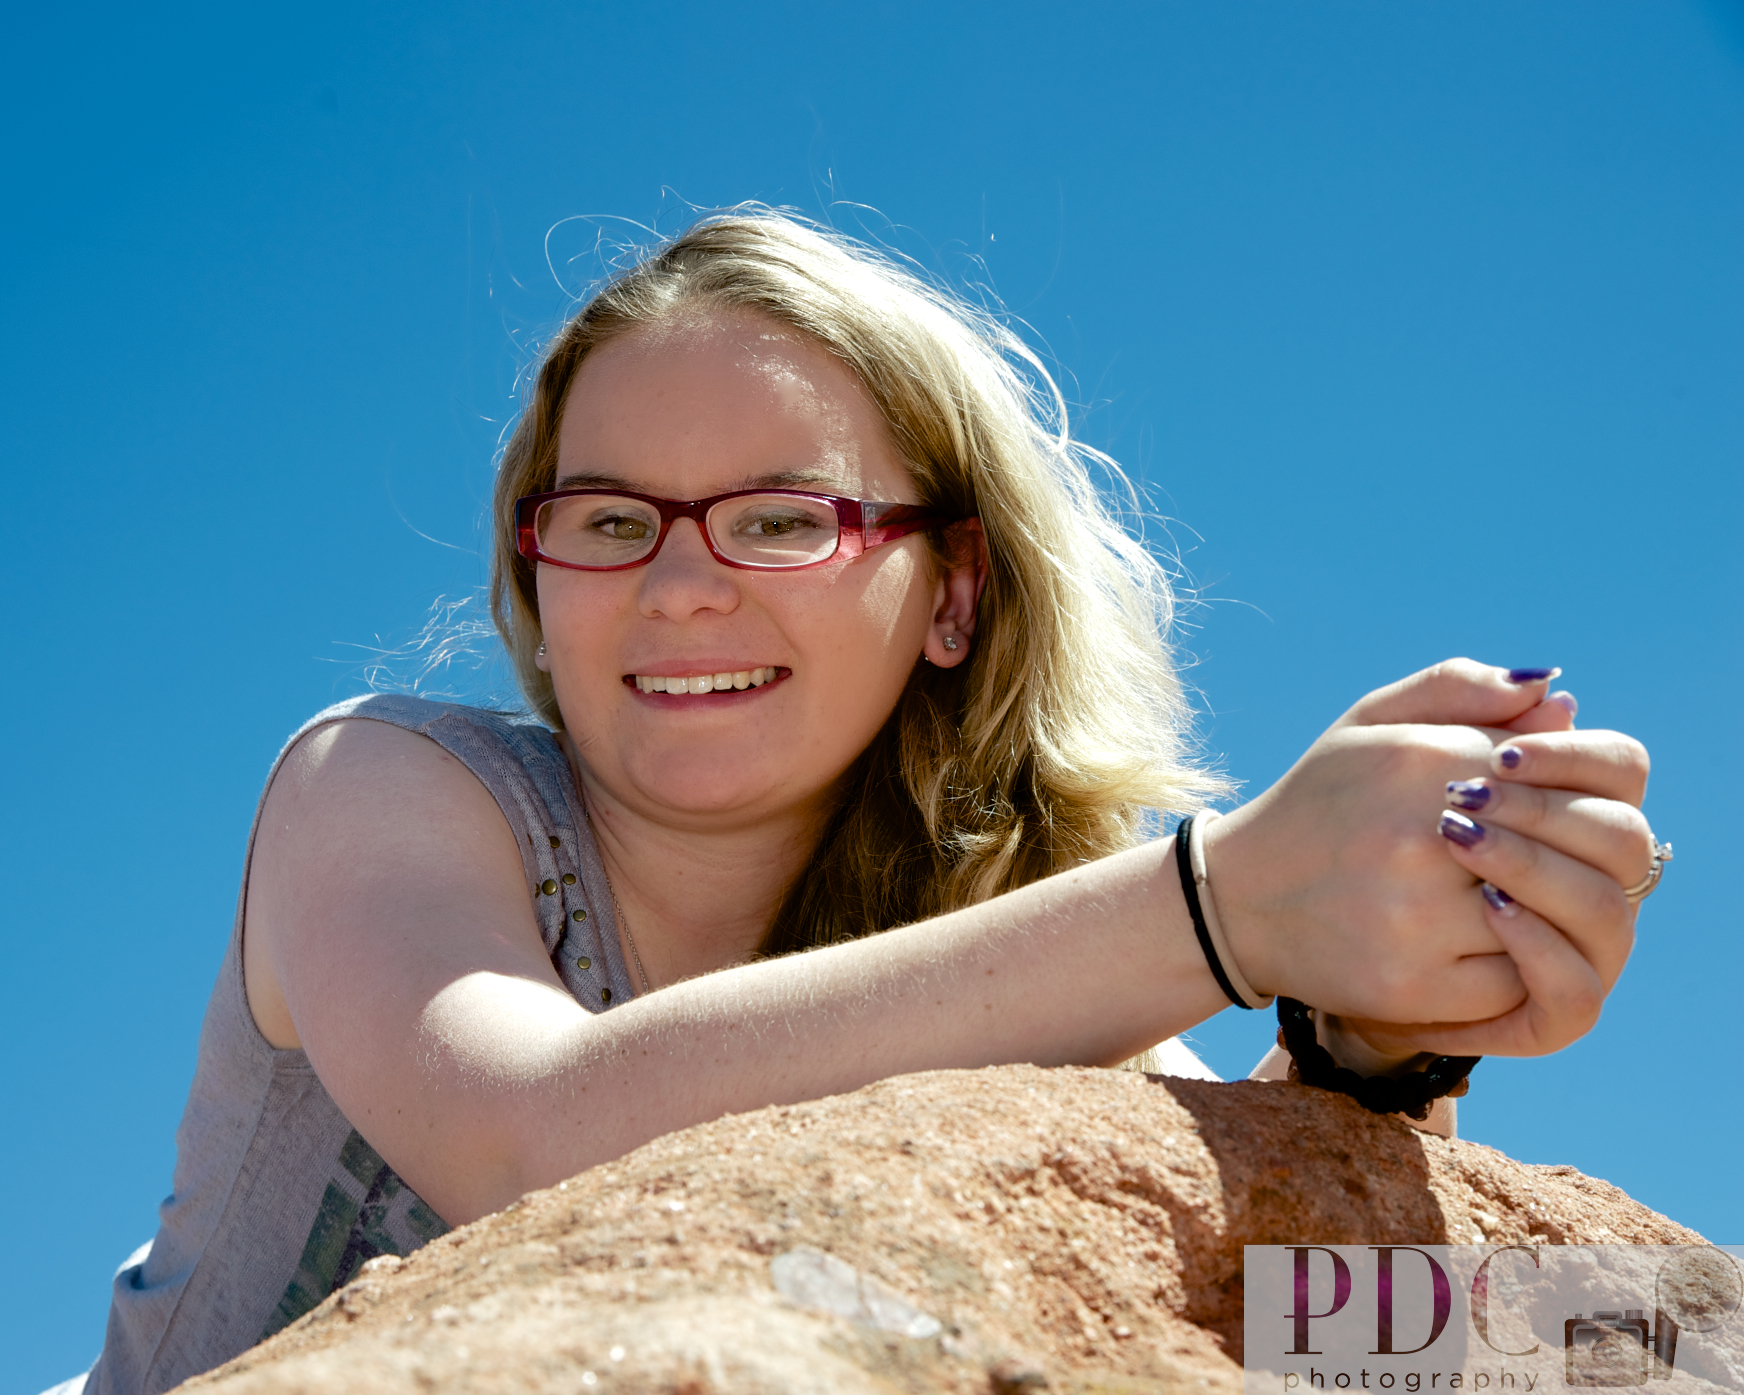
Libby laying on top of a rock at Garden of the Gods
Monday was a travel day. I decided to go half way to Flagstaff Arizona, stopping in Cortez Colorado. We stopped in Alamosa County in Colorado and payed a visit to the Sand Dunes National Park. I am so glad I purchased a park pass…it has more than paid for itself!

Sand Dunes National Park in Alamosa County Colorado
This was the first mountainous area I traveled through pulling the camper. Traveling Rt 160 while very picturesque, I was not prepared for the 8000 feet in altitude and the ascent and descent that lasted 8 – 10 miles each way! What goes up must come down you know! I had to watch my temperature gauge as it crept up. I found if I lifted my foot off the gas it helped a great deal. It also made me nervous at times when the engine revved to over 5000 RPMs. I would back off again and still it did fine. I made it through the mountains…very carefully! I took it easy on my brakes too! My car has a “gear down” feature and all you do is push a button and it saves a great deal of braking! My one friend says I have a “jake brake” on my car. Whatever it is, it works very well!
We traveled on into Flagstaff today, stopping, of course at the Four Corners Monument.

I’m standing in four states at one time! 🙂
On our way to Flagstaff I saw a few interesting rock formations.
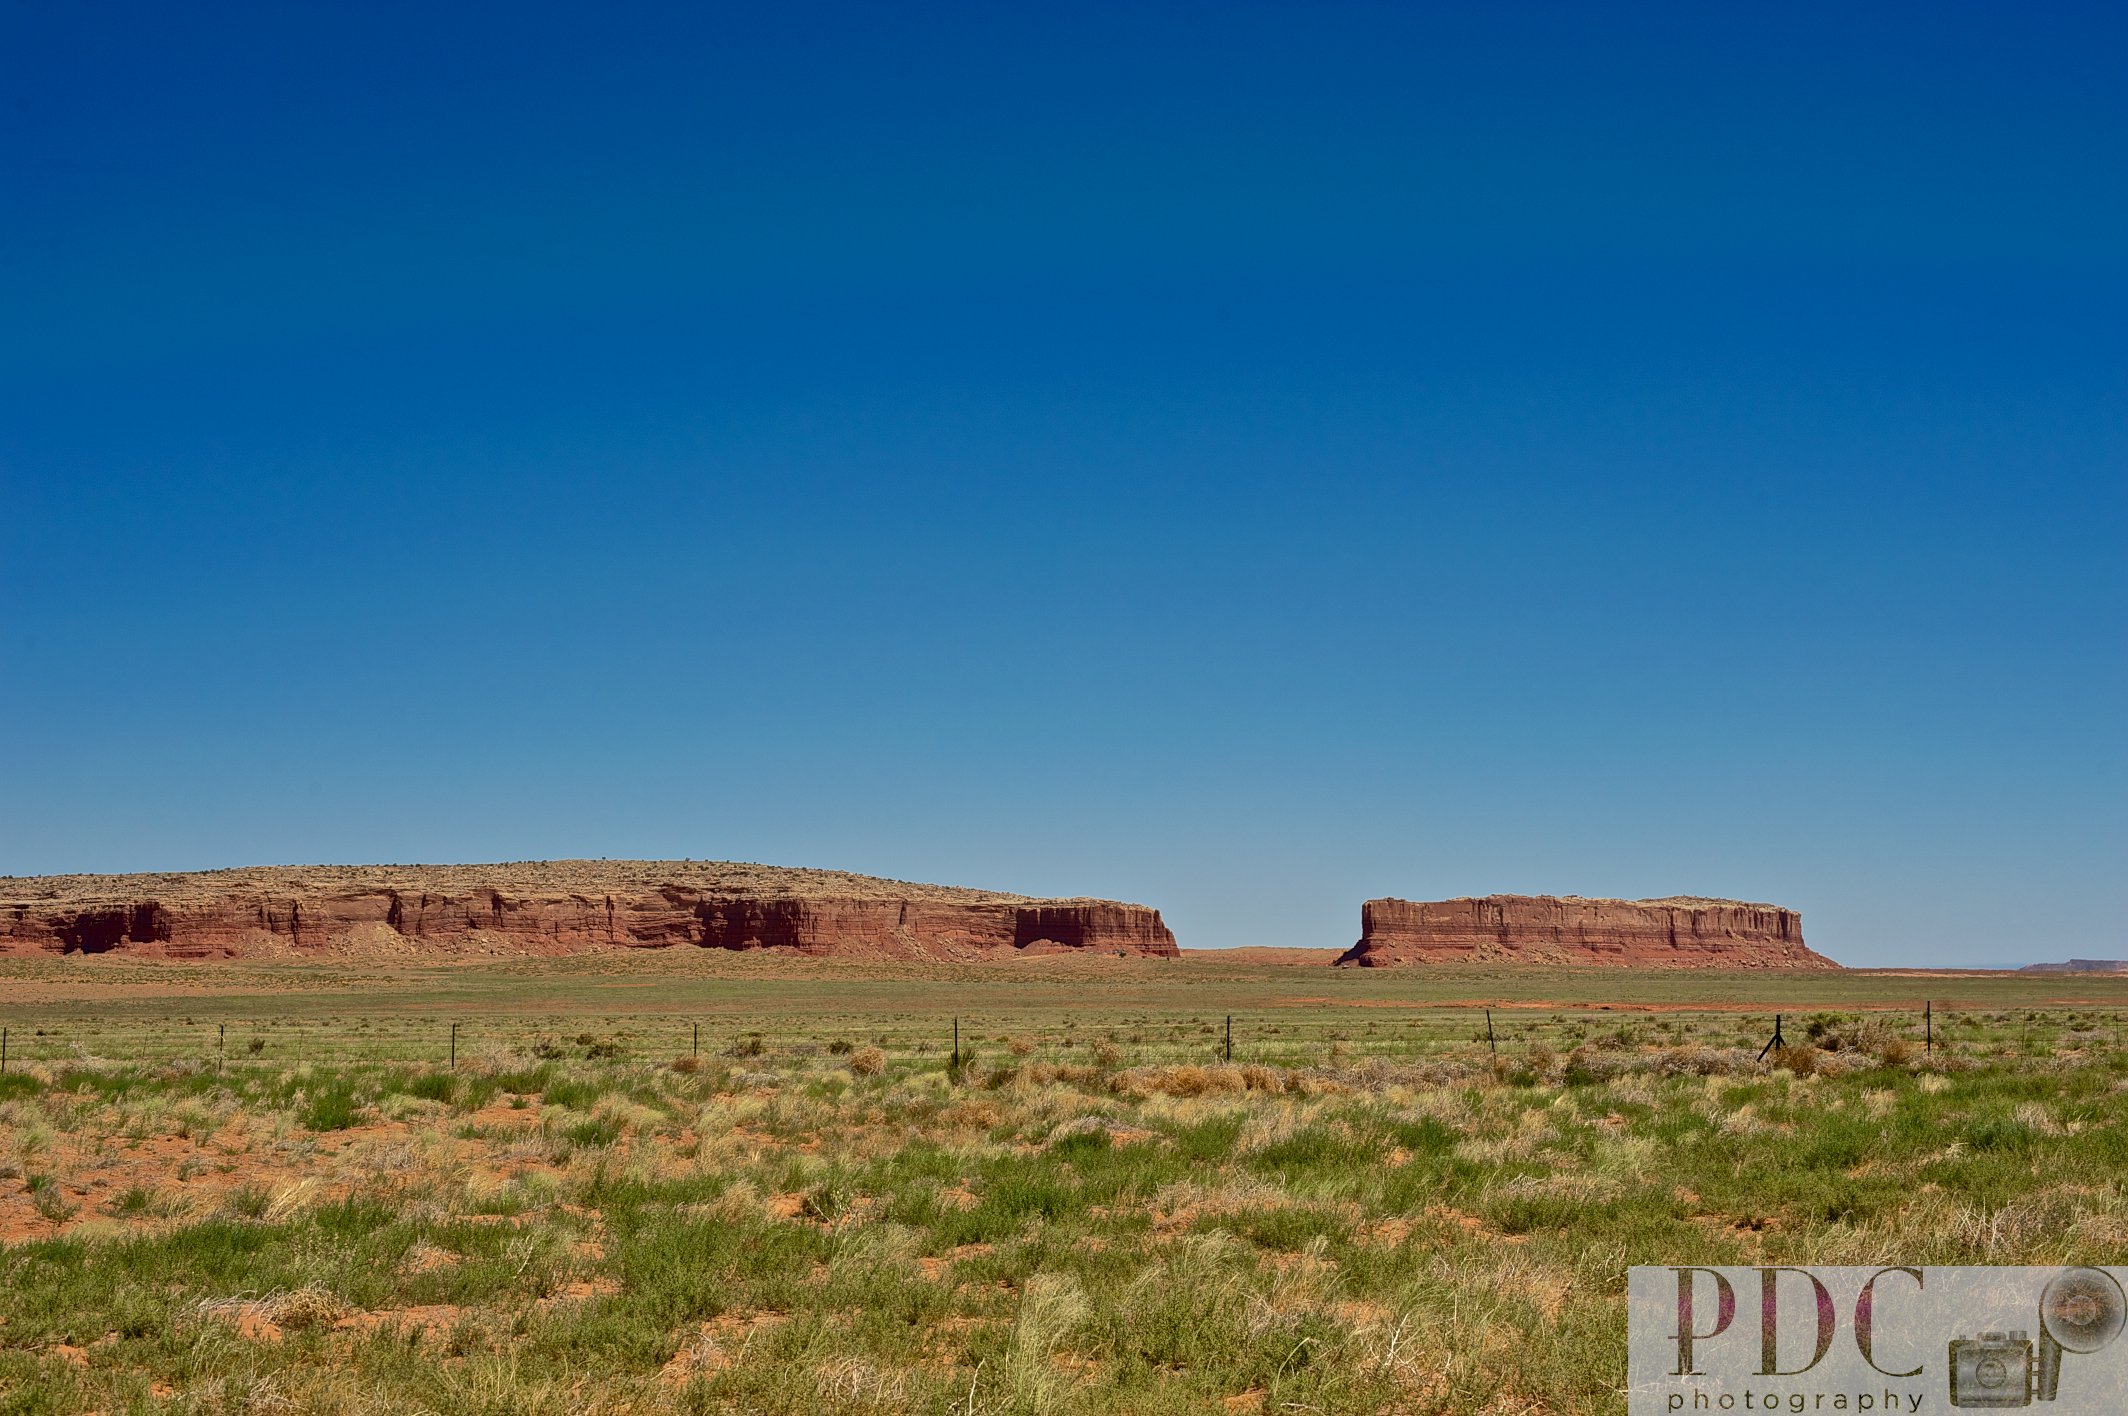
Along Rt 160 in Arizona

Another formation along Rt 160
For supper tonight I decided to use Yelp* to help me pick a place for dinner tonight. I chose the Crown Railroad Cafe. After circling the block a couple of times I figured I’d give it a try. The outside pretty plain except you see the nifty neon Restaurant sign on top of the building. The restaurant is attached to a Howard Johnson that is being remodeled and there are dumpsters in the parking lot. I figured what the heck! Yelp* gave it 4 1/2 stars. The place was very clean on the inside. Reminded me of Mel’s Diner on Alice. It had a model train circling the dinning room along the ceiling. The waitress recommended the burgers and what a treat! Loved it! I can hardly wait to try other local flavors while traveling the area and on the way home via Route 66!

If I was Guy Fieri I’d visit this place. A real Diner, Drive-in and Dive! Great Burgers!
Tomorrow is the Grand Canyon. I think I will travel there in the evening to catch the sunset. Such pretty colors I saw tonight!
Before PhotoShop

On my recent trip to the Antique Mall in Medina, Ohio I happened upon a couple of items and my curiosity got the best of me. The box and sleeve were marked Spiratone and one was a Vignetar and the other was a Center Sharp Focus. They were both marked 52mm and I thought out loud, “Those would fit my 50mm lens!” So for about $23 I purchased both items. Spiratone was a manufacturer of camera accessories from about 1946 to 1990. Many of the younger photographers have never used or seen these types of filters because Photoshop or other programs can provide these effects. Photography, back in the day (LOL), was much more, how would I say this, accessory dependent than what we are now. In the darkroom you would achieve vignetting by cutting piece of paper and shooting your light beam from your enlarger through it. You dodged and burned using cutouts of the image. If you were lucky you could purchase filters to give you the star effects and soft focus for portraits (I still have mine!).
Today, I decided to “play” with my newly found items. I had to experiment with the f/stop settings and found if I kept it mid-range or stopped down all the way the effects were much better. The Vignetar is adjustable and will give you a smaller or larger vignette. The Center Sharp Focus had its challenges. If I shortened my depth of field (smaller f/stop) I had much more blur within the center part of the photograph; it produced shadows and reflections. If I narrowed my depth of field (higher f/stop) it gave a much better effect.
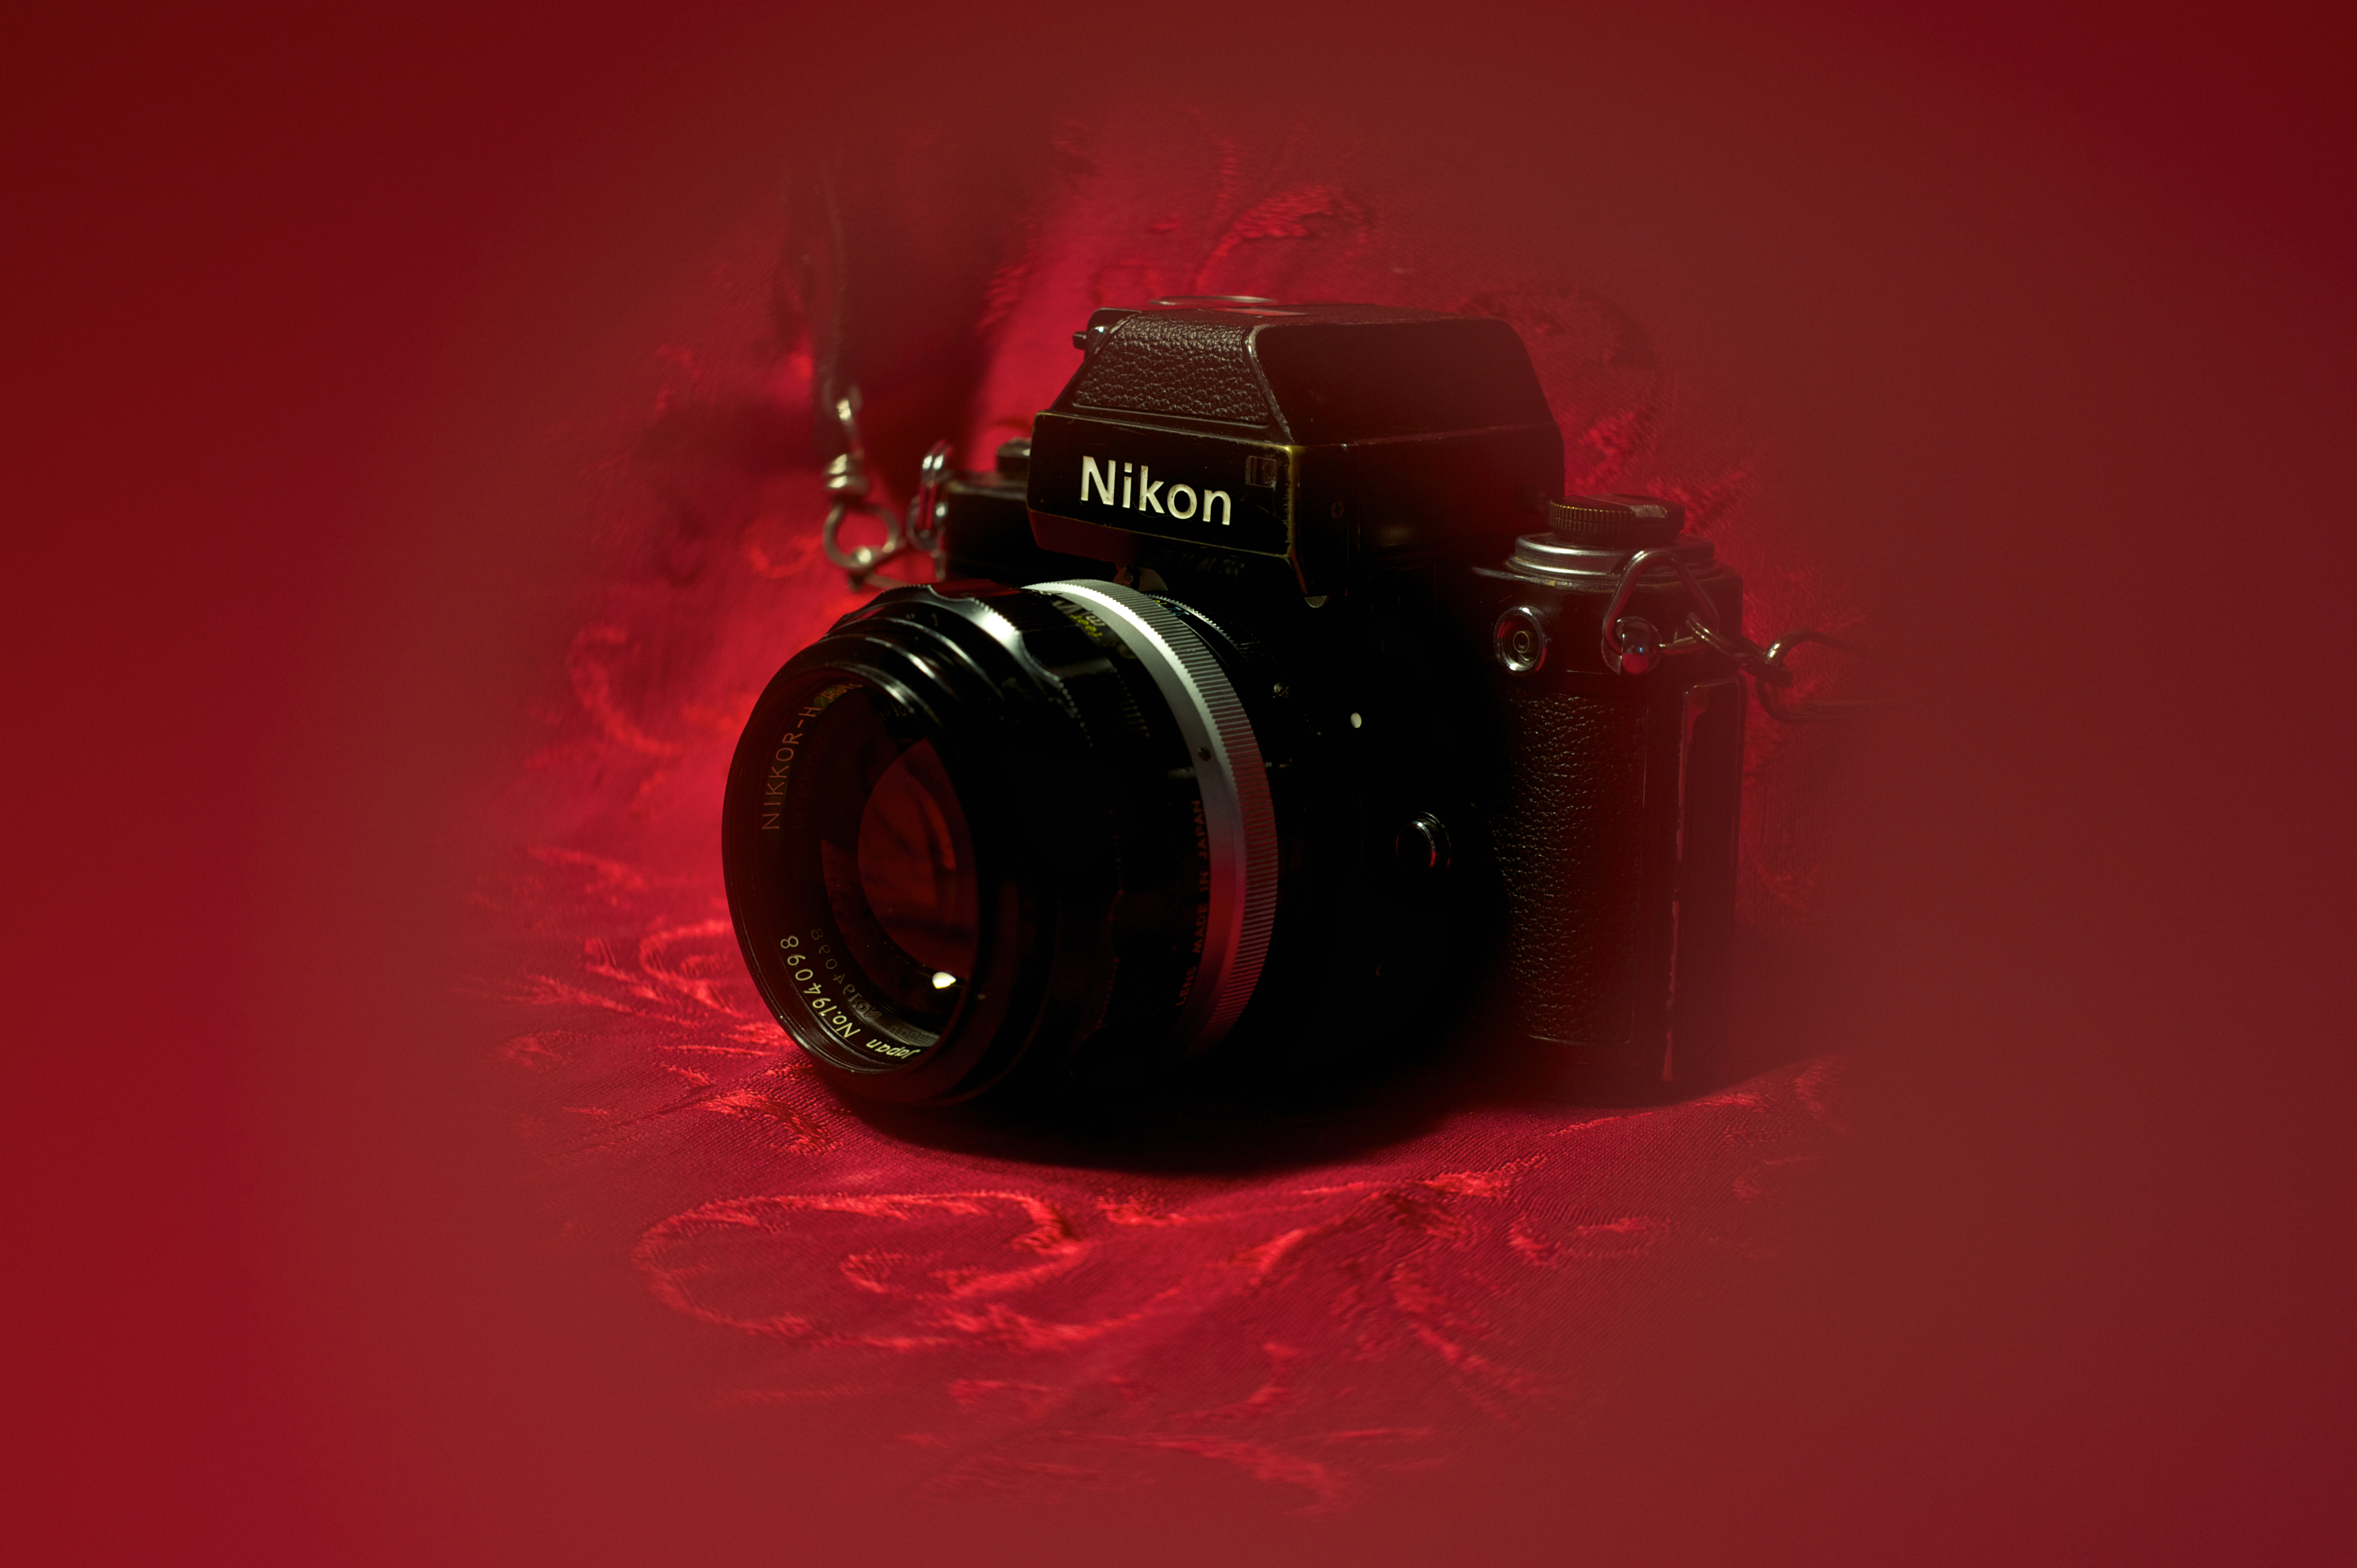

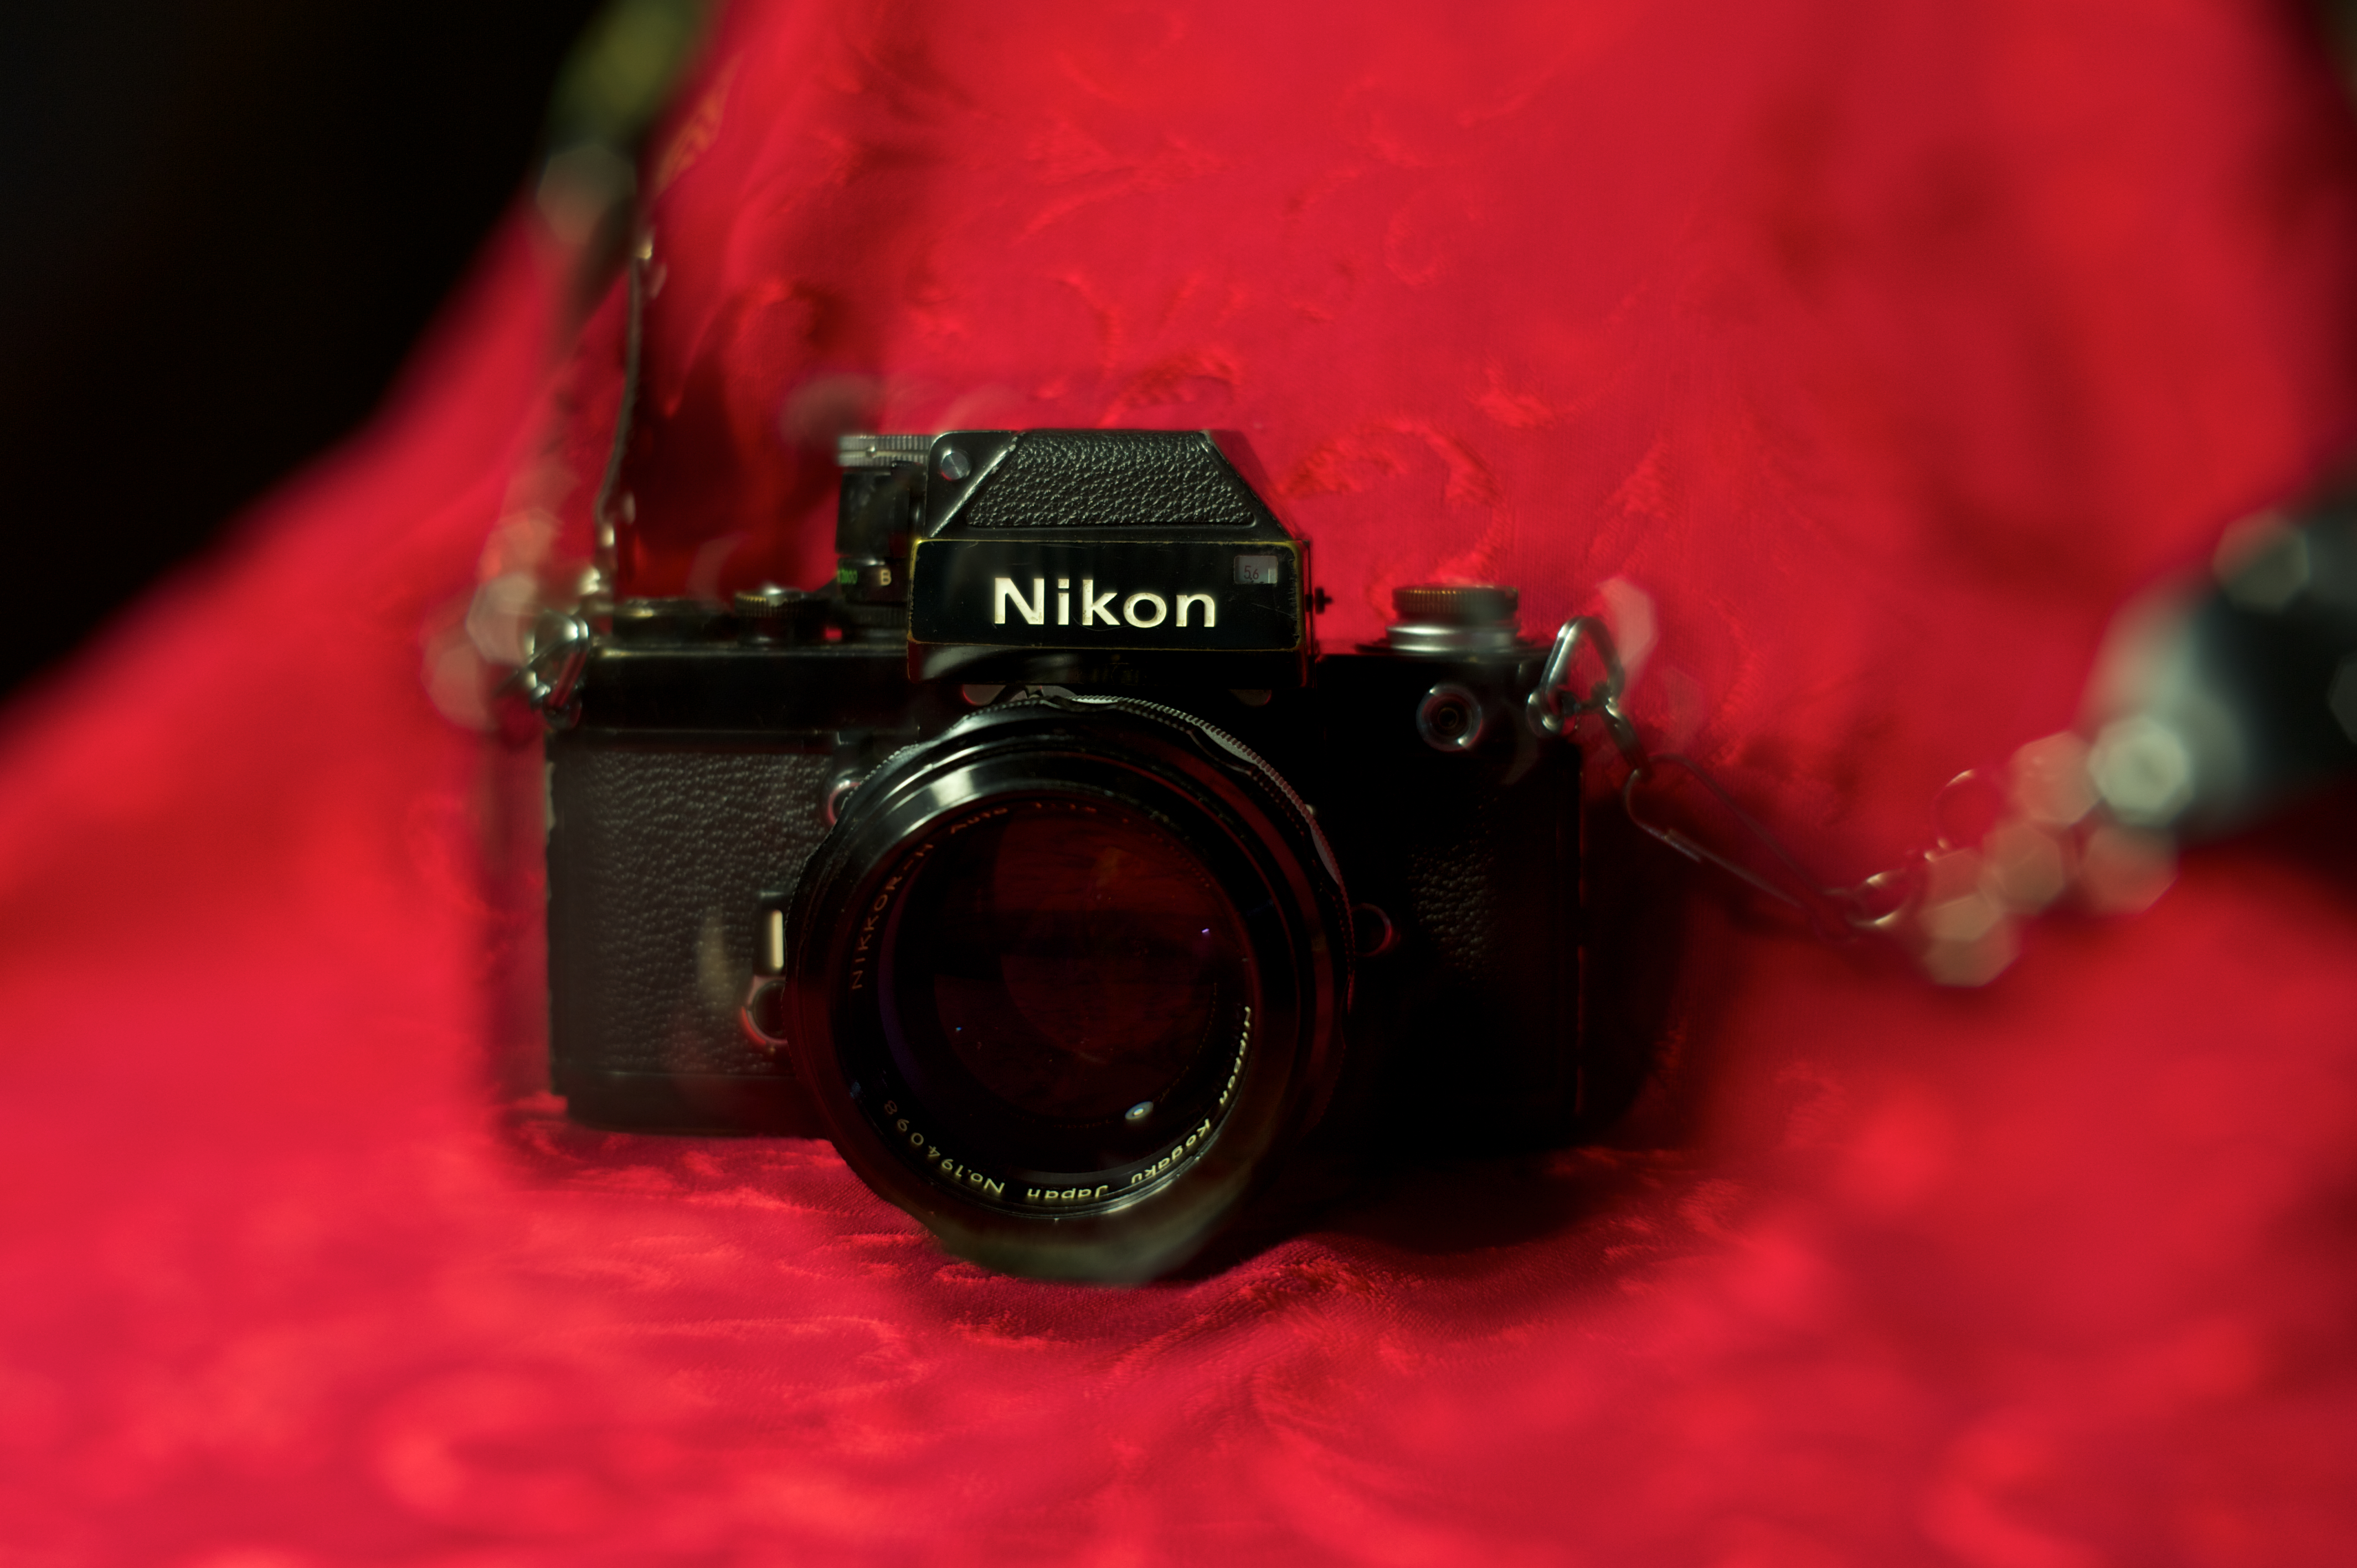
The first photo above (red background) is with the Vignetar and is a straight out of the camera exposure. The black and white version is the same photo using a blue filter effect in Aperture. I like how the camera fades into the background with this. This camera is my old Nikon F2 with the 85mm f/1.8 lens attached (Nikkor). These were photographed with my Nikon D700 and I used a tripod and I lighted this with white fluorescent lights on a pole lamp. My settings were ISO 200, f/6.3, and shutter 1/15.

The next image was taken with the Center Sharp Focus filter and was straight out of the camera. You can see the blur effect it made with the background while keeping the center focused. My settings for this were ISO 200, f/6.3, shutter 1/15.
Here is another view of the effect the Center Sharp Focus filter produces; my settings for this photo were ISO 200, f/6.3, shutter 1/13.

My final image is a shot taken with the Vignetar; my settings were ISO 200, f/9, and 1/3 of a second. I again, used the blue filter in Aperture to convert to the black and white.
I think these are great finds. I enjoyed shooting with these and they make great effects. I think they would be a great addition to macro photography to help keep your central focus on your subject. I am going to keep my eye open for other cool “old” items to use.
Happy Shooting!
The Making of Scrooge

I know this is a late update to the Christmas season, but I felt it was worth publishing. I had a wonderful opportunity to photograph the special effects make-up process of RJ Haddy of RADFX Company in Charleston West, Virginia. For those of you who are not familiar with RJ’s work, he was a finalist and fan favorite on the SyFy Channel’s second season of Faceoff. RJ (pictured below) came to Wheelersburg, Ohio to transform Jordan Nickles, a 19 year old actor, in to the elder Ebenezer Scrooge for JAX Theatre presentation of A Christmas Carol: The Musical.

RJ, in the weeks preceding the play, had taken a plaster mold of Jordan’s face so he could design the foam latex mask to apply to Jordan’s face to make him look “old”. Below is Jordan.

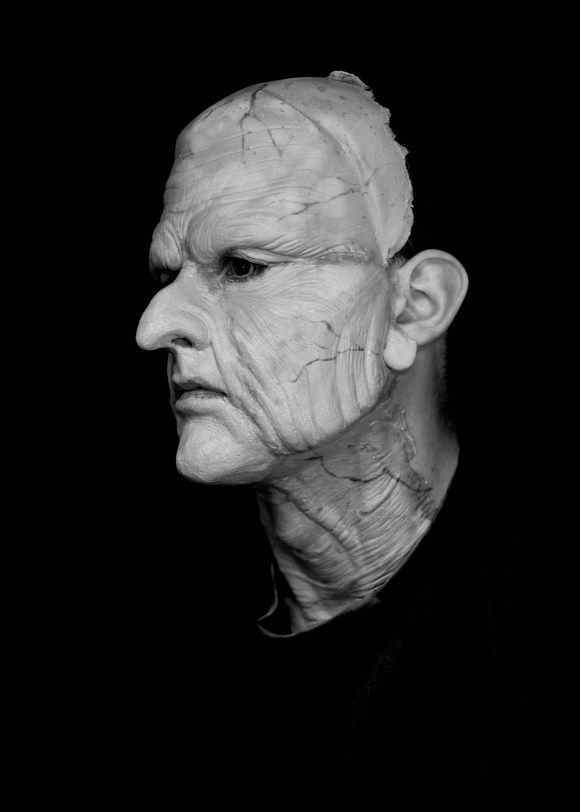
The mask was a 6 piece foam latex prosthetic that was applied one piece at a time and then the “seams” were glued and blended together so it would appear as one piece. The “mask” moved naturally with Jordan’s facial expressions and was very realistic in appearance.
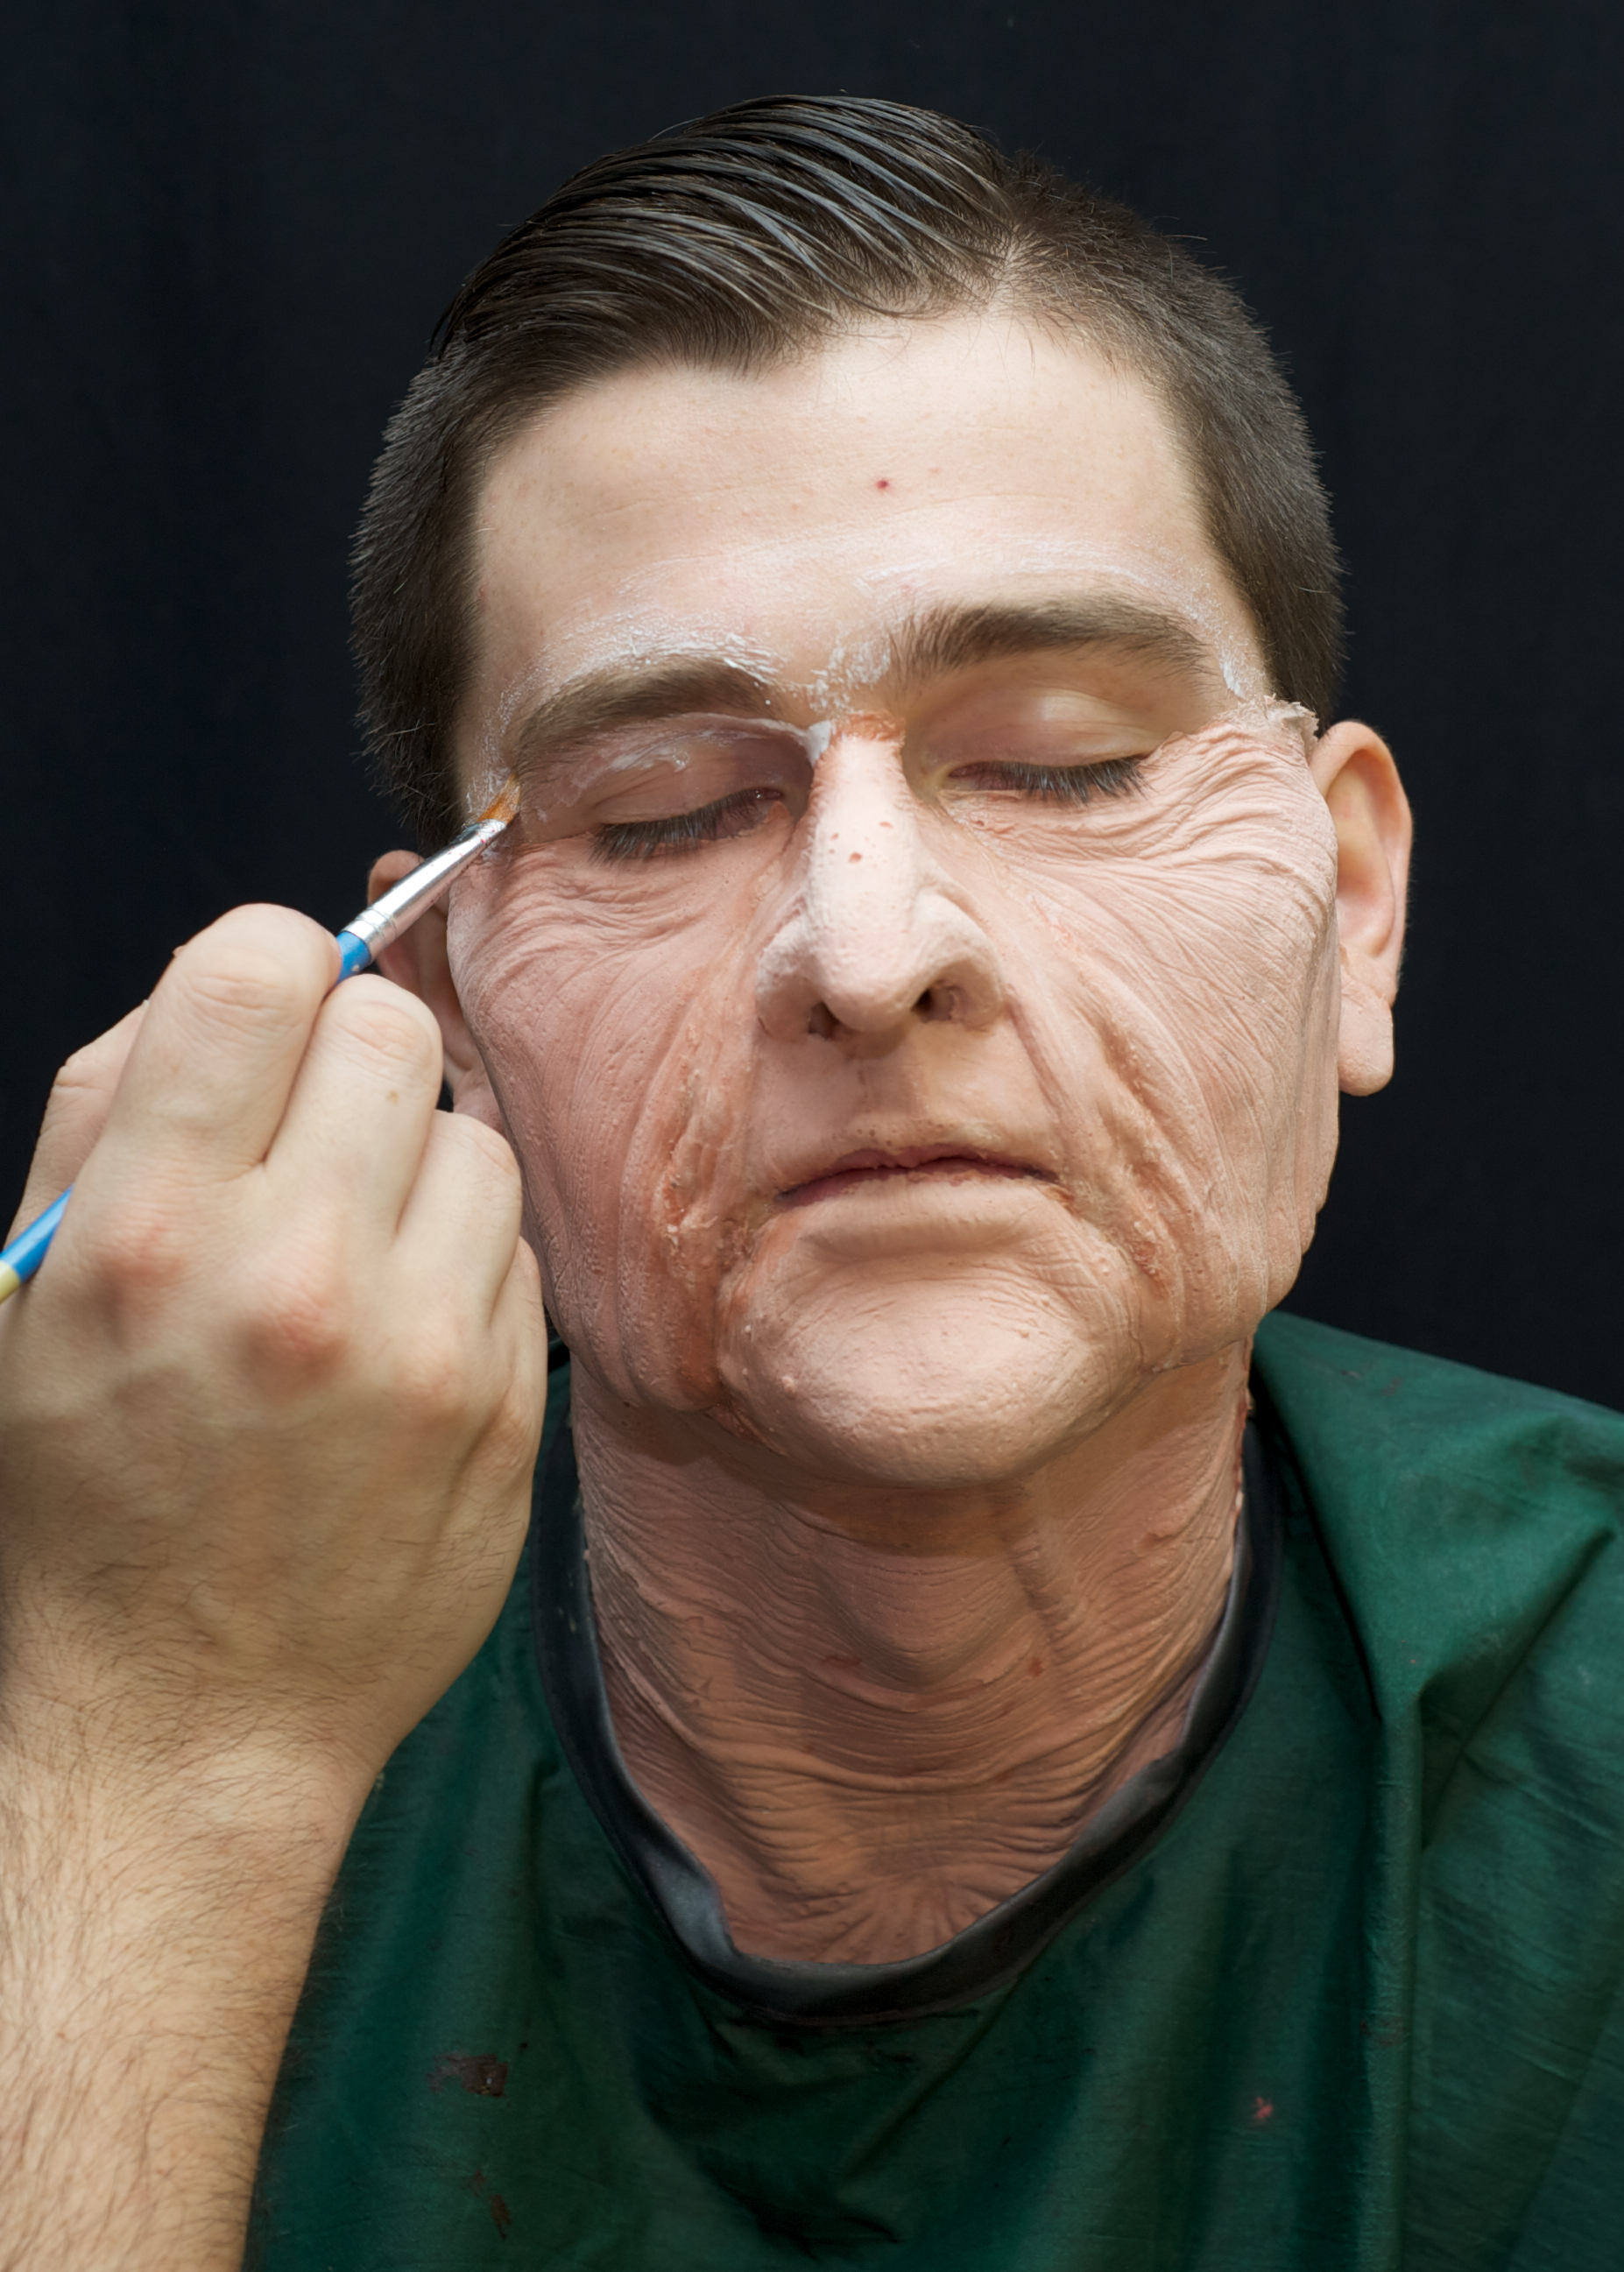
The next photos show how the mask application progressed. The entire process took 4 hours to complete. If you want to view the video of the entire process (8 minutes) go to this link: http://www.youtube.com/watch?v=m2l0BF8ieXc

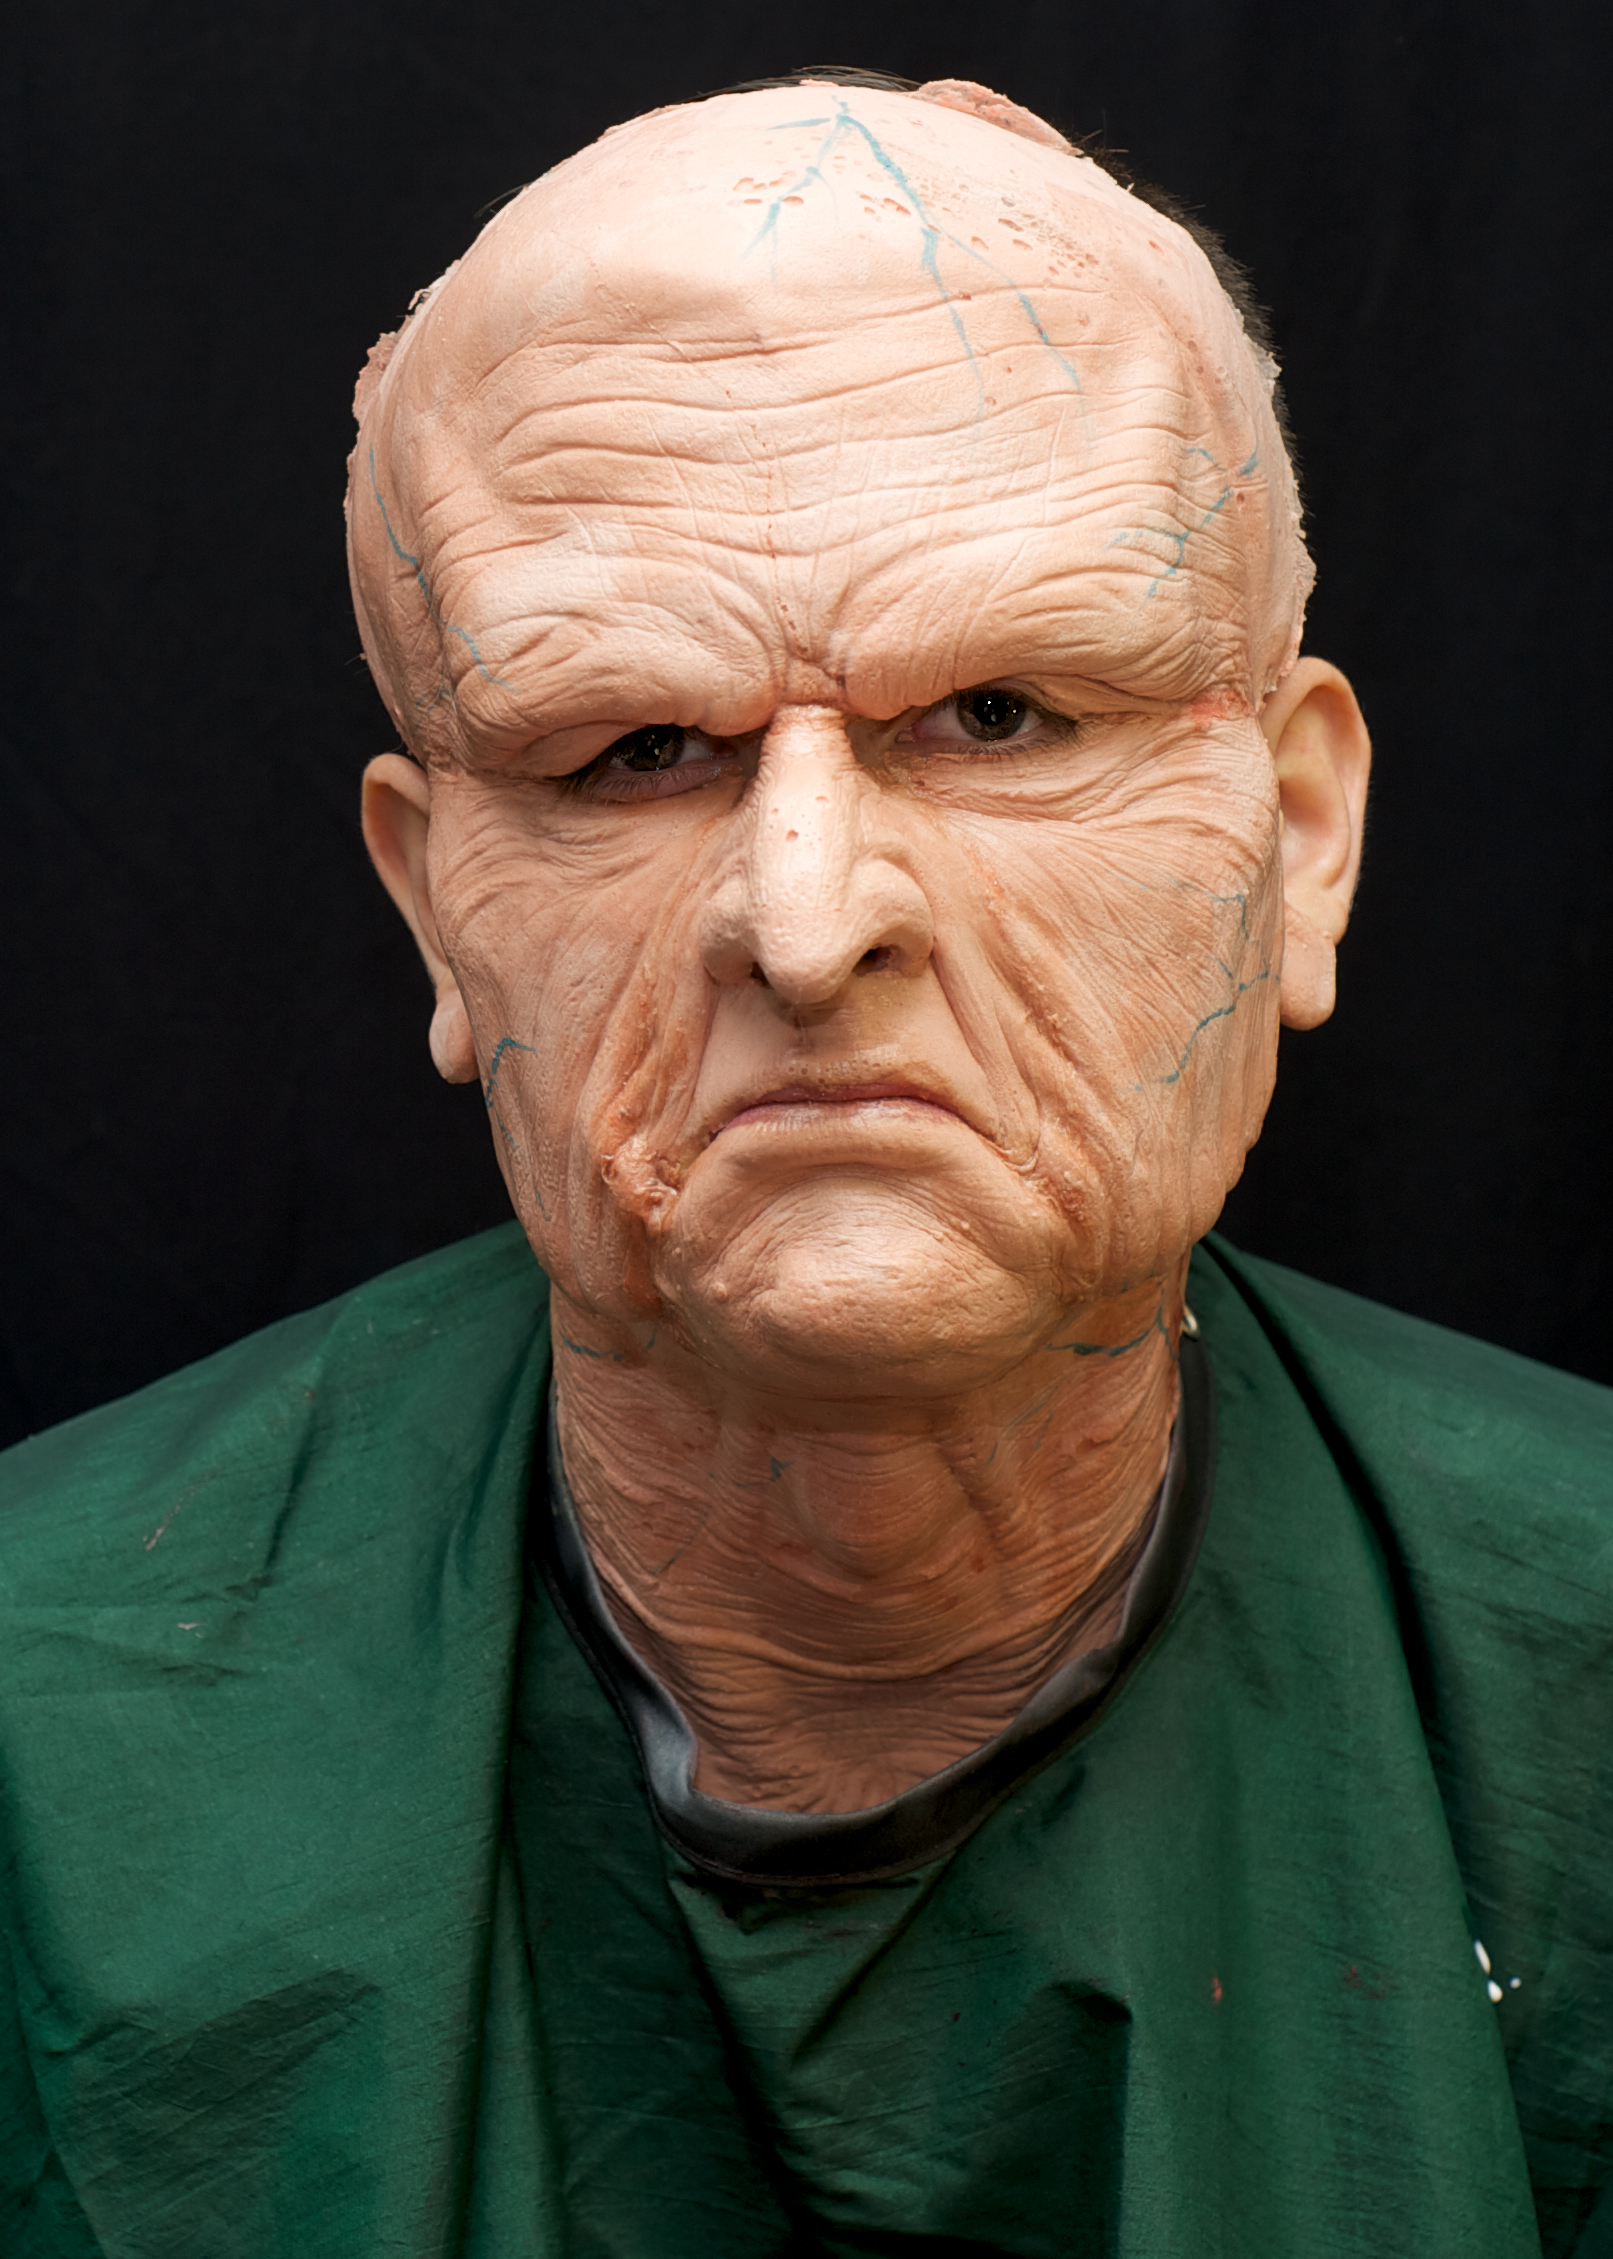
Veins and age spots were added to make the skin appear more realistic.

The following sequence is the application of the hair, eyebrows, and sideburns.
I enjoyed, very much, photographing and video taping this process. RJ is a wonderful to work with. Jordan is a very bright and talented young man and he has made JAX Theatre a wonderful establishment and had brought a variety of cultural experiences to our area. 
Jordan and RJ posing and showing off the final results.

I have to include one more shot…This is my favorite shot of the two of them.

I hope you enjoyed this visual journey of The Making of Scrooge. This was such a fun assignment that I hated not to share it with everyone.
Stay tuned for my next adventure!
12 Hours and 3 Friends In New York City: Street Photography
This past weekend a couple of friends and I had the “courage” to take a “red-eye” bus tour to New York City. The total time for the trip from Portsmouth Ohio is about 14 hours–give or take! For most of the trip we either slept or talked. There were those every couple hour breaks when we could purchase a snack or a pillow for our backs! We spent a total of 12 hours in New York City. This is my first installment and showcases my street photography. (more…)
Rainbow

I was at the bank today and the sun was out and there were nice white fluffy clouds in the sky. I was talking with the customer service assistant and looked out the window and saw this beautiful rainbow. It extended from the river over to roughly Sciotoville. The best I could do at the time was photograph it with my iPhone through the tinted window of the bank. I started to get up and go out to shoot it outside, but it disappeared as quickly as it came. It was colorful and sharp. What a wonderful scene to see today.
Paddle Wheel

Today I was pleasantly surprised by seeing this magnificent paddle wheel boat traveling along the Ohio River. I was on my way home from Flatwoods Kentucky traveling west along route 23 toward the Greenup Dam. I had already passed through Greenup when I spotted this beauty. I turned my car around (safely!) and went back to Greenup to find a spot that I could get a clear view of the boat. I circled the courthouse as they were bringing inmates out, thinking, do I really want to be in this area? I tried to find a place to park only to find the parking spaces were reserved for the dignitaries of the courthouse. I finally found a public parking space and parked between two sheriff cruisers! I ran to an opening in the trees overlooking the river just in time to capture a few shots with my iPhone…while standing in the rain! The riverboat did not have a name on the side I saw and I did not see a name on the back. This was a special treat today! I found out today that this is the Queen of the Mississippi. This is her maiden voyage and it is a new paddle wheel boat and she is 4 months old!
