Leaves

Until recently I did not realize how many different types of leaf photographs I had. Leaves are fascinating. They bud in the spring and are a lively green; then in the fall, they change to reds, yellows, and oranges. Structurally, leaves have veins, stems, and are textually interesting. I love to bring that texture forward in my photographs.


I had posted the above before and after in my post “Creativity: Where Does it Start?” I had transformed the ordinary palm leave to be viewed “differently”. I feel as a photographer it is my job to challenge our view of reality from time to time. The processing I chose for this image changed the color as well as the perspective of the image. It also highlighted the details in the leaf and stem.


On the left you see the original image of the green leaves. I liked how the light was hitting the leaves and felt there was a “photograph” somewhere in this image. I began using my crop tool and started dragging it around the image until I settled on a crop I thought was pleasing to the eye. There was so much going on in the original photograph that I needed to isolate a section. I then converted it to black and white. The tonal range of the image worked well with that choice. I then finished my editing in On1 Effects to add texture and to bring out the details in the leaves.


The above sycamore leaf was taken with my Sigma 120 – 300 f/2.8 zoom. I removed the lower right stem with the patch tool in Photoshop, then edited the color and texture in On1 Effects. The transformation was just what I wanted.
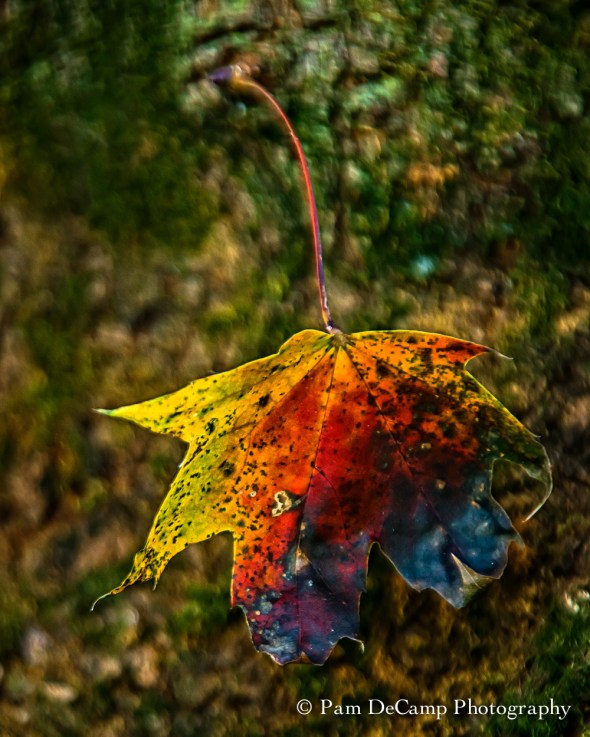
Maple Leaf
I was trying out my Tamron 28 – 300 f/3.5 – 5.6 and captured this leaf hanging off of my maple tree. I was exploring for things to photograph with the lens as I had just purchased it from KEH. I brought out the texture and details using On1 Effects. The sharpening tools in On1 Effects does a great job bringing out the details in images.
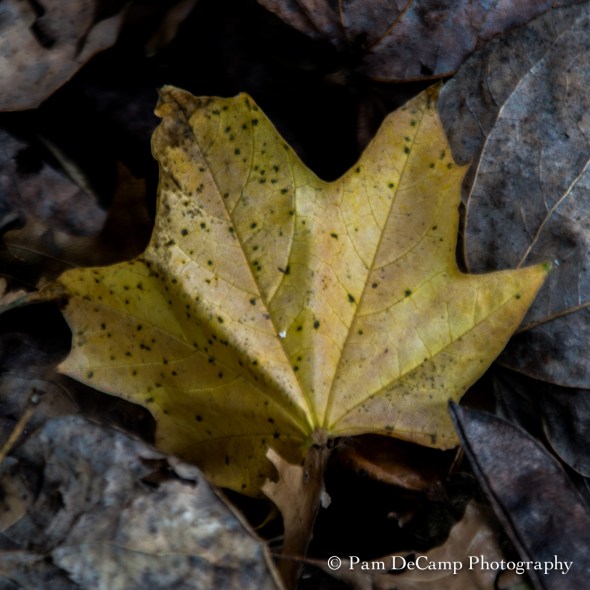
Maple Leaf
This was another leaf I was practicing on with my Tamron 28 – 300 f/3.5 – 5.6. It was a single color leaf among the dry gray and brown leaves. It caught my attention while walking around my patio.
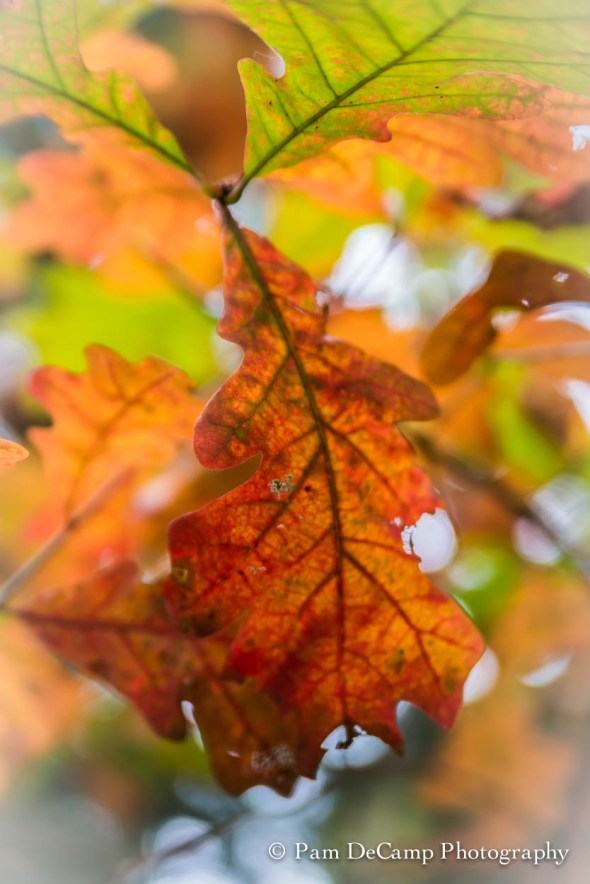
Oak Leaf
I spotted the oak leaf while walking around William and Mary College’s Campus this fall. While the image itself is a little soft, I enhanced that softness by decreasing the clarity. The colors are very vibrant. I added a soft white vignette to make the leaf stand out.


Above are a few of my other leaf images I have captured over the last year. I hope you enjoyed exploring the world of leaves! Effects 10 is available as a free download!

Lightroom Presets


Direct Positive Preset in Lightroom
Lightroom presets are interesting. Most of the time I prefer to edit my own images. If I do decide to choose a preset, I end up making additional adjustments, so I figure I should start from scratch anyway.
I saw the frosty fog rising off of the river on Sunday morning and noticed how the trees became frost covered. I know the time frame to capture this is short and it was already 10:00 a.m. I knew I had to get moving!
I used a 0.6 ND filter, because the sun was so bright and it really separated the blue sky while maintaining the white snow. I photographed these images with my Tamron 24 – 75mm f/2.8 on my Nikon D800E at ISO 50. Shutter speeds and aperture varied depending on the light. Most of the time it was at f/8 – 11 and 1/100 – 1/200.
In post I decided to try the IR preset. Some of the images were very impressive using this preset. I do like a little more contrast, so I adjusted the blacks and contrast slightly to give me the look I wanted.
I hovered over some of the other presets and the Direct Positive really made the images pop with color! The contrast between the blues and whites was beautiful! Direct positive is a process dating back to the 1800’s. Typically, the image was captured directly onto the paper and it was a black and white image. In Lightroom, the direct positive setting increases the saturation, blacks, and highlights and produces a very high color image. The image can be easily converted to black and white after using the Direct Positive preset.
The images below demonstrate the use of 2 different presets in light room; Direct Positive on the left and infrared (IR) on the right.


While I do like my images to have a little more contrast (more pleasing to my eye), there is something about the subtleness of the image below that I like. Left is the original and right is IR. I did remove the boat from the image.


The vignette in the corners is from my ND filter on the camera. I do attempt to remove that with cropping or adding a reverse vignette.
I suggest you try some of the presets in Lightroom; what is nice, Lightroom gives you a preview of what it will look like. I use this as a starting point then make my own adjustments. I have also set up my own presets in the past if I’m editing a batch and making the same changes throughout.
Have fun experimenting in Lightroom!
Focus Stacking

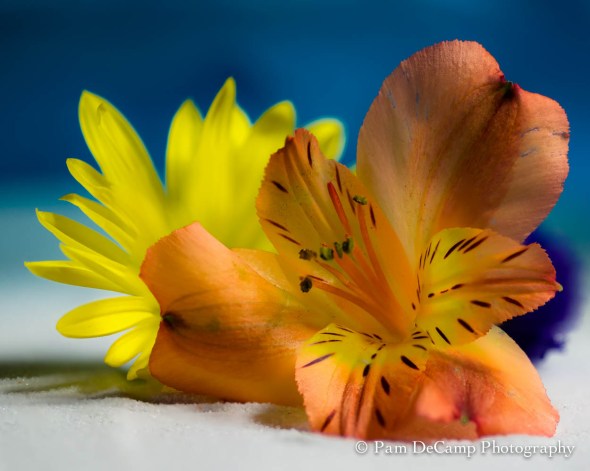
Image Created Using Focus Stacking
I decided to try focus stacking. Focus stacking is when you take a series of images and you focus on one section of the image at a time, then save them as PSD images. The key is to have your camera on a tripod so you do not change position.
Open the images then go to File>Scripts>Load Files into Stacks. After you stack the files you go to Edit>Auto-Blend-Layers.
The image will be in focus throughout.
This was fun to try. I will have to try it again sometime.
Refraction of Light in Photography


I saw a Facebook post on group site I participate in about refraction of light. The images were very interesting. I decided to put together a few items for our camera club to use at a future meeting.
If you google refraction of light you come back with a lot of scientific information. However when you google refraction of light in photography a lot of nice images appear!
With help from a friend of mine, I put together several backgrounds; some had color some were black and white. I purchased scrapbooking paper and used double stick tape and old scrap mats to mount the paper to so they would not bend.


Using a pole lamp with 3 lights to light my subject, I put up my backgrounds and filling glasses with water. I also laid some of the backgrounds flat and used them as a base; the patterns then reflected on top of the water.
My camera settings (Nikon D800E) ISO 640, f/14 – 16, shutter speed ranged from 1/5, 1/3, 1/13 sec depending on which background was being used.


This is a fun winter project as you do not need a lot of supplies, just clear glasses, vases, bowls, water (distilled is recommended because tap water bubbles), and paper or fabric with a design. You can make your own designs using Photoshop and printing the off of you printer.


Have fun experimenting!
Old Country Store, Jackson, Tennessee

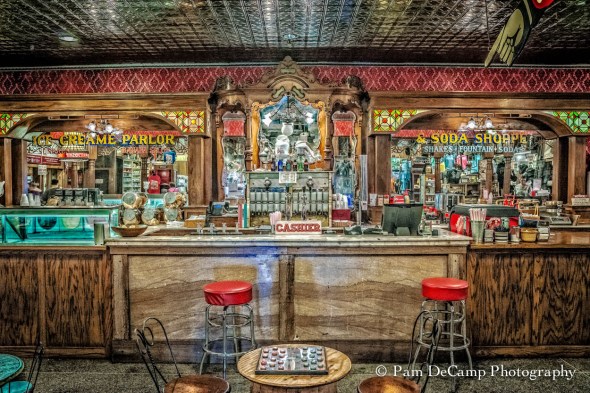
Ice Cream Parlor at the Old Country Store in Jackson, Tennessee
Every so often I browse through my images and something catches my eye. I look at it and think, “What can I do with this?” Images like this have so much detail and I like converting that detail into an HDR-like image. I started out by making a few adjustments to the shadows and highlights in Lightroom. I then moved the image over to On1 Effects to do the rest. I used the Amazing Detail Finder, Clarity, I lightened the shadows, Exaggerated the tones and edges, and added a subtle HDR look to the image. I moved it back into Lightroom to adjust the contrast slightly for my finished product.
See the before and after side by side:


Never give up on images you may have in your files. I hear people all of the time say they delete pictures. While I have many, many images I will never process, occasionally I find one that surprises me!
After posting this blog, it was suggested to me to see what the image looked like in black and white. Here is the result:

Black and White Version of the Ice Cream Parlor

Nature’s Imperfections

When photographing nature we encounter imperfect subjects. It takes a little patience and imagination to make corrections to an image after it’s captured.
While looking through images that were photographed this summer, this one was intriguing. The bug on the coneflower was lost in the shadows and was very much in focus.

Bug lost in the shadows
The shadow slider in Lightroom opened the area and other adjustments were made to the image. Then the gap on the left kept screaming! Cropping did not help, so the image was edited in Photoshop (Photoshop is used as a plug-in to Lightroom). The magic brush tool was used to capture a piece of the adjacent area and a layer was created of that selection. The petal was turned and transformed, then a layer mask was applied so the petal could be blended in with the rest of the flower.

A petal was added to the left to fill the gap
Then the space on the right was an attention grabber. The same technique was applied. After the second petal was added the image was saved in Lightroom and the radial filter and adjustment brush was used to make sure the bug was the central focus of the image.

The gap on the right was filled with data captured from the adjacent area
Nature is imperfect and as the old margarine commercial says, “It’s not nice to fool Mother Nature!” there are those who believe that you capture the image “as is” and make no changes. Making changes to an image that is imperfect has it’s merit. The photographer has to make the decision if the risk of “fooling Mother Nature” is worth taking!
Creativity: Where does it start?

We are all familiar with the chicken and egg concept…which came first? In photography we are faced with a similar dilemma, do our creative ideas come when the photograph is taken or afterwards in post-processing?
There are times when an image is photographed with an end result in mind. Then there are times during post-processing when an idea emerges on how to create a special image.
Take this palm leaf for example:
Palm leaf as shot
It is a nice image, but it is not “special”. How about if the perspective is changed?

Changing the perspective of an image can give more interest
A diagonal line forces the eye to move up through the photograph. While it is an acceptable image, what else can be done to make it more interesting?

Colorization and the addition of textures
By changing the color and adding textures to the image it changed the look all the way around. A tilt-shift was added on a diagonal to give a soft blur to the edges. On1 Effects is an easy way to make these changes. After the changes were made and tweaked, the images were then saved back into Lightroom.

After a few changes in Lightroom
Once the image was imported back into Lightroom, the Trey Ratcliff HDR Romance Soft pre-set was applied and the image was cropped.
Using Lightroom and On1 together is simple. If On1 is set up as a plug-in program to Lightroom, you right click on your image and choose <Edit in> and select the module you need. It will save a copy in Lightroom with your initial edits and then when you are finished in On1 it will save those changes in Lightroom so you can make additional edits if necessary.
Enjoy being creative!

My Favorite Images of 2015: Macro/Close-up

Happy New Year to all! Each new year brings hope and the prospect of new opportunities for us to pursue.
On April 23, I will host my first Spring Flower Workshop. You will notice that I do not always use a macro lens to capture a nice sharp close-up. A good zoom lens (like the one your received if you purchased a kit) will give you the range you need to create wonderful close-up images. If your zoom says “macro” on it, you will be able to get a little closer than you would with a regular zoom lens. It is not a 1:1 macro, but you should be able to get close enough to capture many of the small details in your image. I wanted to share some of my macro/close-up images from 2015 to inspire you to get out and explore your surroundings!


This first group of images was taken in Colorado at Garden of the Gods. I saw this as the life span of a thistle. Through the series you can see how it changes over time. These were taken with my Tamron 24 – 75mm f/2.8. I often use it as a carry around lens and it has great close-up capabilities. I love how it blurs the background, but keeps the main image sharp.

White Trillium
This image will always be special to me. It was taken at the Shoot the Hills weekend photography competition. You are not able to edit your images and you have to choose your best image in each category (approximately 6 images) and turn those in to the judges. The white trillium was taken with my Sigma 105mm Macro lens using the ring flash. This was my first time participating in the competition; the image won an honorable mention in the Flora Category.
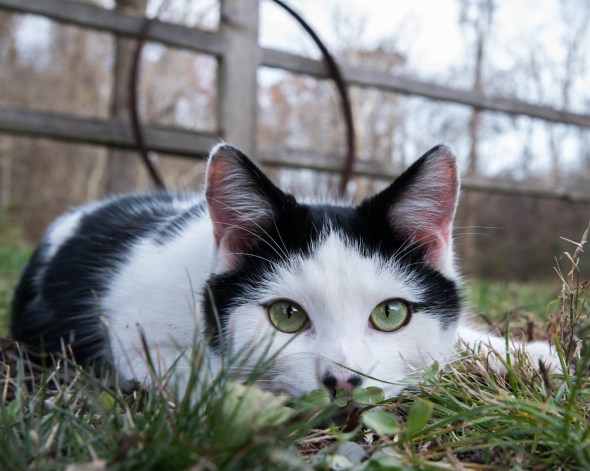
Here Kitty!
While not a flower; this cat is a nice example of a close-up image. Eyes are in focus and looking straight into the camera! I had put my camera on the ground and “hoped” it would focus on the right area. Again, this was taken with my Tamron 24 – 75mm f/2.8.
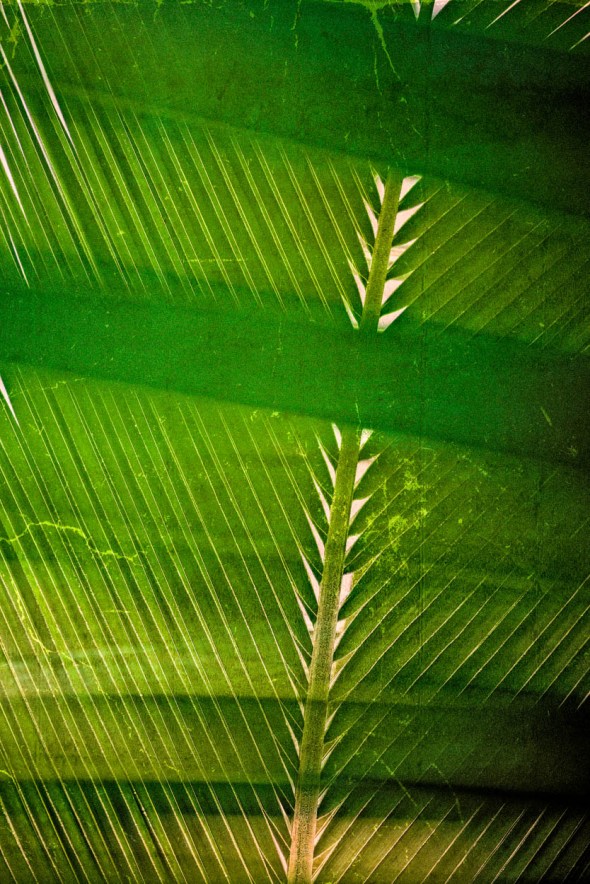
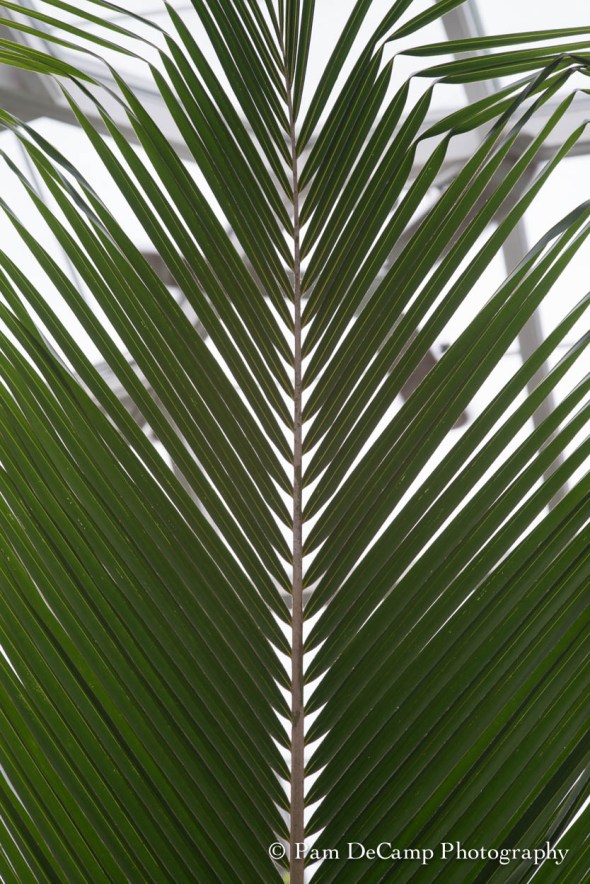
Intersecting Lines
I enjoy experimenting with textures and other processing techniques. I try to look for interesting forms and shapes in my surroundings. This was taken at the Huntington Museum of Art Conservatory. It is a wonderful place to take photographs. Most of the time is is not crowded and it is great to go to on a cold day. The palm branch was processed using the On1 Photo system.

Follow the Line
I also look for leading lines. The vine entwined itself along the branch of this plant. There is a nice curve for the eye to follow.

Young Coneflower
Young Coneflower was an image I enjoyed experimenting with. I had photographed the coneflower in front as it developed over several days. I wanted a nice linen texture and painterly feel. I used a combination of Oil Paint filter in Photoshop and did texture layering using On1 Photo. I had it printed on metallic paper with a linen texture. It does have the look and feel of a painting.
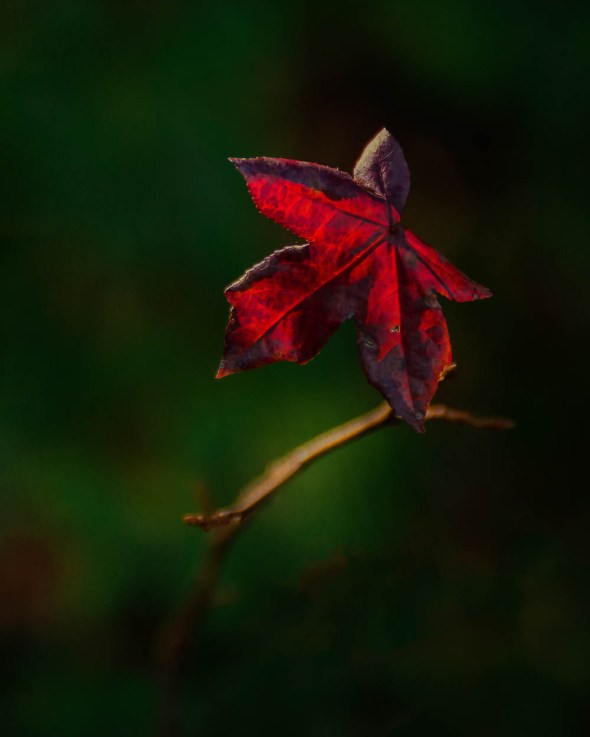
All Alone
This was taken in North Carolina at Thanksgiving. I saw the “lone” leaf sticking up off of a branch in the woods. This was photographed with my Sigma 120 – 300mm f2.8. The image was processed in Lightroom.

Purple Basil
In my opinion, I saved the best for last! My image, Purple Basil, was captured with the LensBaby Spark. The Spark comes with multiple disks that you can insert to create interesting shapes out of light. I did very little processing to this image; just basic adjustments using Lightroom. The morning sun was hitting the leaf just right. I had only a couple of minutes to photograph the leaf and the light was gone! I print this image on metallic paper and also have had a metal print created. The highly saturated colors pop on the metallic mediums. It won an Honorable Mention at the Foothills Competition in the fall.
I hope you have enjoyed the 2015 recap of my favorite images! I look forward to sharing more information in 2016!
Watch for notices of my classes and workshops for the upcoming year!

My Favorite Images of 2015: People

A second installment of my favorite images of 2015 has to do with people. I love to photograph people in their natural settings or as a portrait shoot environment. People can be very expressive and interesting.


A couple of my favorite photographs came from my 98 year-old uncle’s life-long companion, Lela’s 100th birthday! Lela and Thelma were being interviewed by a local television station on their “secrets to a long life.” They were wonderful to listen to.

Jules In Motion

Pasta Lady at Fil0mena’s in Georgetown (Washington DC)

Wedding party goes to the dogs!


Two of my favorite wedding photographs of the year were from Ben and Elisha’s reception and Stephanie and Andy’s wedding. Ben and Elisha got married in Australia where they live and came to Cincinnati for their reception. I went outside to check on the sunset and asked them to come out for a few photographs. I took this using a flash so I could retain the colors in the sunset, also so I could have them visible in the image.
Andy is my cousin. He and Stephanie were married in March behind the Smithsonian Castle. While we were taking a few photographs we were asked to leave by security agents. We were told the reason we had to leave was because we could not have an “organized photoshoot” on federal property. Because I was using professional equipment (my flash was on a monopod and I was using it for fill) I guess they thought we were having an “organized photoshoot.” We got what we needed plus a great story to tell! I do like this photograph; the cherry blossoms were added in post processing.


A couple of fun photographs from 2015 were on my trip to Ossabaw Island in Georgia. The domesticated donkeys were a first for me.

Edward Warren as Maleficent

This was taken at the Fire and Ice Festival in Medina, Ohio. The lighting of the ice tower.

Taking aim!
I hope you have enjoyed my people pictures for 2o15!

My Favorite Images of 2015: Landscapes

As 2015 comes to a close, I have decided to share my favorite images of 2015 and why they are special to me. I hope you enjoy these images as much as I do!

Arlington National Cemetery

New River Gorge, West Virginia

Great Sand Dunes National Park, Colorado


The two images above are from the Cadillac Ranch in Amarillo, Texas. I had taken a trip out west in 2013 and passed this area without knowing what it was until after the fact. I knew we were going to be going past here again so I made sure we stopped. The bold, highly saturated colors stand out against the cloudless blue sky. My daughter enjoyed the fact she could “legally” paint graffiti onto an object and not be arrested. Her initials EM were boldly painted in yellow and I’m sure were gone by days end. What a great experience though!
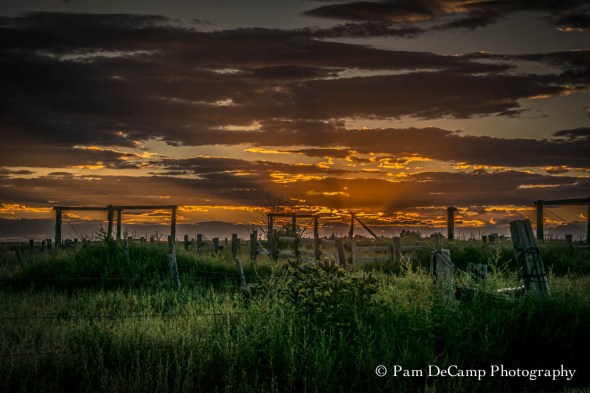
Abandoned Corral, Roy, New Mexico

Cabin in the Woods, Adams County, Ohio
Enhanced Landscapes
The next 3 images are ones that I did special processing on to give the images an aged feeling or to enhance specific details in the photograph.

Sleigh Ride, Maryland

Old Mill of Guilford, North Carolina

Tabby Shack dating from the 1700’s on Ossabaw Island.
I hope you enjoyed these images! Photographs capture our moments in time and bring back the memories connected to those moments.
Look for my other favorites of 2015!
Photographing Americana: Signs and Structures of our Past: Chapter 3


The Anna Plaza Motel sign in Anna, Illinois is very much a “blast from the past”. The actual age of the sign is unknown but based on the style and shape it is likely late 1940’s or early 1950’s.
Take note of the conveniences listed: Modern Electrically Heated (I assume that means the rooms) and TV. Then as the times changed a sign was added at the bottom to include Cable TV with remote, water beds, and direct dial phones.


Think about what we consider modern conveniences today. Free wifi probably tops the list for most people. I remember traveling with my parents, we looked for places that had a pool; a heated pool was a bonus. We stayed in Ithaca, New York one summer and it was unseasonably cold. The motel said they had a heated outdoor pool, but after an evening swim I was as blue from the cold water as the guy in Big Fat Liar after his swim in the blue dye!
Think about having “direct dial phones” when the majority of the nation has cell phones. How times change. I found an article written in 2005 by someone who also photographed this sign. They said in their article that this sign probably would be gone soon. Here it is 10 years later and it still stands.
As for staying at the Anna Plaza Motel; no thanks! I am sure in the early days it was a very fine establishment. The town of Anna has many old structures and other interesting signs. I look forward to sharing those with you in the future.
Image Enhancement

Since posting my blog on using On1 10, I have received approval to be an On1 Affiliate. You can click the link at the bottom of my post to learn more about the On 1 software.


On1 10 was released in November. I have been an On1 user since about version 6. I received a free version of Perfect Effects for attending a Kelby Photoshop Workshop. I thought it was odd they had another company promoting their products at the workshop, but I took the time to watch the demo during our lunch break.
What I found out was On1 can be used as a plug-in or as a stand alone software. I have used it both ways. I make my adjustments in Lightroom then move my image over to On1 Effects to further process my image.
For me On1 is a very simple way to enhance my images using the filters they have built into the program. I am able to layer and mask my images to bring out the details I want or to add in textures or other color enhancements to make my images stand out. And as an O1 user, I receive several preset packages throughout the year. Most of the time I create my own images, but I also try the others out.
My favorite adjustments in On1 Effects are the Amazing Detail Finder located under the sharpening tab and clarity under the tone enhancement tab. I find that these two adjustments bring out details in my images that I may have not noticed.


I use a Nikon D800E DSLR and shoot in RAW. The image above was taken with a Tamron 28 -75mm f/2.8 lens. My settings were ISO 320, f/11, 28mm, 1/160 sec. The light was behind me and it was about 4:00 in the afternoon. While I was happy with my original image I decided to work with it in On1 Effects. I used the adjustments I mentioned above and then worked on the highlights and shadows. On1 works similar to Photoshop in that you can make adjustments in different layers and if you are not happy with the change you can always go back and change or delete the layer. I also added a leather texture to the image which created a warm feel. When I photograph a landscape with an older structure, such as this grist mill, I prefer to age the photograph to give it character.


The image on the left is what was captured out of the camera. On the right I used the On1 Effects to pull out the detail in the bricks and to give the image a more surreal look. The time of day I captured my images made the reds pop. My settings were the same as in the images above. After I adjust in O1, it saves it back into my Lightroom catalog and I can


This is a collection of bottles in a potting shed. I thought this made a nice grouping. I did not move anything, just photographed it “as is”. My settings were ISO 800, f/4.0, 1/125, at 38mm with a Tamron 28 – 300mm. I like how the coarse detail in the wood was revealed using the Amazing Detail Finder. I also used a subtle HDR look in this image. I like photographs with lots of texture.
Many times On1 offers the On1 Effects module as a trial; that’s how I started. In the full suite they had enhance, portrait, resize, and B&W modules, too. I have used all of these at one time or another. What I like about On1 is it’s ease of use. I have produced several images with On1 that have been in exhibits, competitions, and have won awards.
Thanks for reading! Photography provides infinite opportunities for learning!

Fisheye Lens: Pros and Cons


Yorktown Beach captured with a fisheye lens; you can see the slight curve in the foreground from lens distortion
The 8mm Rokinon fisheye lens is a great lens to capture landscapes and to create surreal images. There are definite advantages and disadvantages to using a fisheye lens. The photographer has to decide what adds to or takes away from the image.
Pros of using a fisheye:


Using the fisheye to creatively “bend” the subject is a pro of this fine lens. The clarity throughout remains intact. It creates a snow globe effect when used close-up.


When shooting with a fisheye lens it is possible to capture sweeping landscapes with a greater depth of field. The image quality and sharpness throughout the image is a definite pro. The photographer can also create surreal images with a fisheye lens.
Getting low to the ground will provide for interesting foreground in the image.
Cons of using a fisheye:
While the pros listed above are very positive uses, they can turn into cons if you do not want your subject to bend or curve. Even in the best case scenario you may end up with a slight curve on the edges. When looking through the viewfinder, move the camera up and down and watch for the bend. The image can be exaggerated or will look fairly normal as the camera is moved.
Photoshop and Lightroom have excellent lens correction features; with practice, lens distortion can be corrected or enhanced depending on the final vision of the photographer.


In the sunrise photos above you can see how the clouds curve, but the horizon is fairly level. It does make for a nice effect with the arching clouds. In the photograph of the boat, the horizon is curved and the foreground is bubbled toward the viewer. While this may not be a desirable outcome, the photographer has to decide if that is what the end result should be.


The fisheye lens definitely has its place in the photographer’s bag and there are many creative uses for it. Adding a slight curve to a photograph can enhance the image or provide an unwanted distraction to the viewer. It is up to the photographer to decide how to use the lens. If given the opportunity to try one; see what kind of images can be made!
Photography is a skill with infinite learning opportunities!
Photographing Americana: Signs and Structures of Our Past: Chapter 2


Standard Oil Service Station, Vienna, Illinois
Having grown up in a small rural community, I remember an old castle gas station in the center of town. It is long gone and I so wish I had taken a photograph of it to preserve its heritage. Vienna, Illinois has a beautiful gem that has fallen victim to vandals and decay.
The station was built in 1930 by the Standard Oil Company. It is one of several that was built across the country to fit the space available. Many of these old stations have been converted into private residences and other businesses. I spoke to a resident of Vienna and he said, “Many people have expressed interest in the building, but there it sits, decaying each day.”
My imagination wandered to the days of “full service” stations. I could visualize the service man rushing out to gas the car, clean the windscreen and “take a look under the hood!”


As you can see from the above photographs, the torch (in photographs of other stations, it was a beautiful gold and red torch) has been chiseled away. It also appears that someone has tried to removed the entire “service” emblem! The lettering on the crown has also been removed leaving behind a skeleton of the past.


Other views of the building show the decay that is occurring. It is just a matter of time this beautiful landmark will be a memory just as the castle in my hometown is a memory for me.


I could only see inside the bay area; there were broken panes of glass that I could aim my camera through. I read other articles lamenting the sadness people have for this wonderful icon on the corner of Routes 146 and 45. It is a shame that someone will not step up and take charge of the restoration. I’m sure the expense is a hinderance. The red tiled roof, the yellow brick; a wonderful contrast of color!
Take the time to notice the images around you; pause and reflect on the past.
Photographing Americana: Signs and Structures of Our Past Chapter 1


When you take the roads less traveled there are gems to be found!
While driving through Carbondale, Illinois this sign caught my attention. I stopped and took as many photographs as I could.
The sign says closed for the season, but according to research this Dairy Queen on 508 South Illinois Avenue is a busy place! The building is the original structure that was built in 1951 by Jack Clover. According to a 2014 article in the Southern Illinoisan, the stand has been owned by Mark Waicukauski for over 25 years and was owned by his father before him. In the article, Waicukauski says, “That old sign’s been there since the beginning!”
While traveling across the country, take the time to look around you! The gems you uncover may be diamonds in the rough!
Senior Photographs: Nelson

I had the pleasure of photographing a friend of mine’s grandson. I have known Nelson for almost 10 years; it is difficult to imagine him as a senior in high school. To me he will always be the freckled face little boy who liked to ride bikes at the campground. Nelson has always been a polite young man and I wish the best for him in the future!

Nelson posing next to his truck.
Nelson is a sportsman. He enjoys archery, hunting, fishing, boating…you name it! They chose the location for his senior photographs; a cabin in the woods! It was about an hour drive from Chillicothe into Hocking County. It was an ideal location for Nelson’s photographs. It was on the cool side and the sun was out. With the dense forest we had a little shadow play from time to time. Occasionally I called upon my daughter to help with a reflector to help fill in the areas if the shadows were too strong.

Without the reflector.

With the reflector

My assistant using the reflector to brighten the scenes
You can see how the reflector fills in the shadows to help produce more even lighting on the subject.
As mentioned above, Nelson is an excellent marksman particularly in archery. He has won many awards and is ranked high in his age group. He has enjoyed deer hunting since he was a young boy.

Nelson pictured with his first shotgun

Nelson and his deer scull

Taking aim!
Nelson’s brother Logan and step brother Brandon joined Nelson for a few informal photographs too.

Logan and Nelson

Logan, Nelson, and Brandon
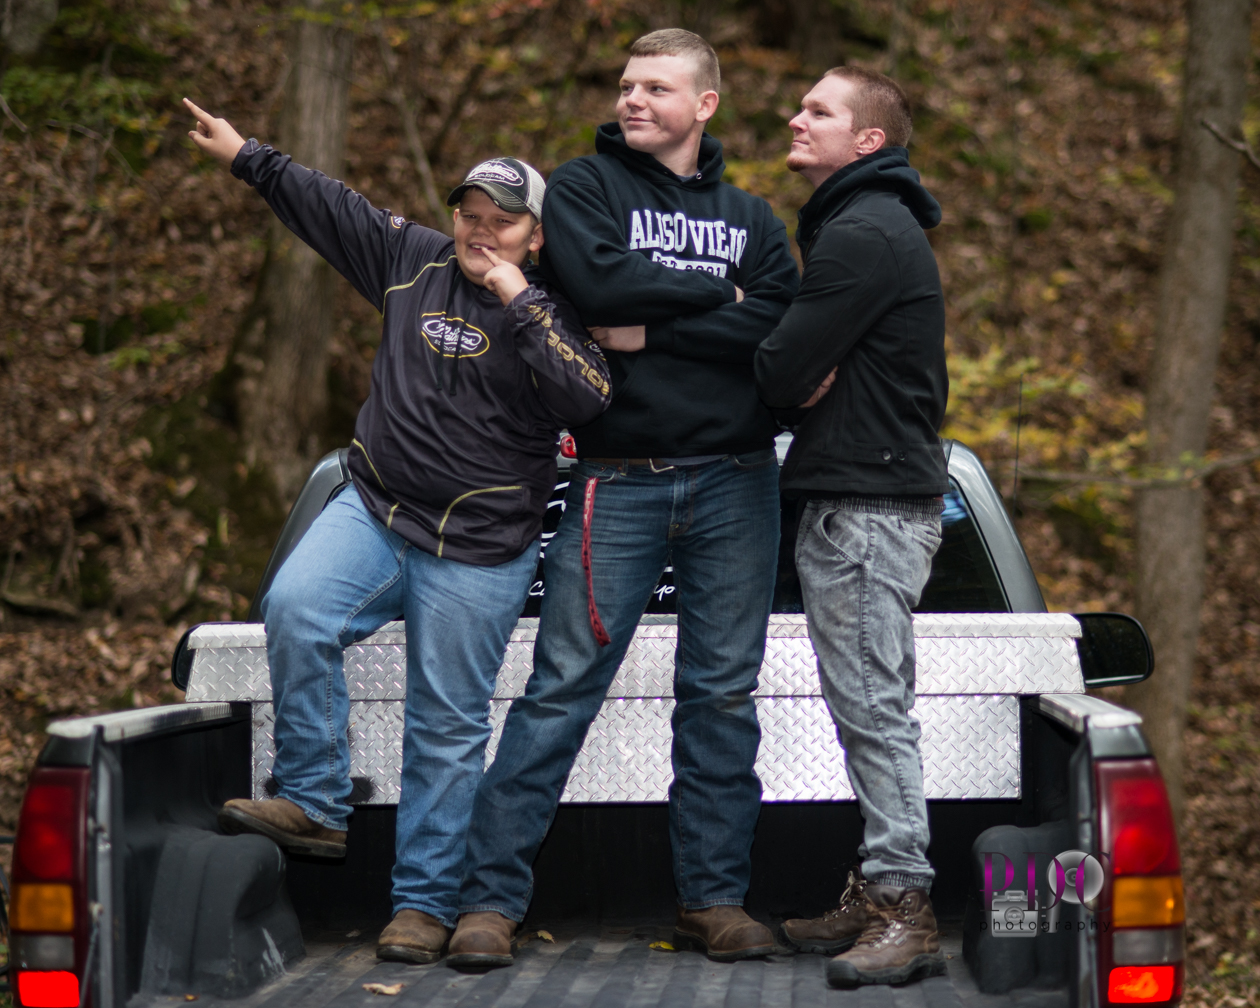
Logan, Nelson, and Brandon

The road to the future is waiting!
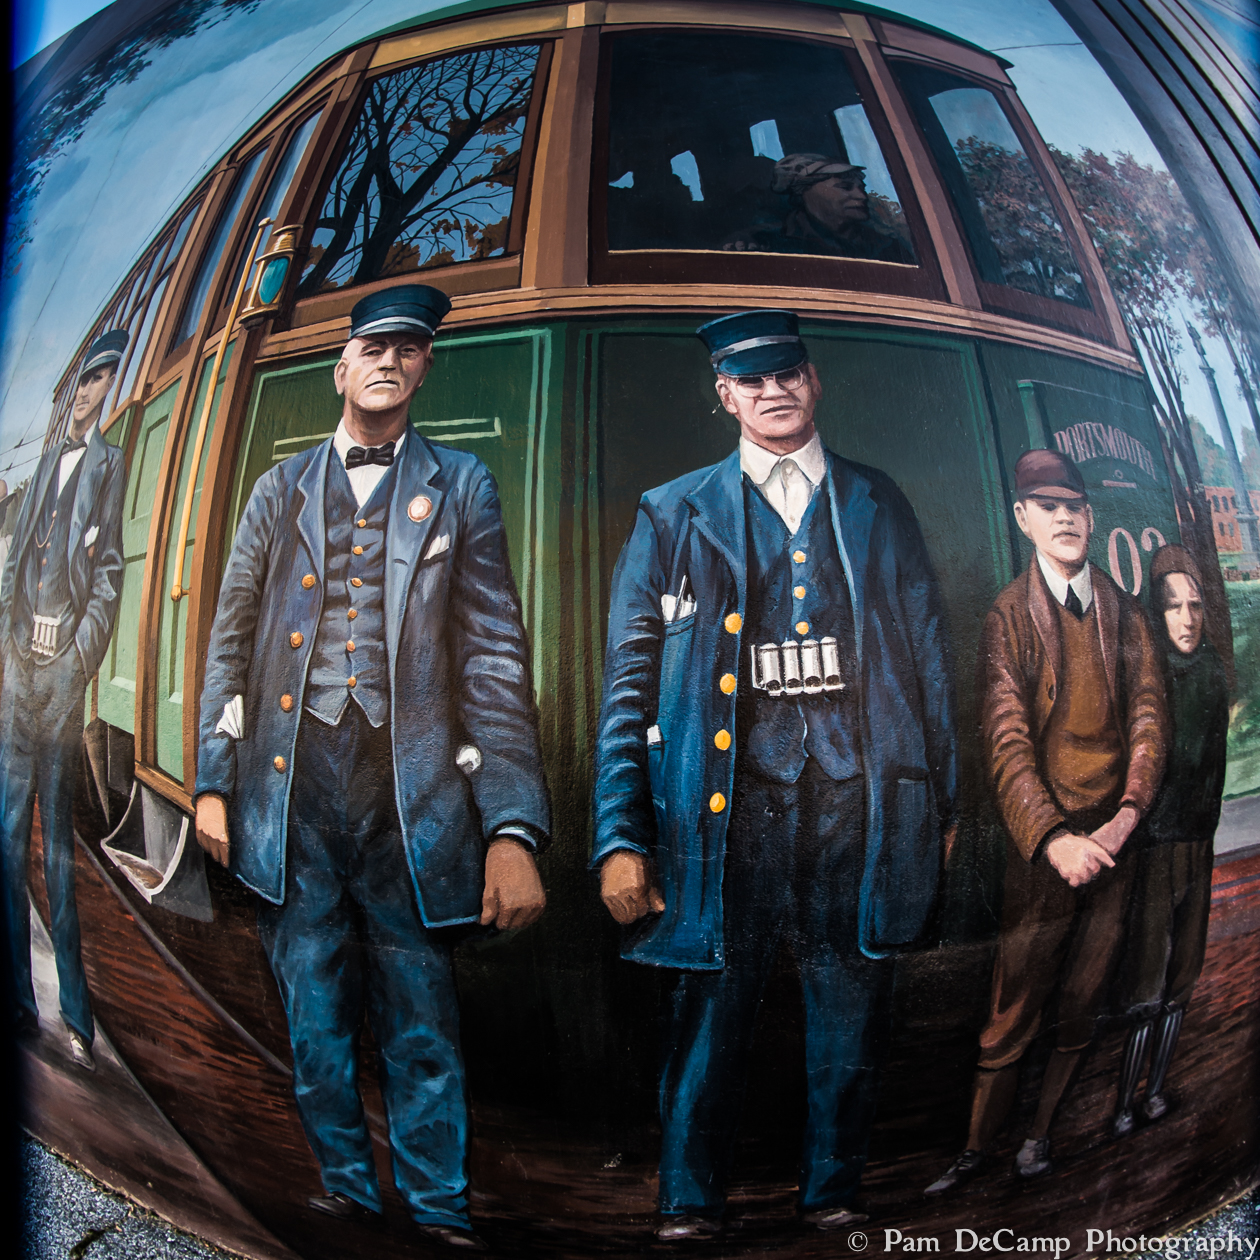
Portsmouth Murals: A Different Perspective


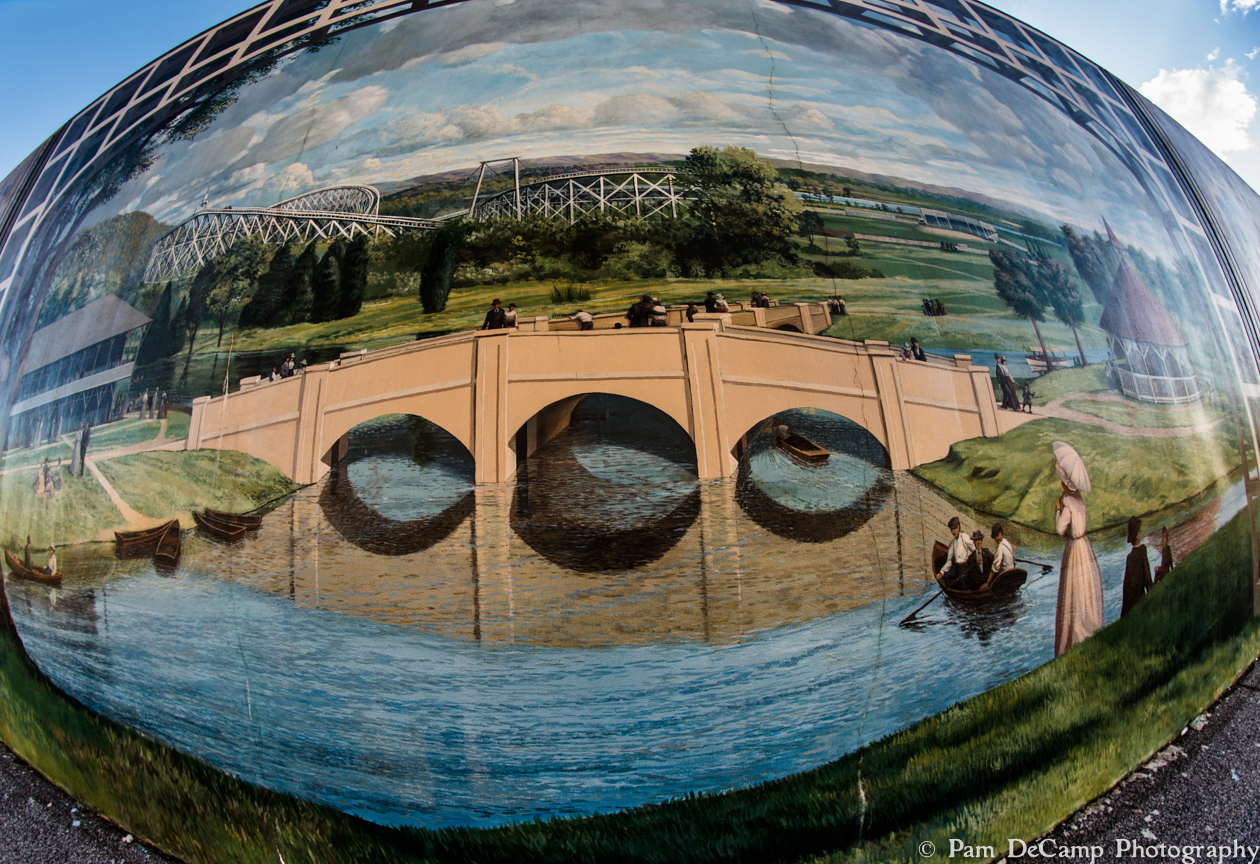 A few evenings ago I took a walk along the Portsmouth Murals. I just purchased a fisheye lens and thought I would experiment with the lens distortion. I like the 3D quality of the lens; it also makes for a cool “snow globe” effect. The shoe factory buildings stood out and appeared to be coming out of the wall! I stood against the mural with the motorcycle and moved the camera around to create just the right curve; the motorcycle looks like it is coming right off the wall! I had always enjoyed looking at images taken with a fisheye lens, but never really thought about purchasing one myself. I have played around with other images using the fisheye; it is definitely something to get used to and will work well on some subjects, but not necessarily on others.
I like the look of the mural images. Cropping a fisheye image is best done unconstrained; meaning adjust the crop manually vs a fixed dimension. Thank you for looking and I look forward to sharing more creative images in the near future!